PHASE 1_WORKSESSION 01_KICK OFF-CLIENT
I researched real-world companies that align with the brand and culture I am interpreting and crafted a compelling narrative by exploring the company's origins, story, values, target customers, and unique traits. I also analyzed how the company wants to be perceived and chose descriptors, visual elements, and attributes that reflect its personality and purpose. This would lead me to create a mood board featuring abstract visuals, fonts, textures, and colors that capture the spirit of the brand, emphasizing its story and values through iterative exploration and testing.
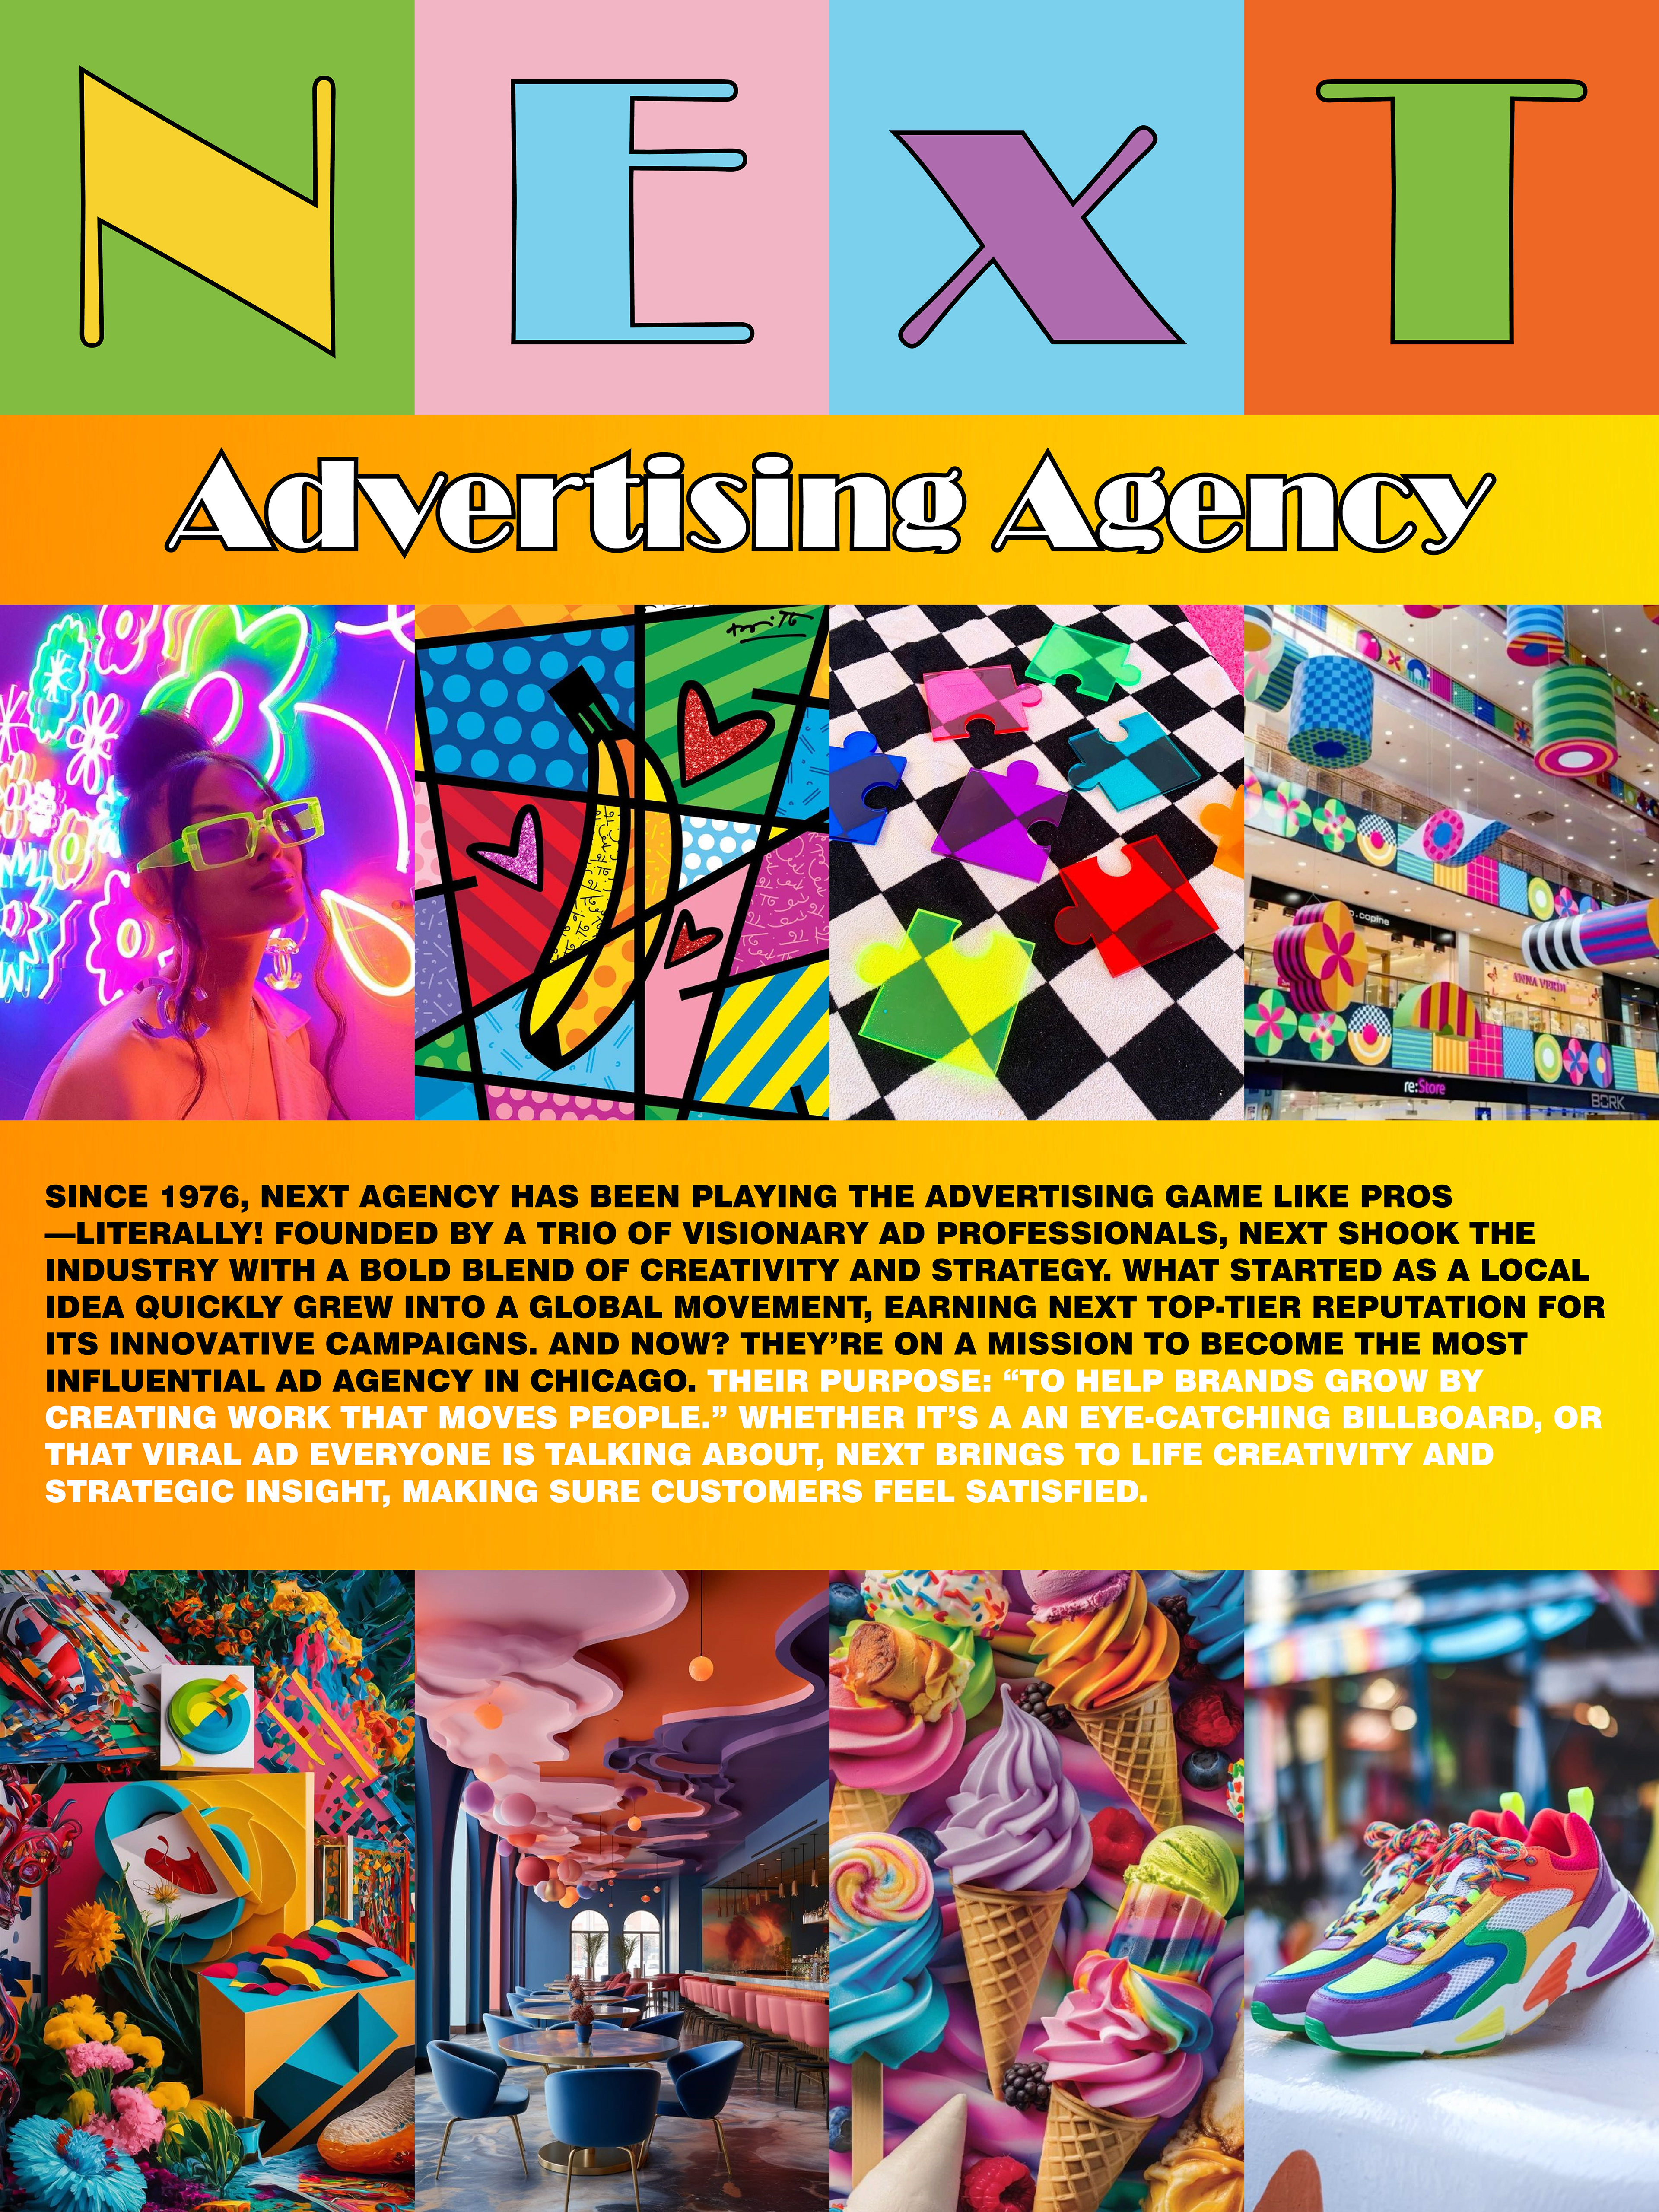
Finalized Mood Board - Page 1
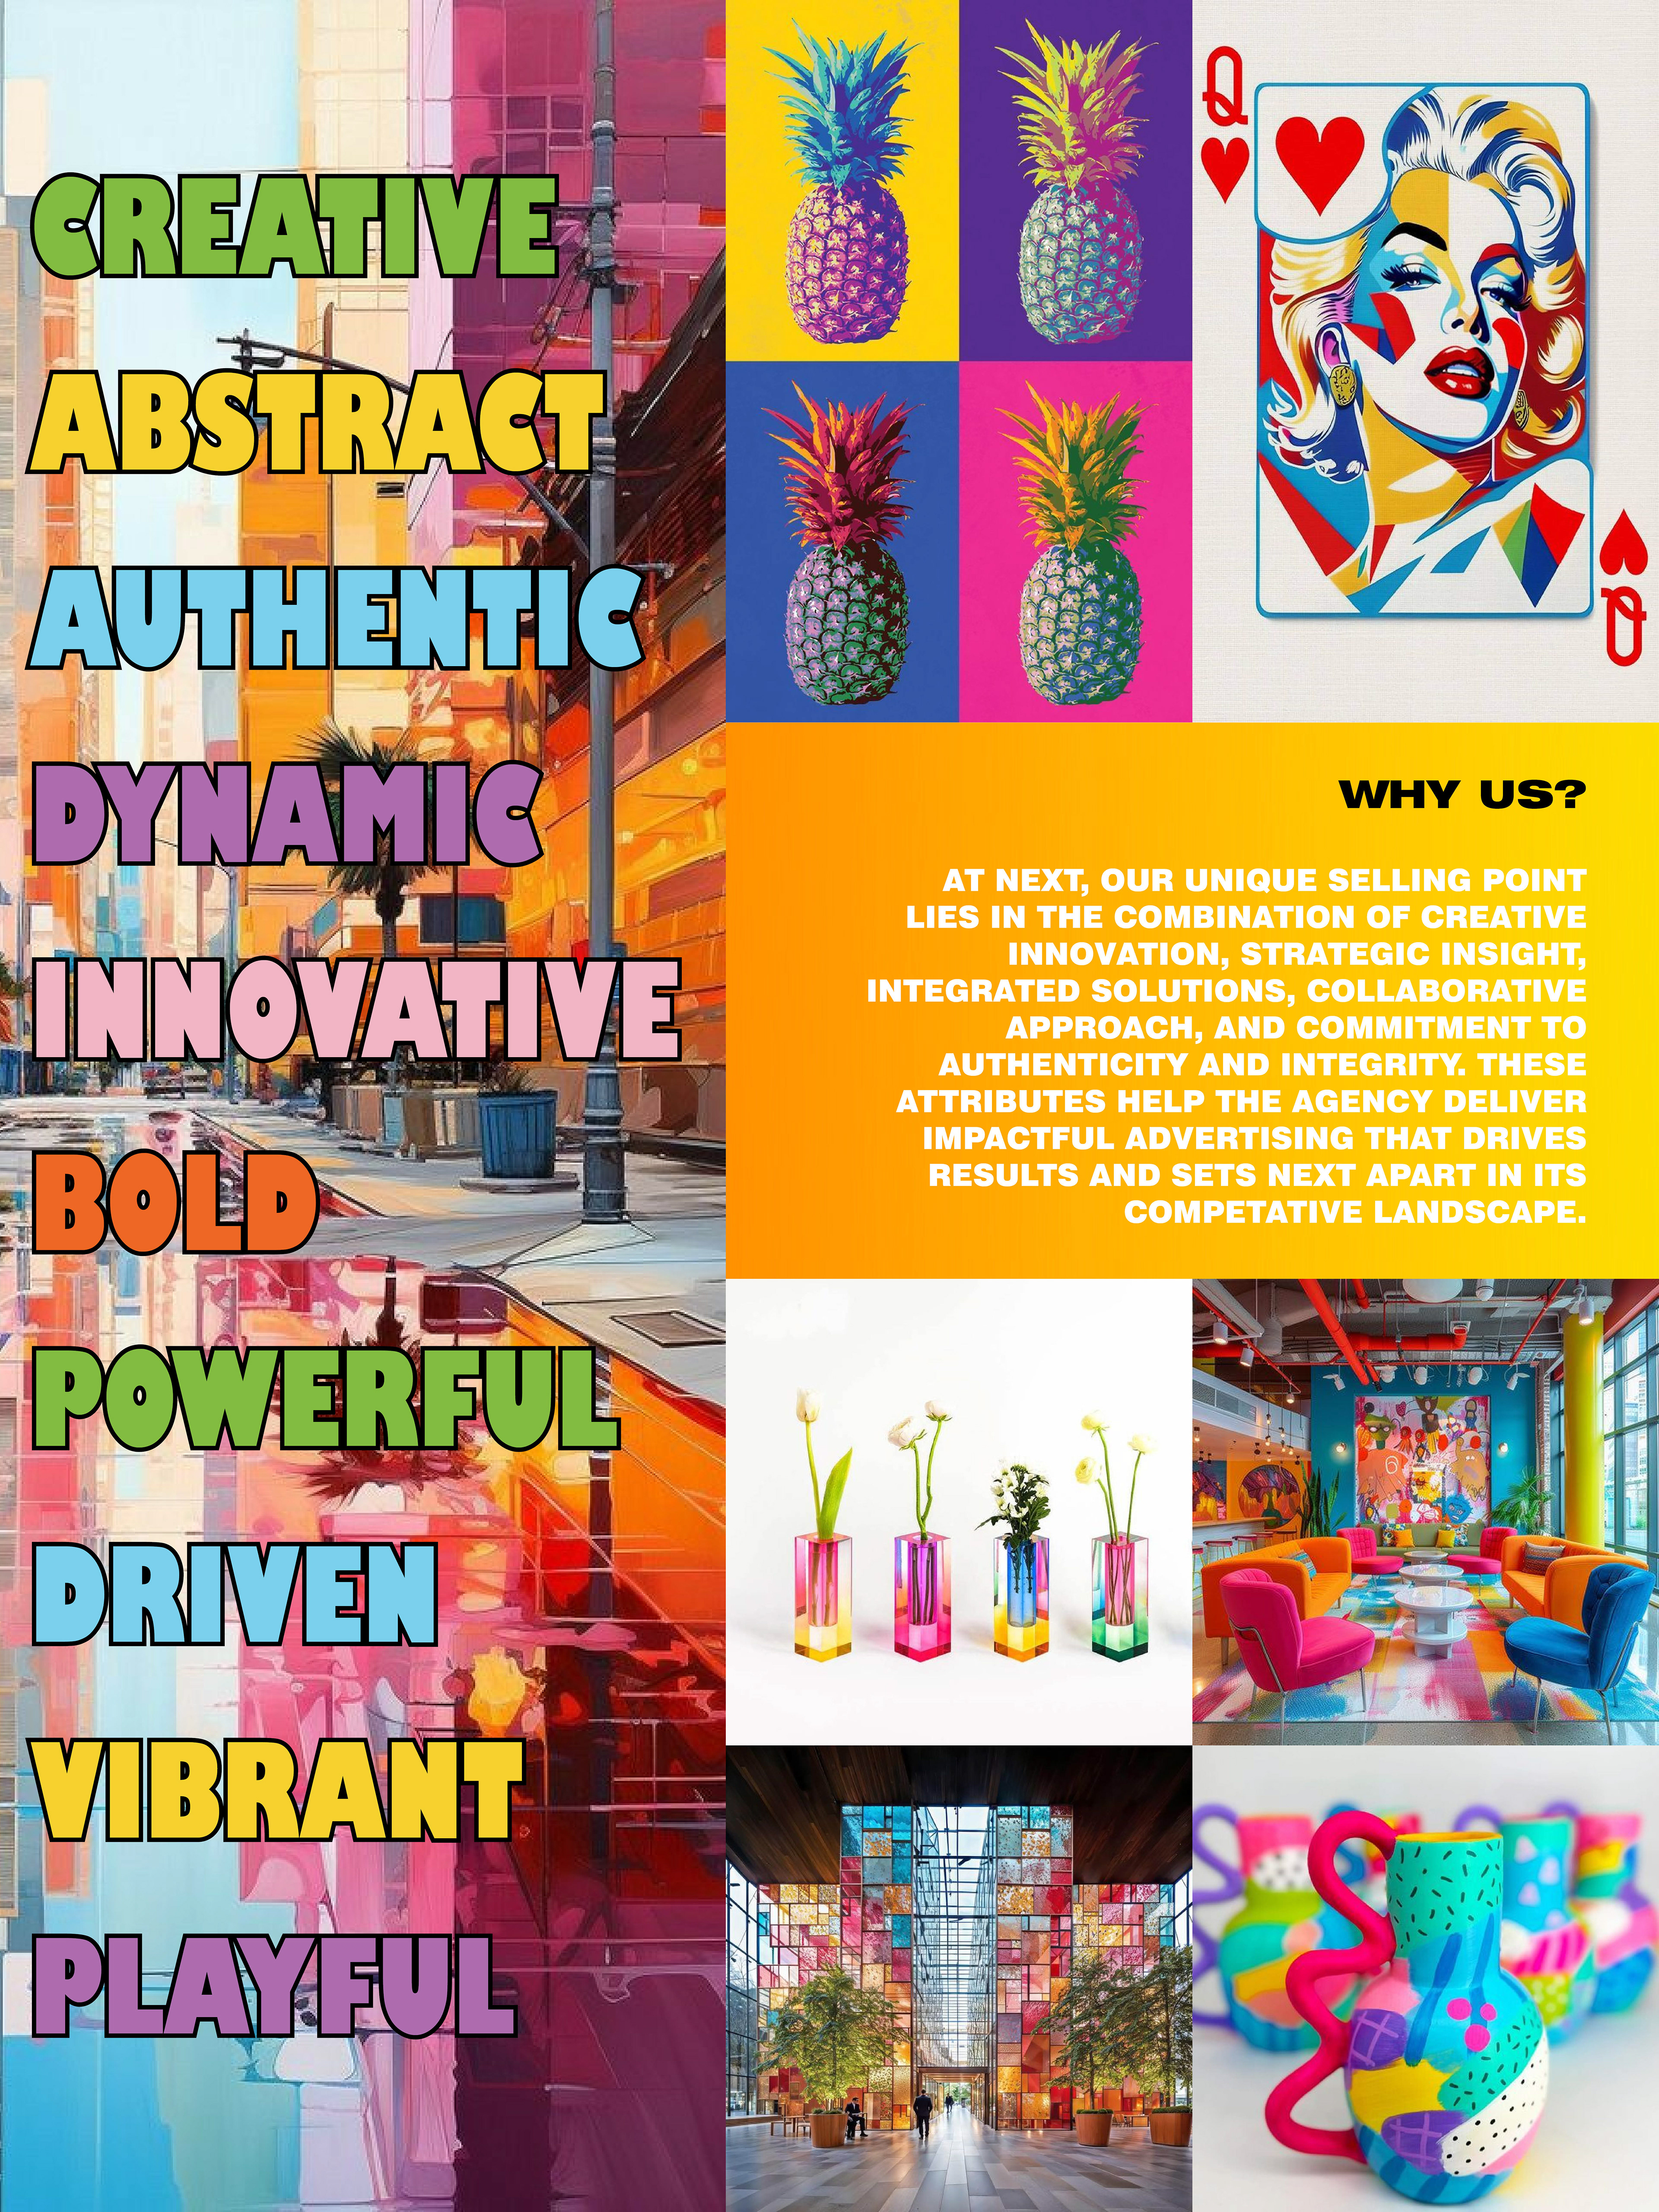
Finalized Mood Board - Page 2
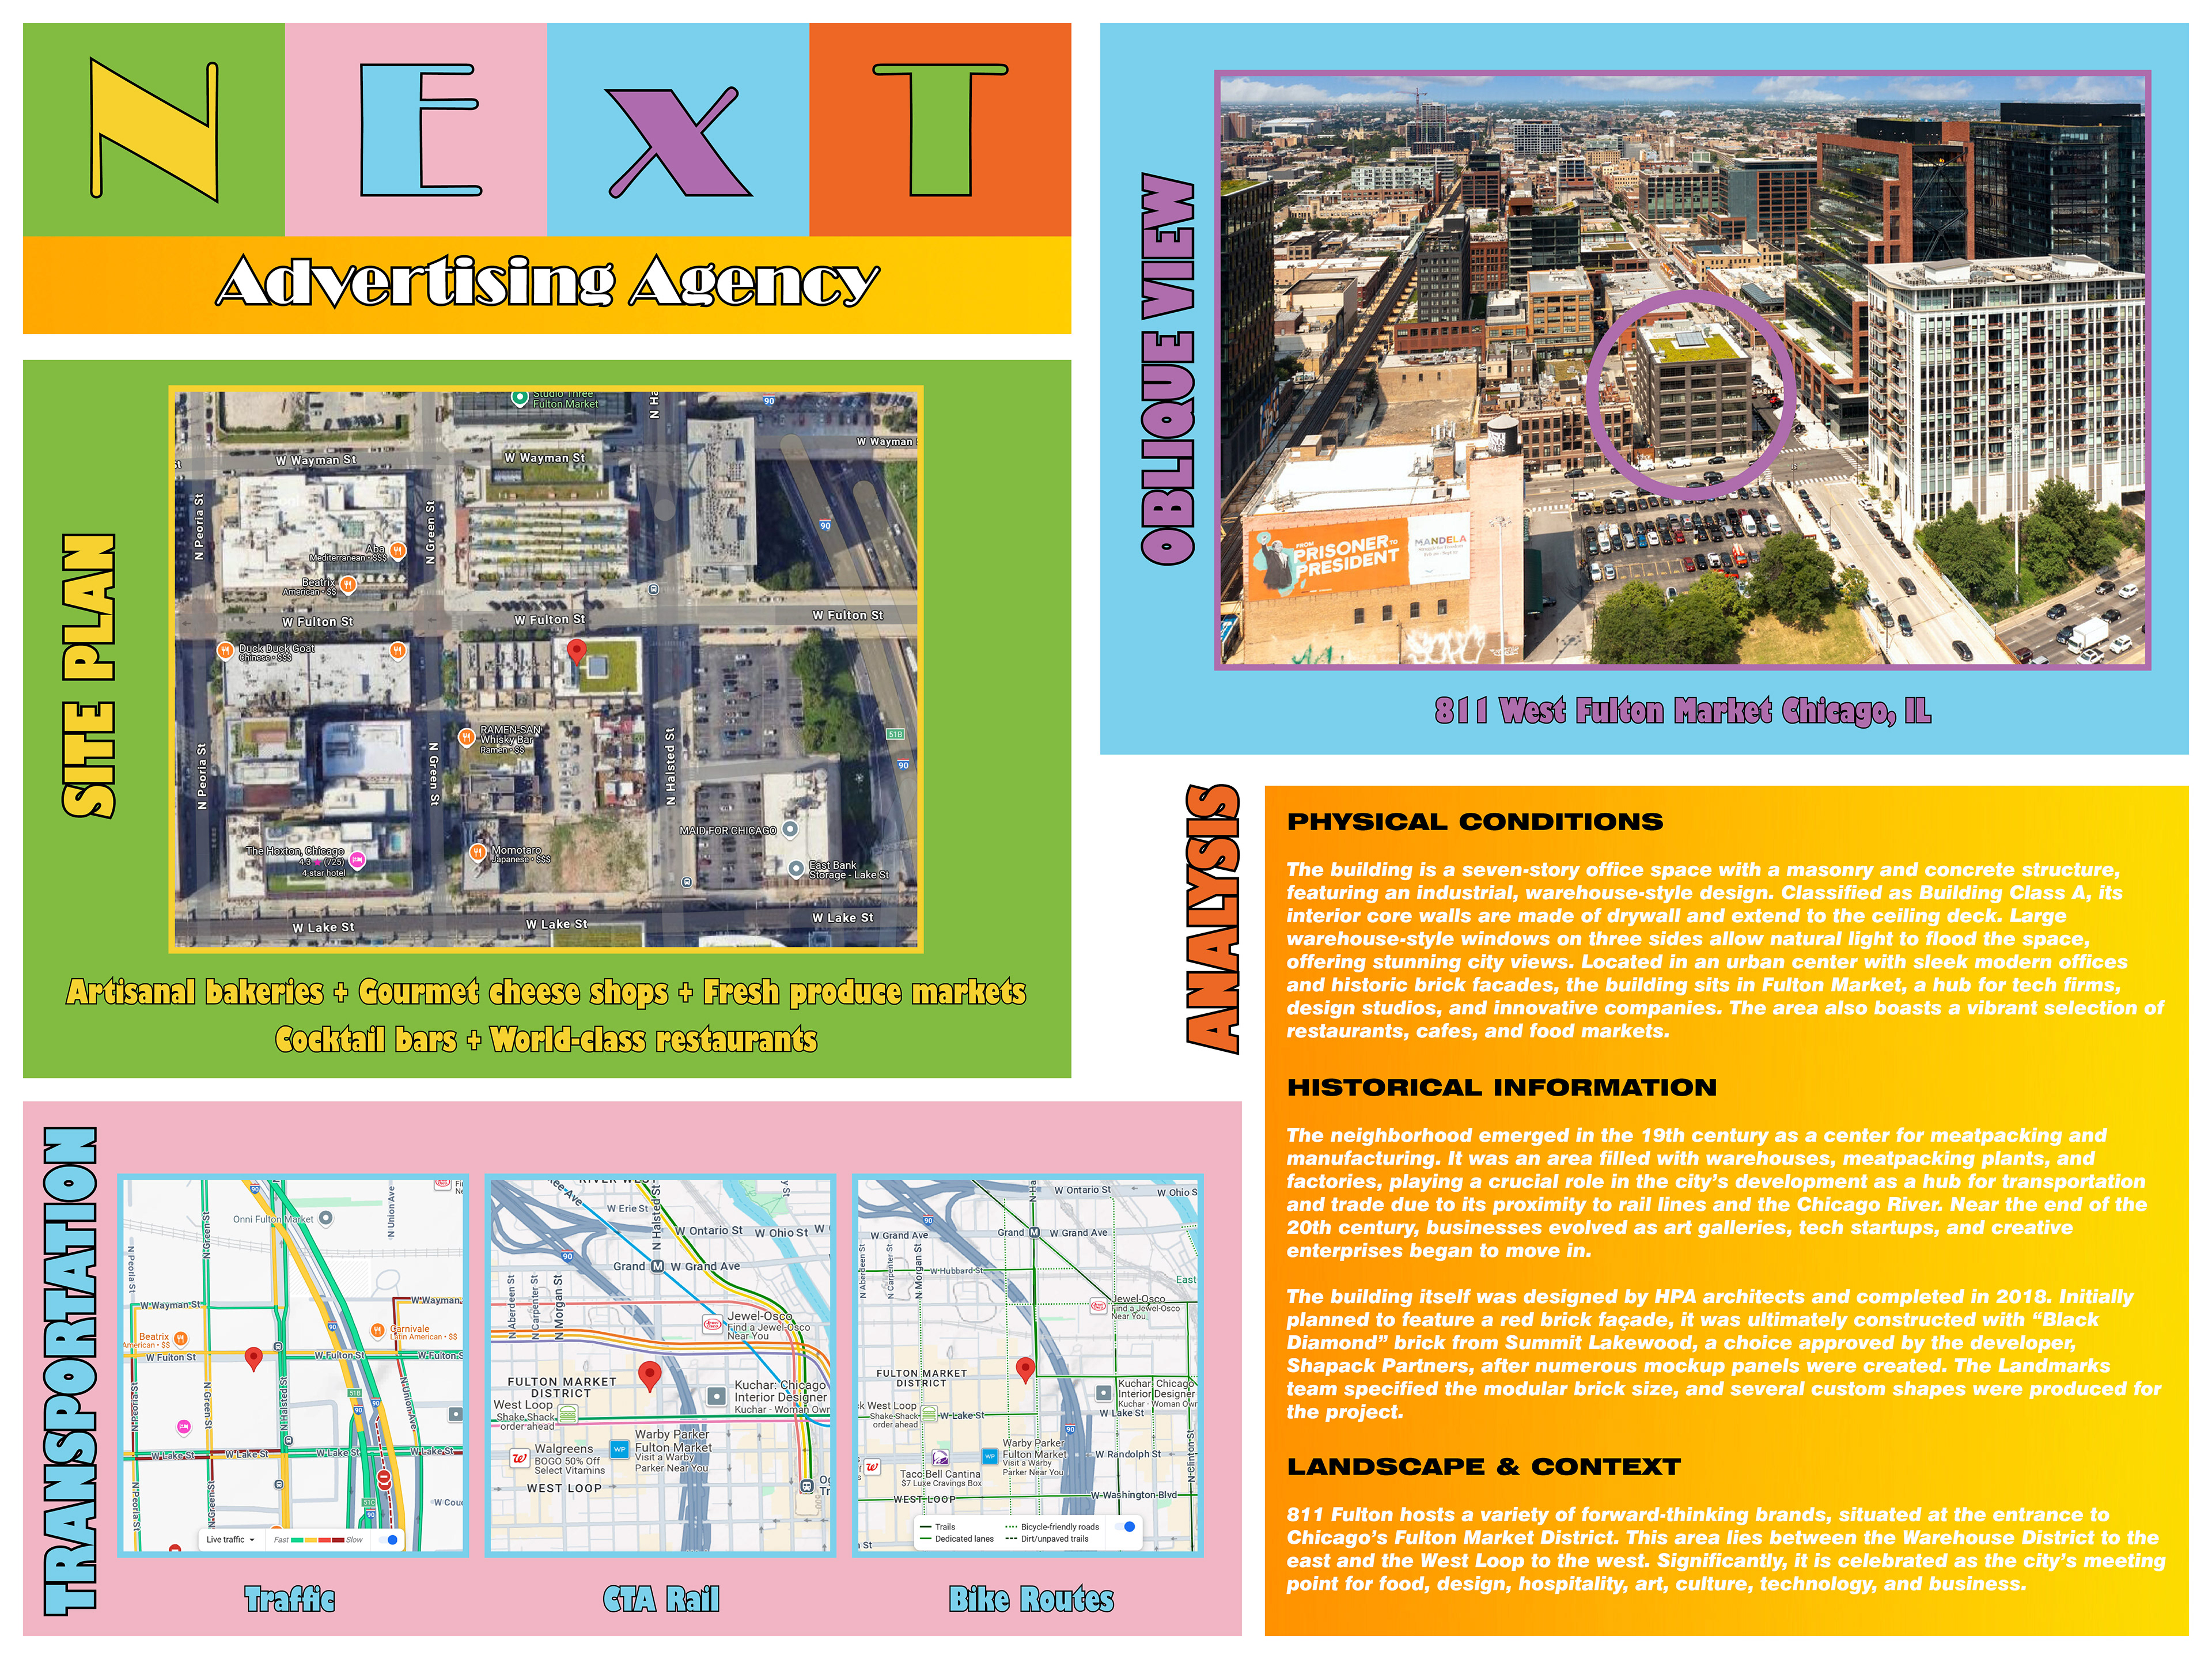
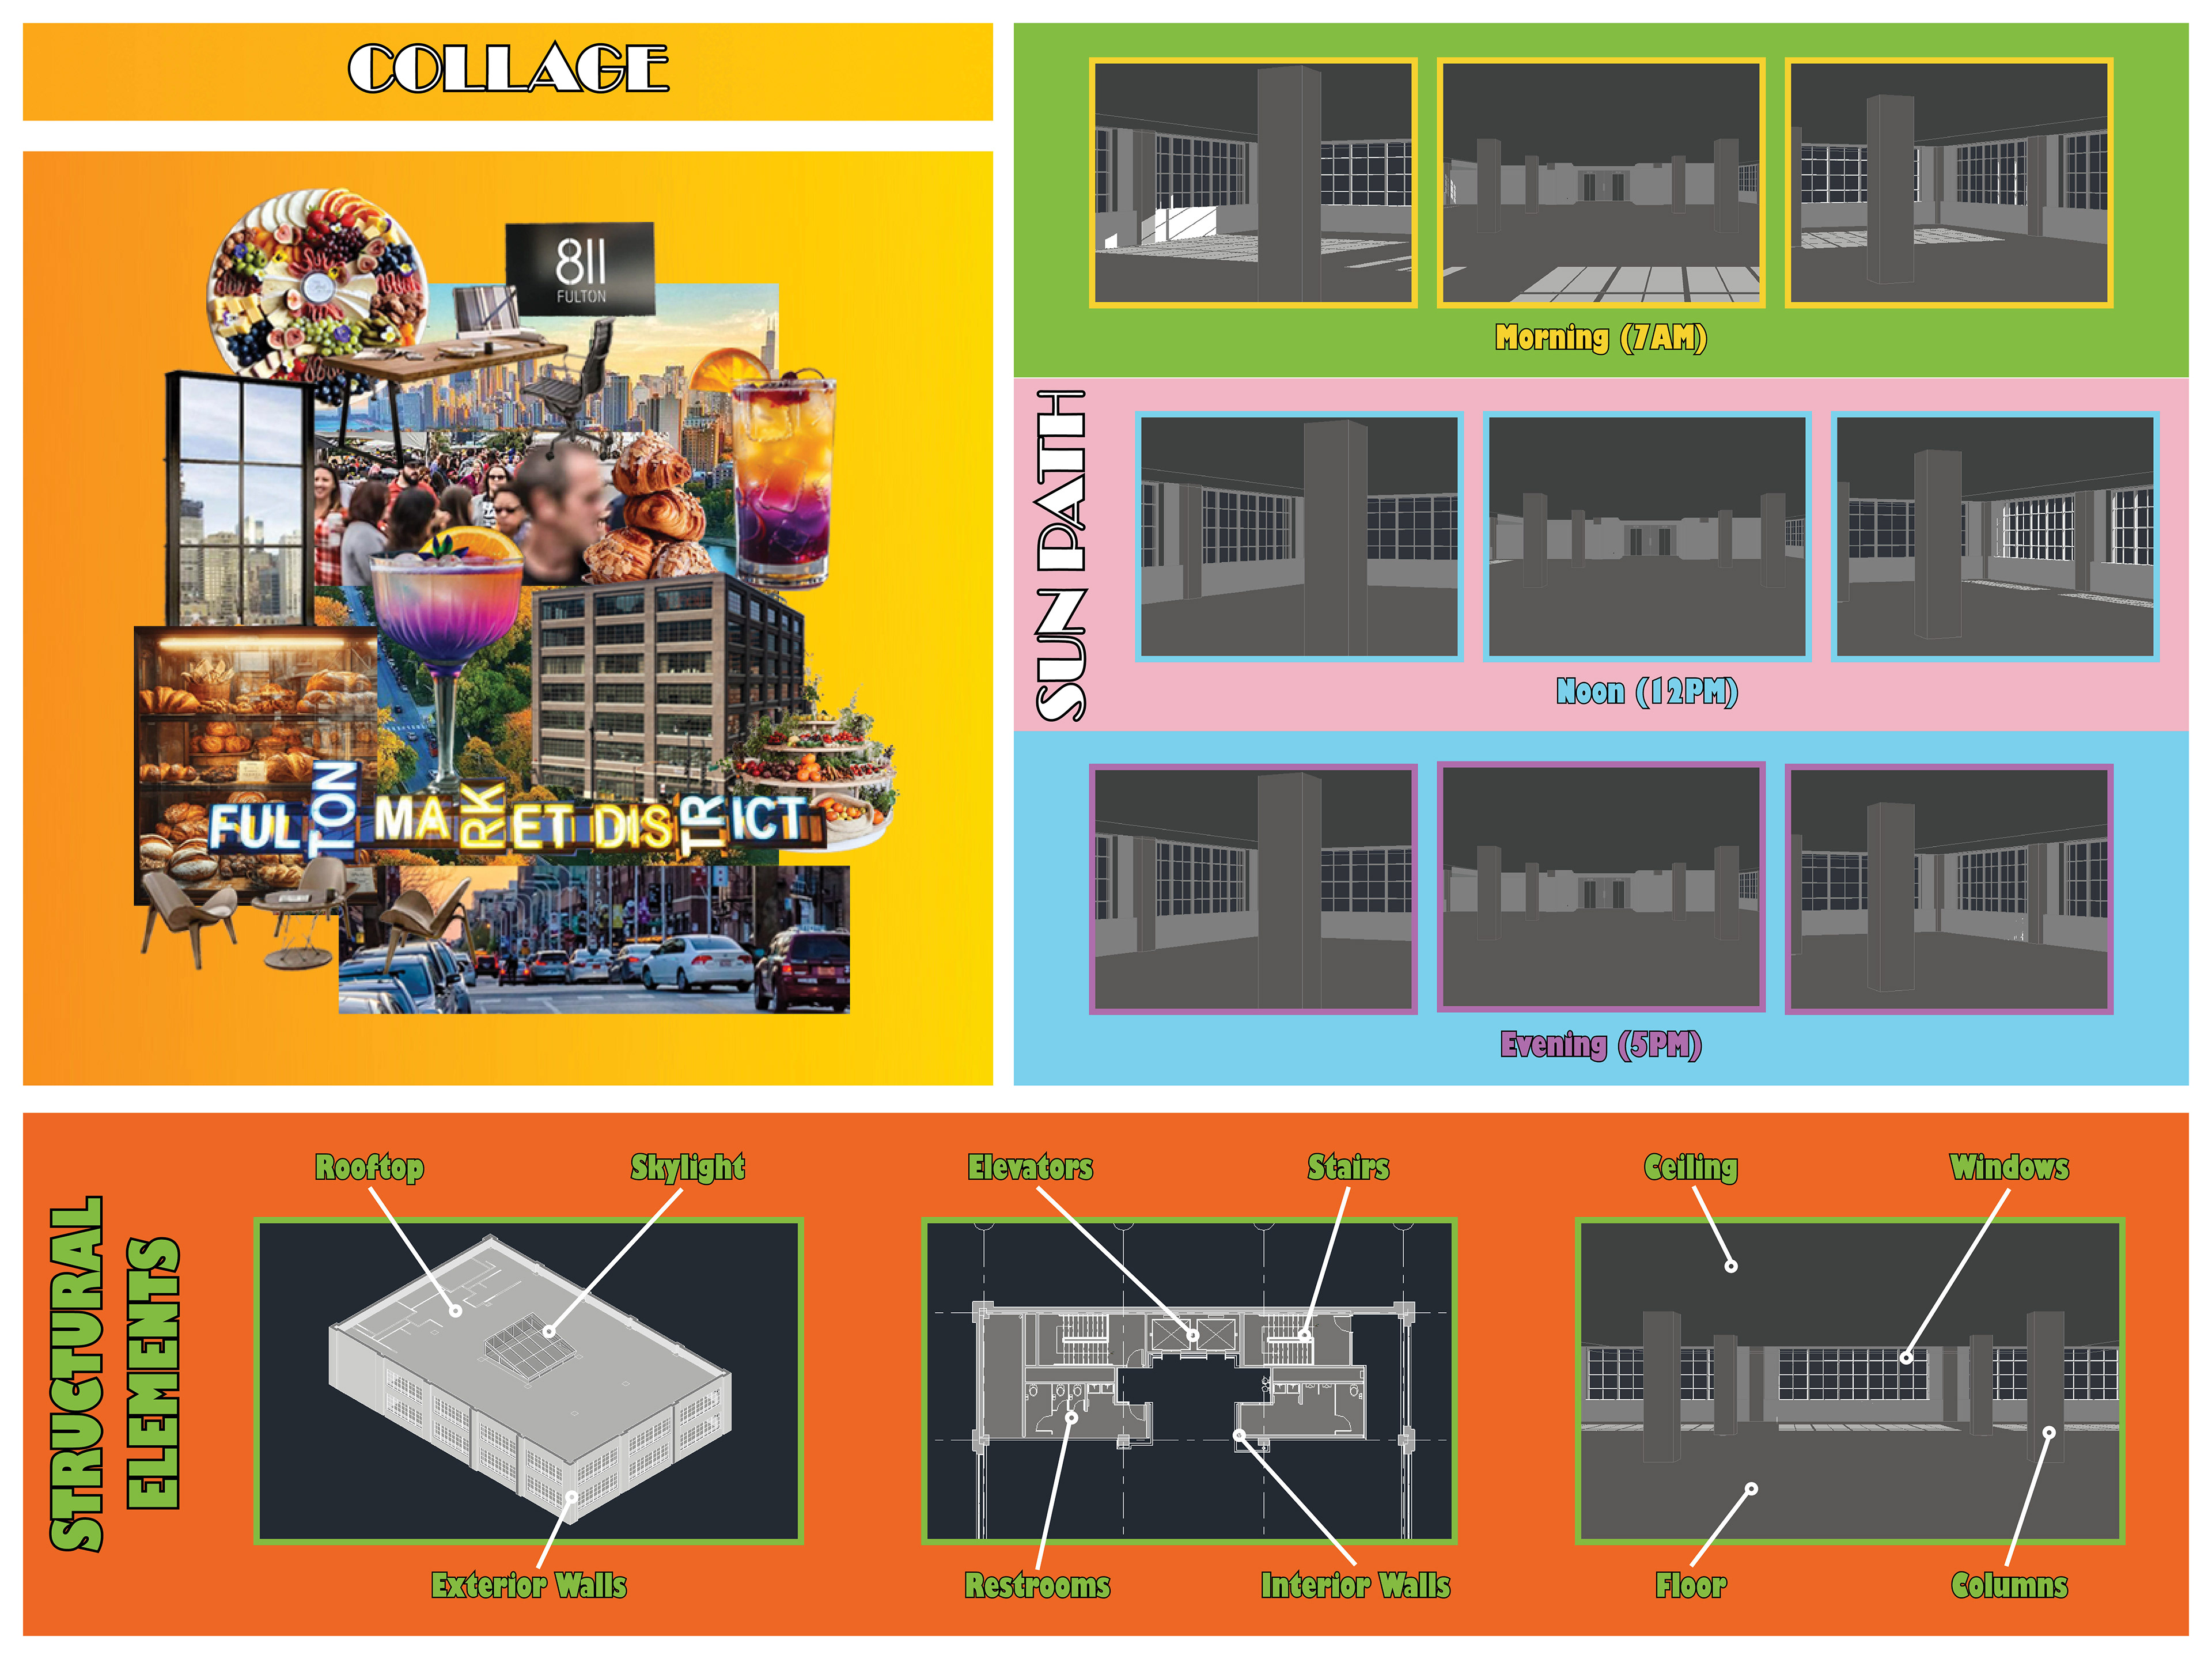
PHASE 1_WORKSESSION 02-SITE ANALYSIS
I researched the site's physical, historical, and contextual conditions, examining its current state, surroundings, and significance within the community. My findings were organized into a clear narrative and visual format, addressing questions about the site's current use, sunlight, circulation, and community integration. I used tools like the provided Revit model for analysis. Finally, I synthesized my research to guide the design process, aligning it with project goals and shaping my concept development.
PHASE 1_WORKSESSION 03_PRECEDENT
I researched and gathered information for two important interior architecture projects of my interest: Droga5 and Saachi & Saachi. With this study, I created a short presentation that includes concept narratives and diagrams, plans, sections, maps, drawings, photographs, and models that I was able to find for my selected projects. This in turn would add to my knowledge about the interior conditions of office projects.
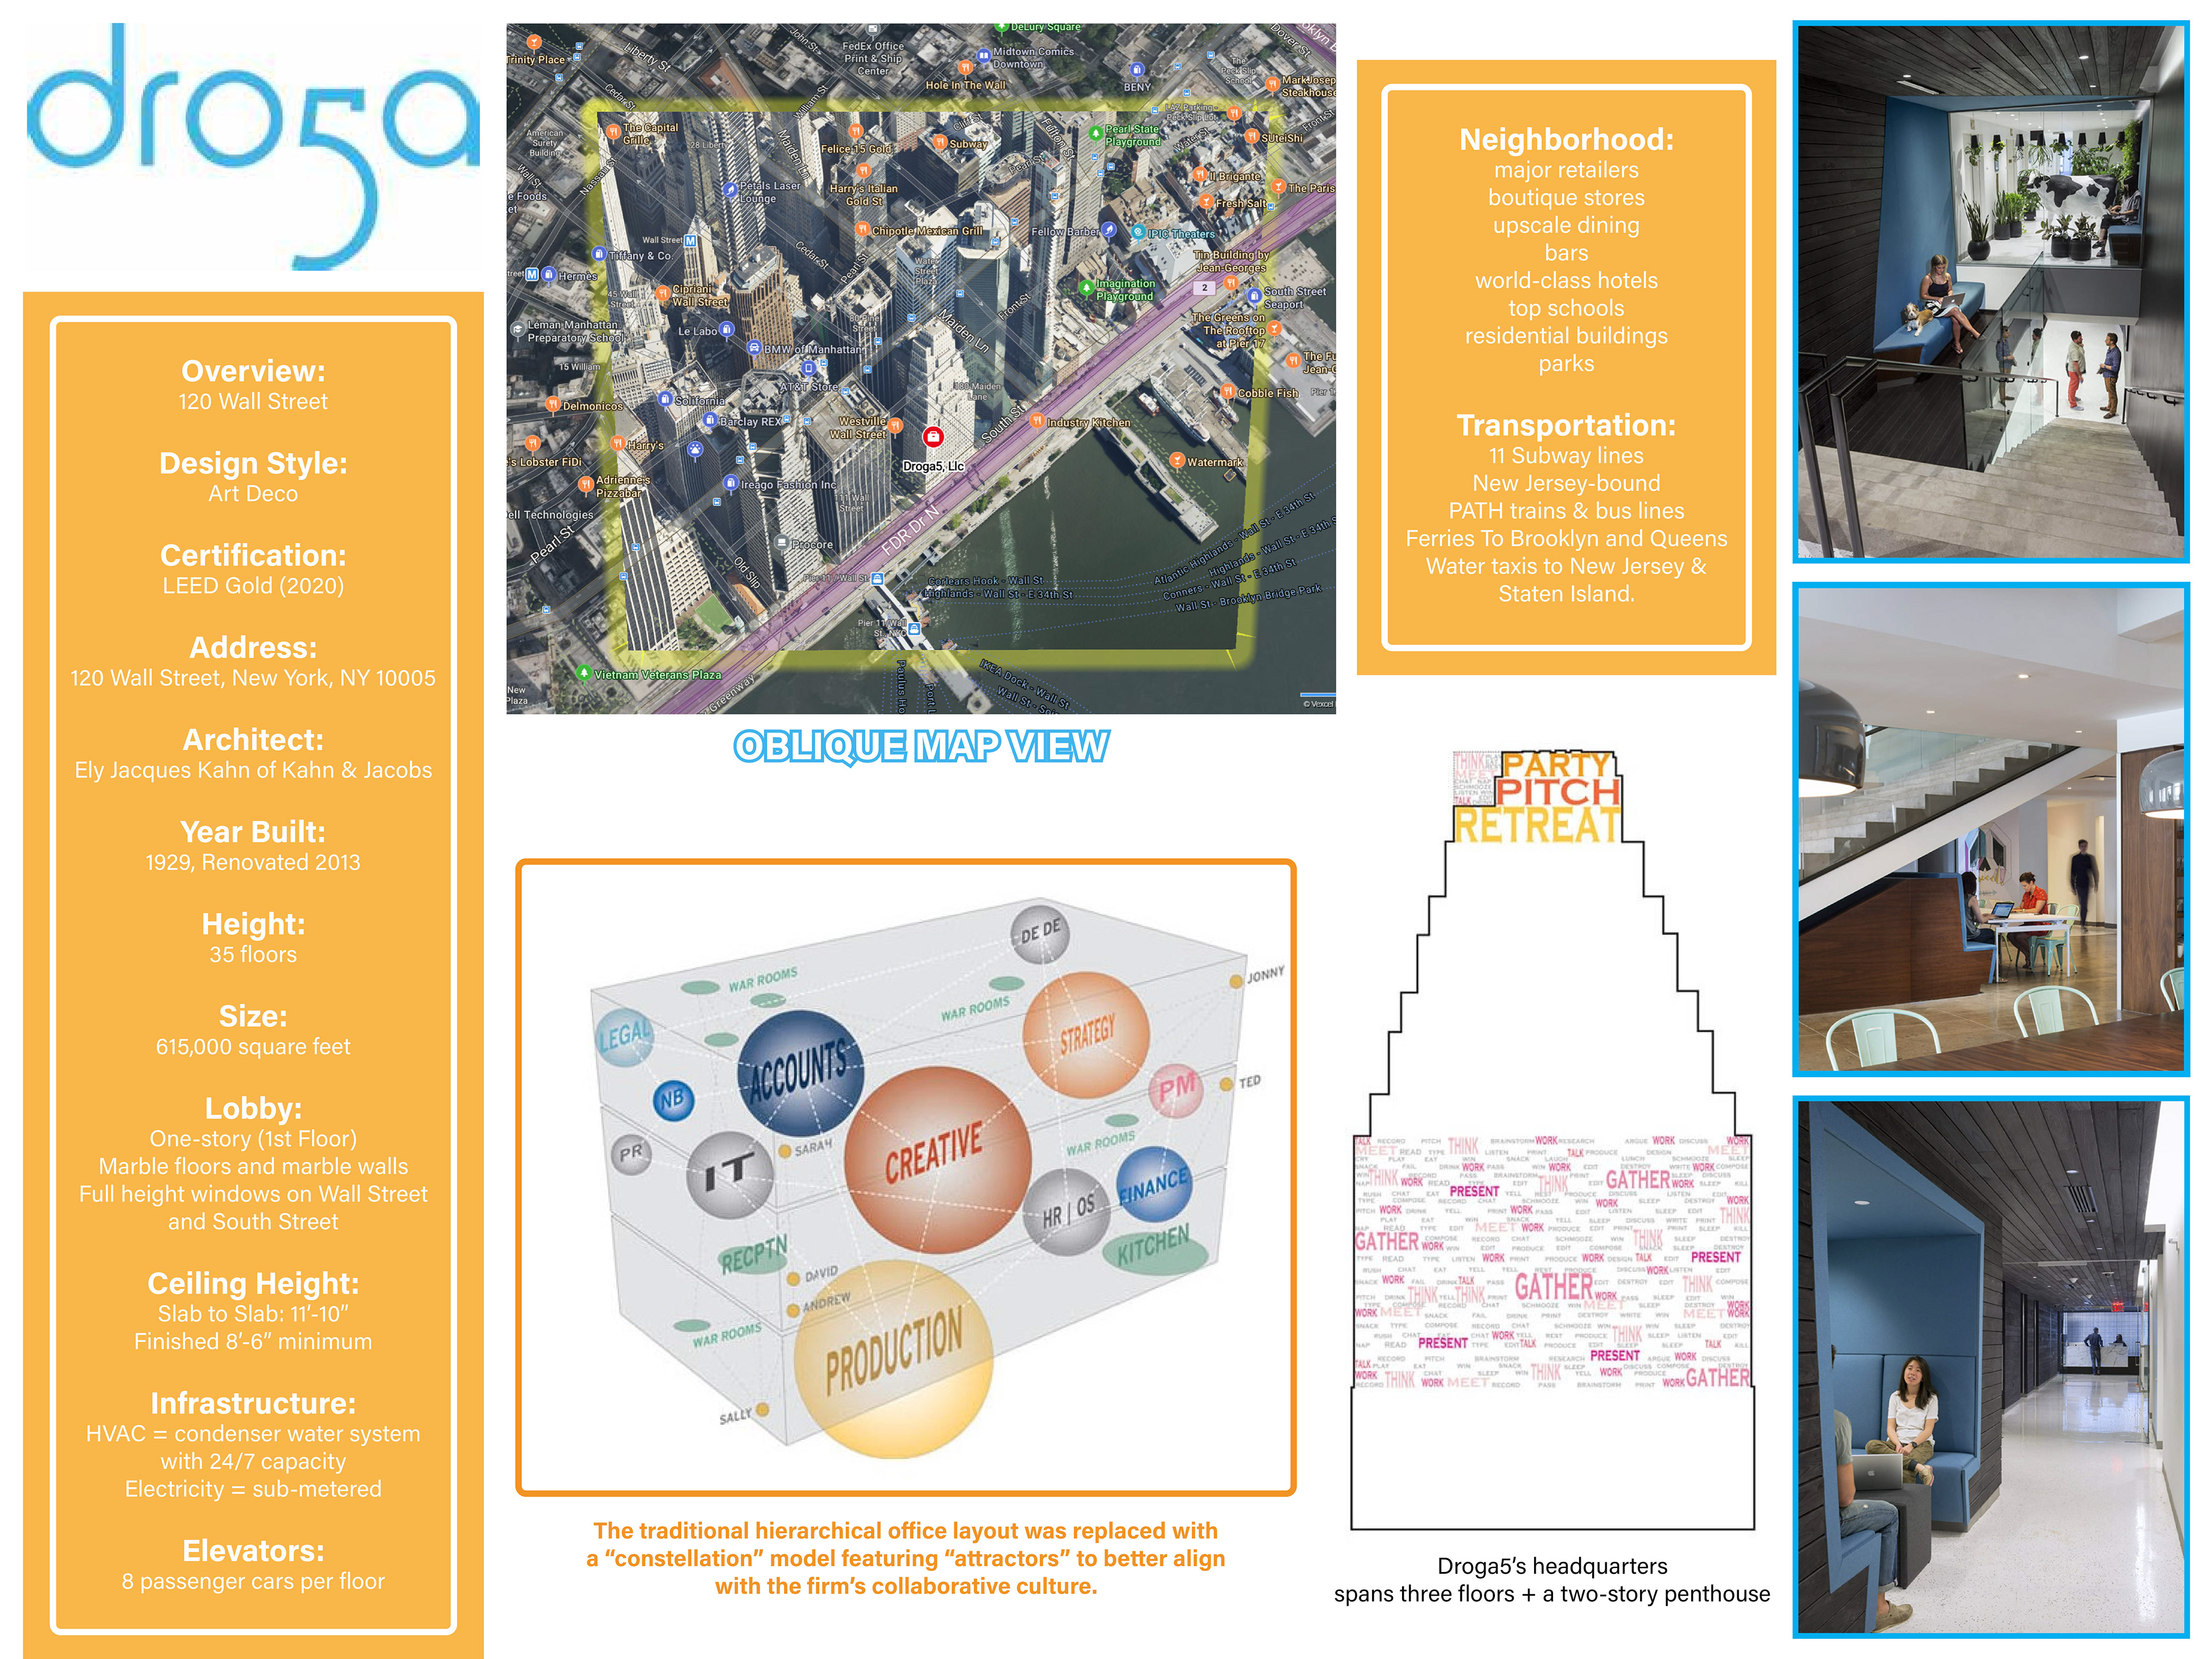
Droga5 Presentation - Page 1
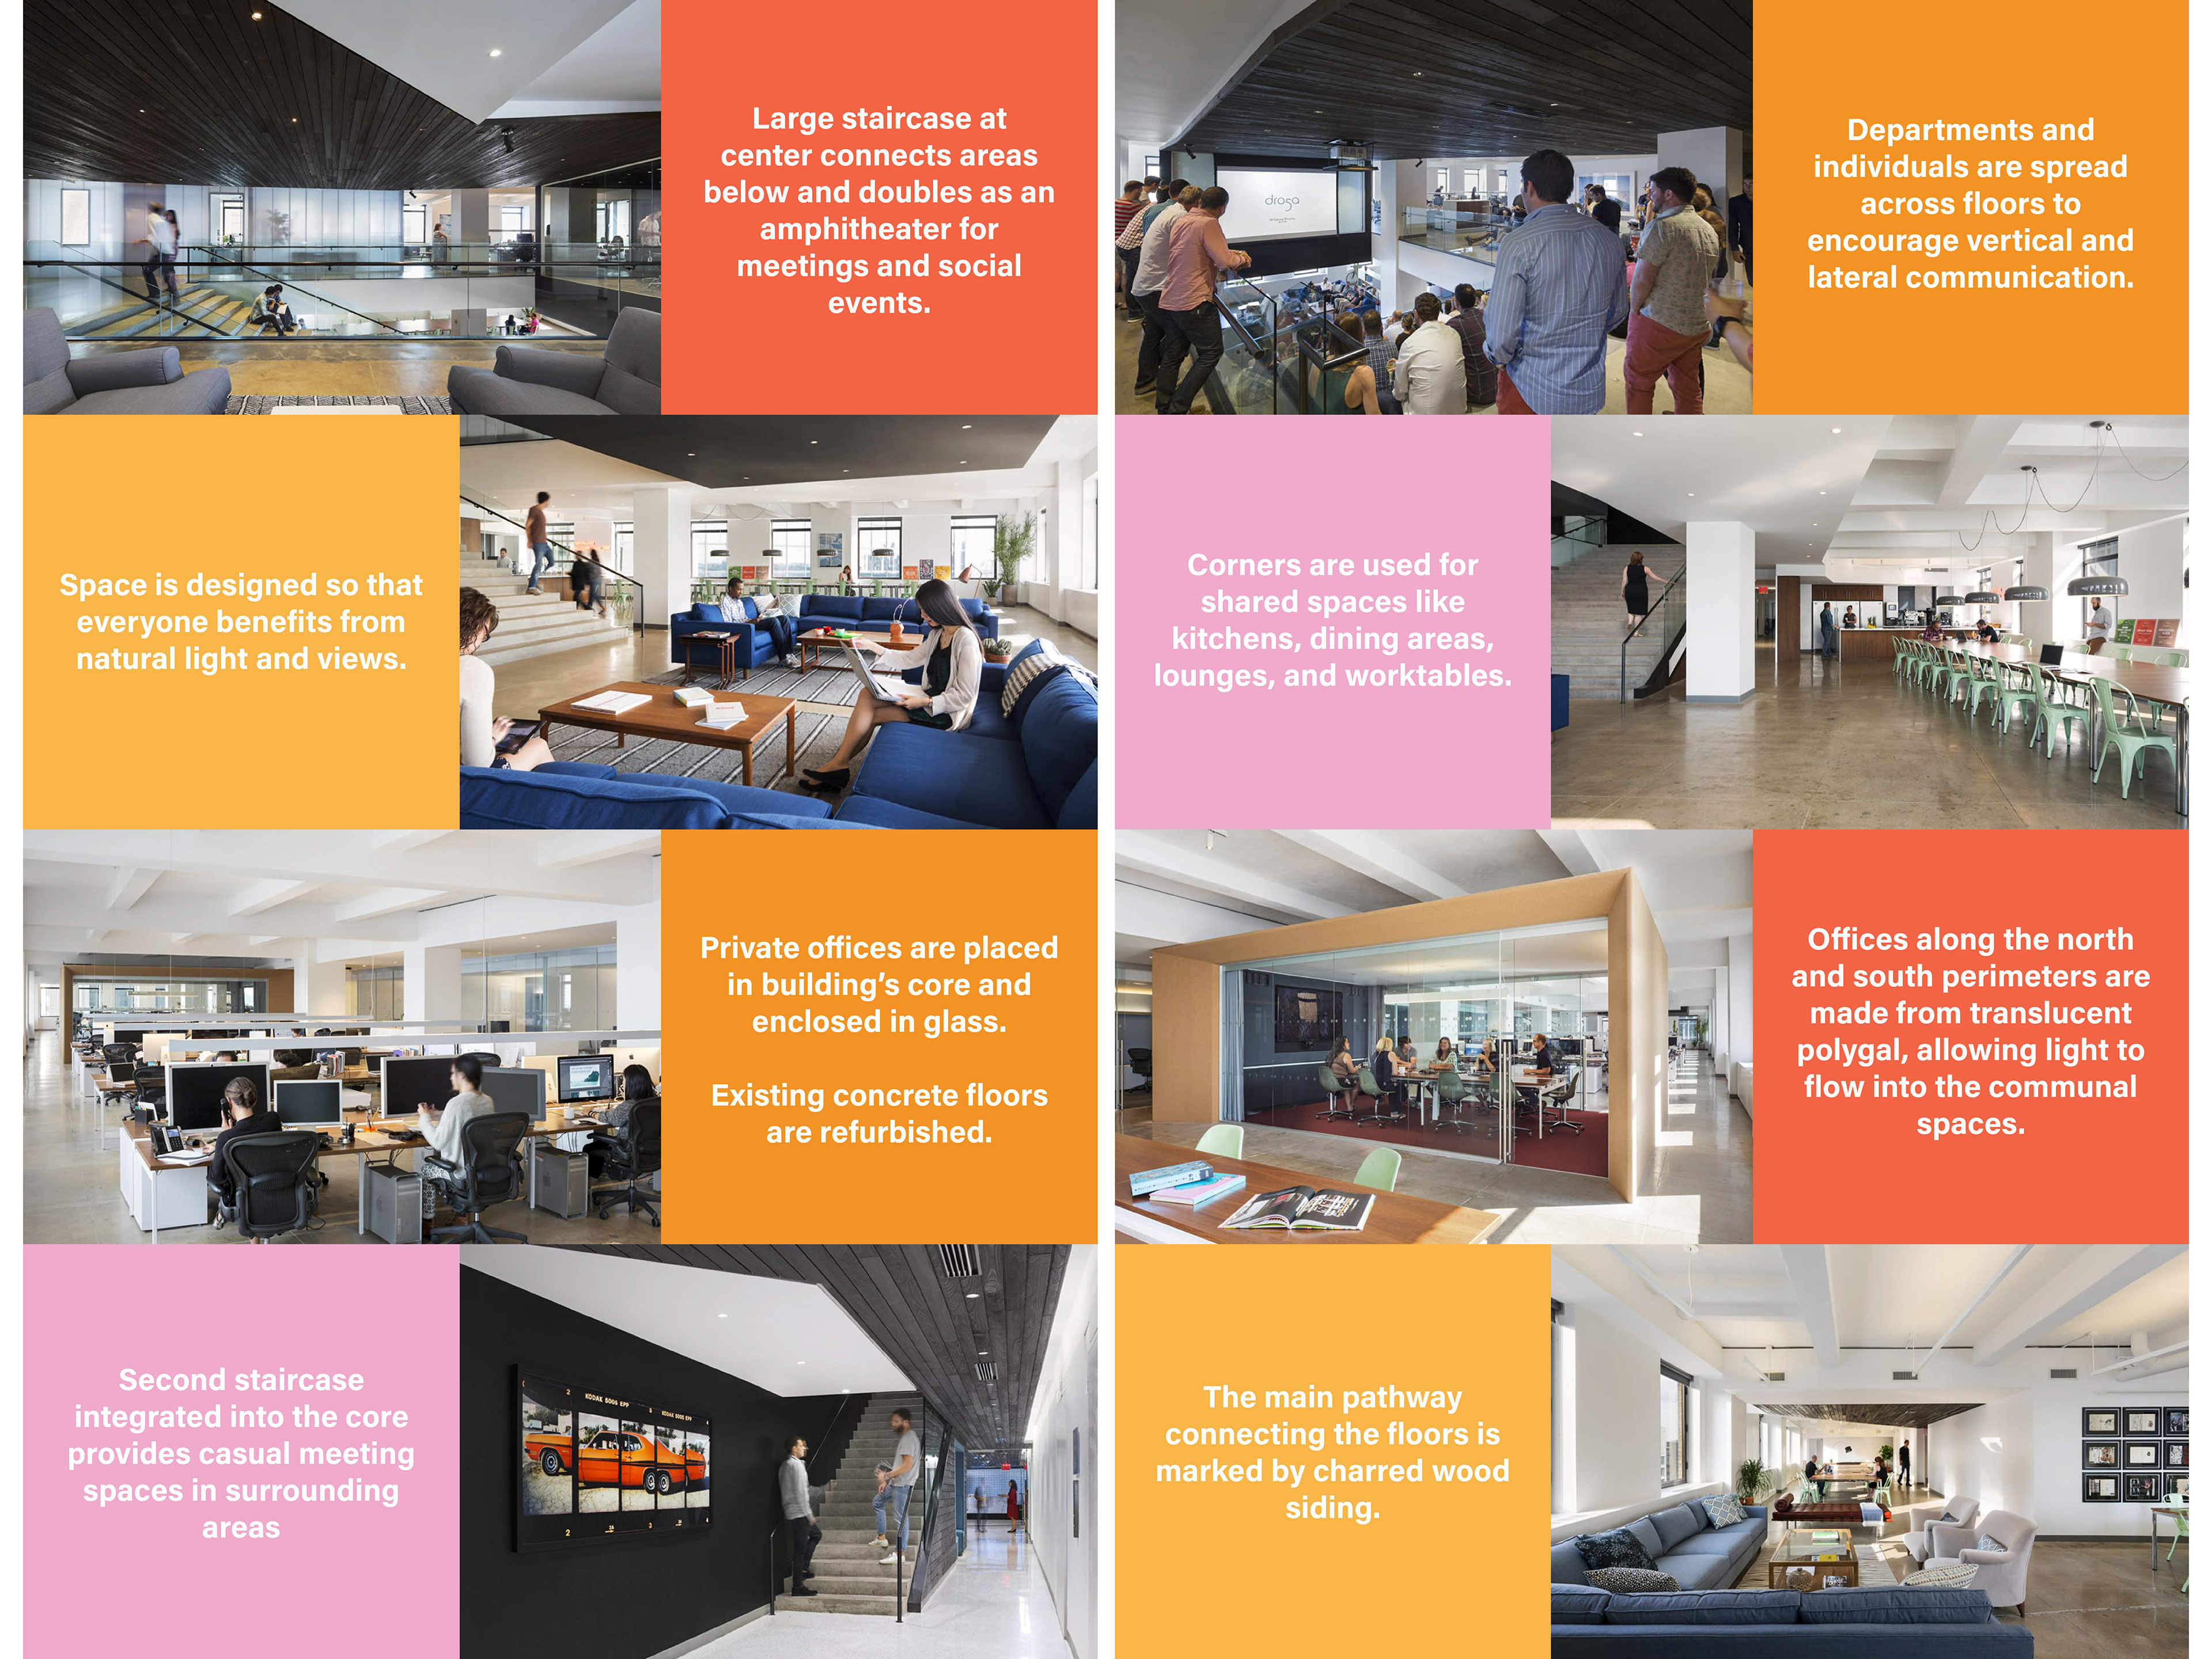
Droga5 Presentation - Page 2
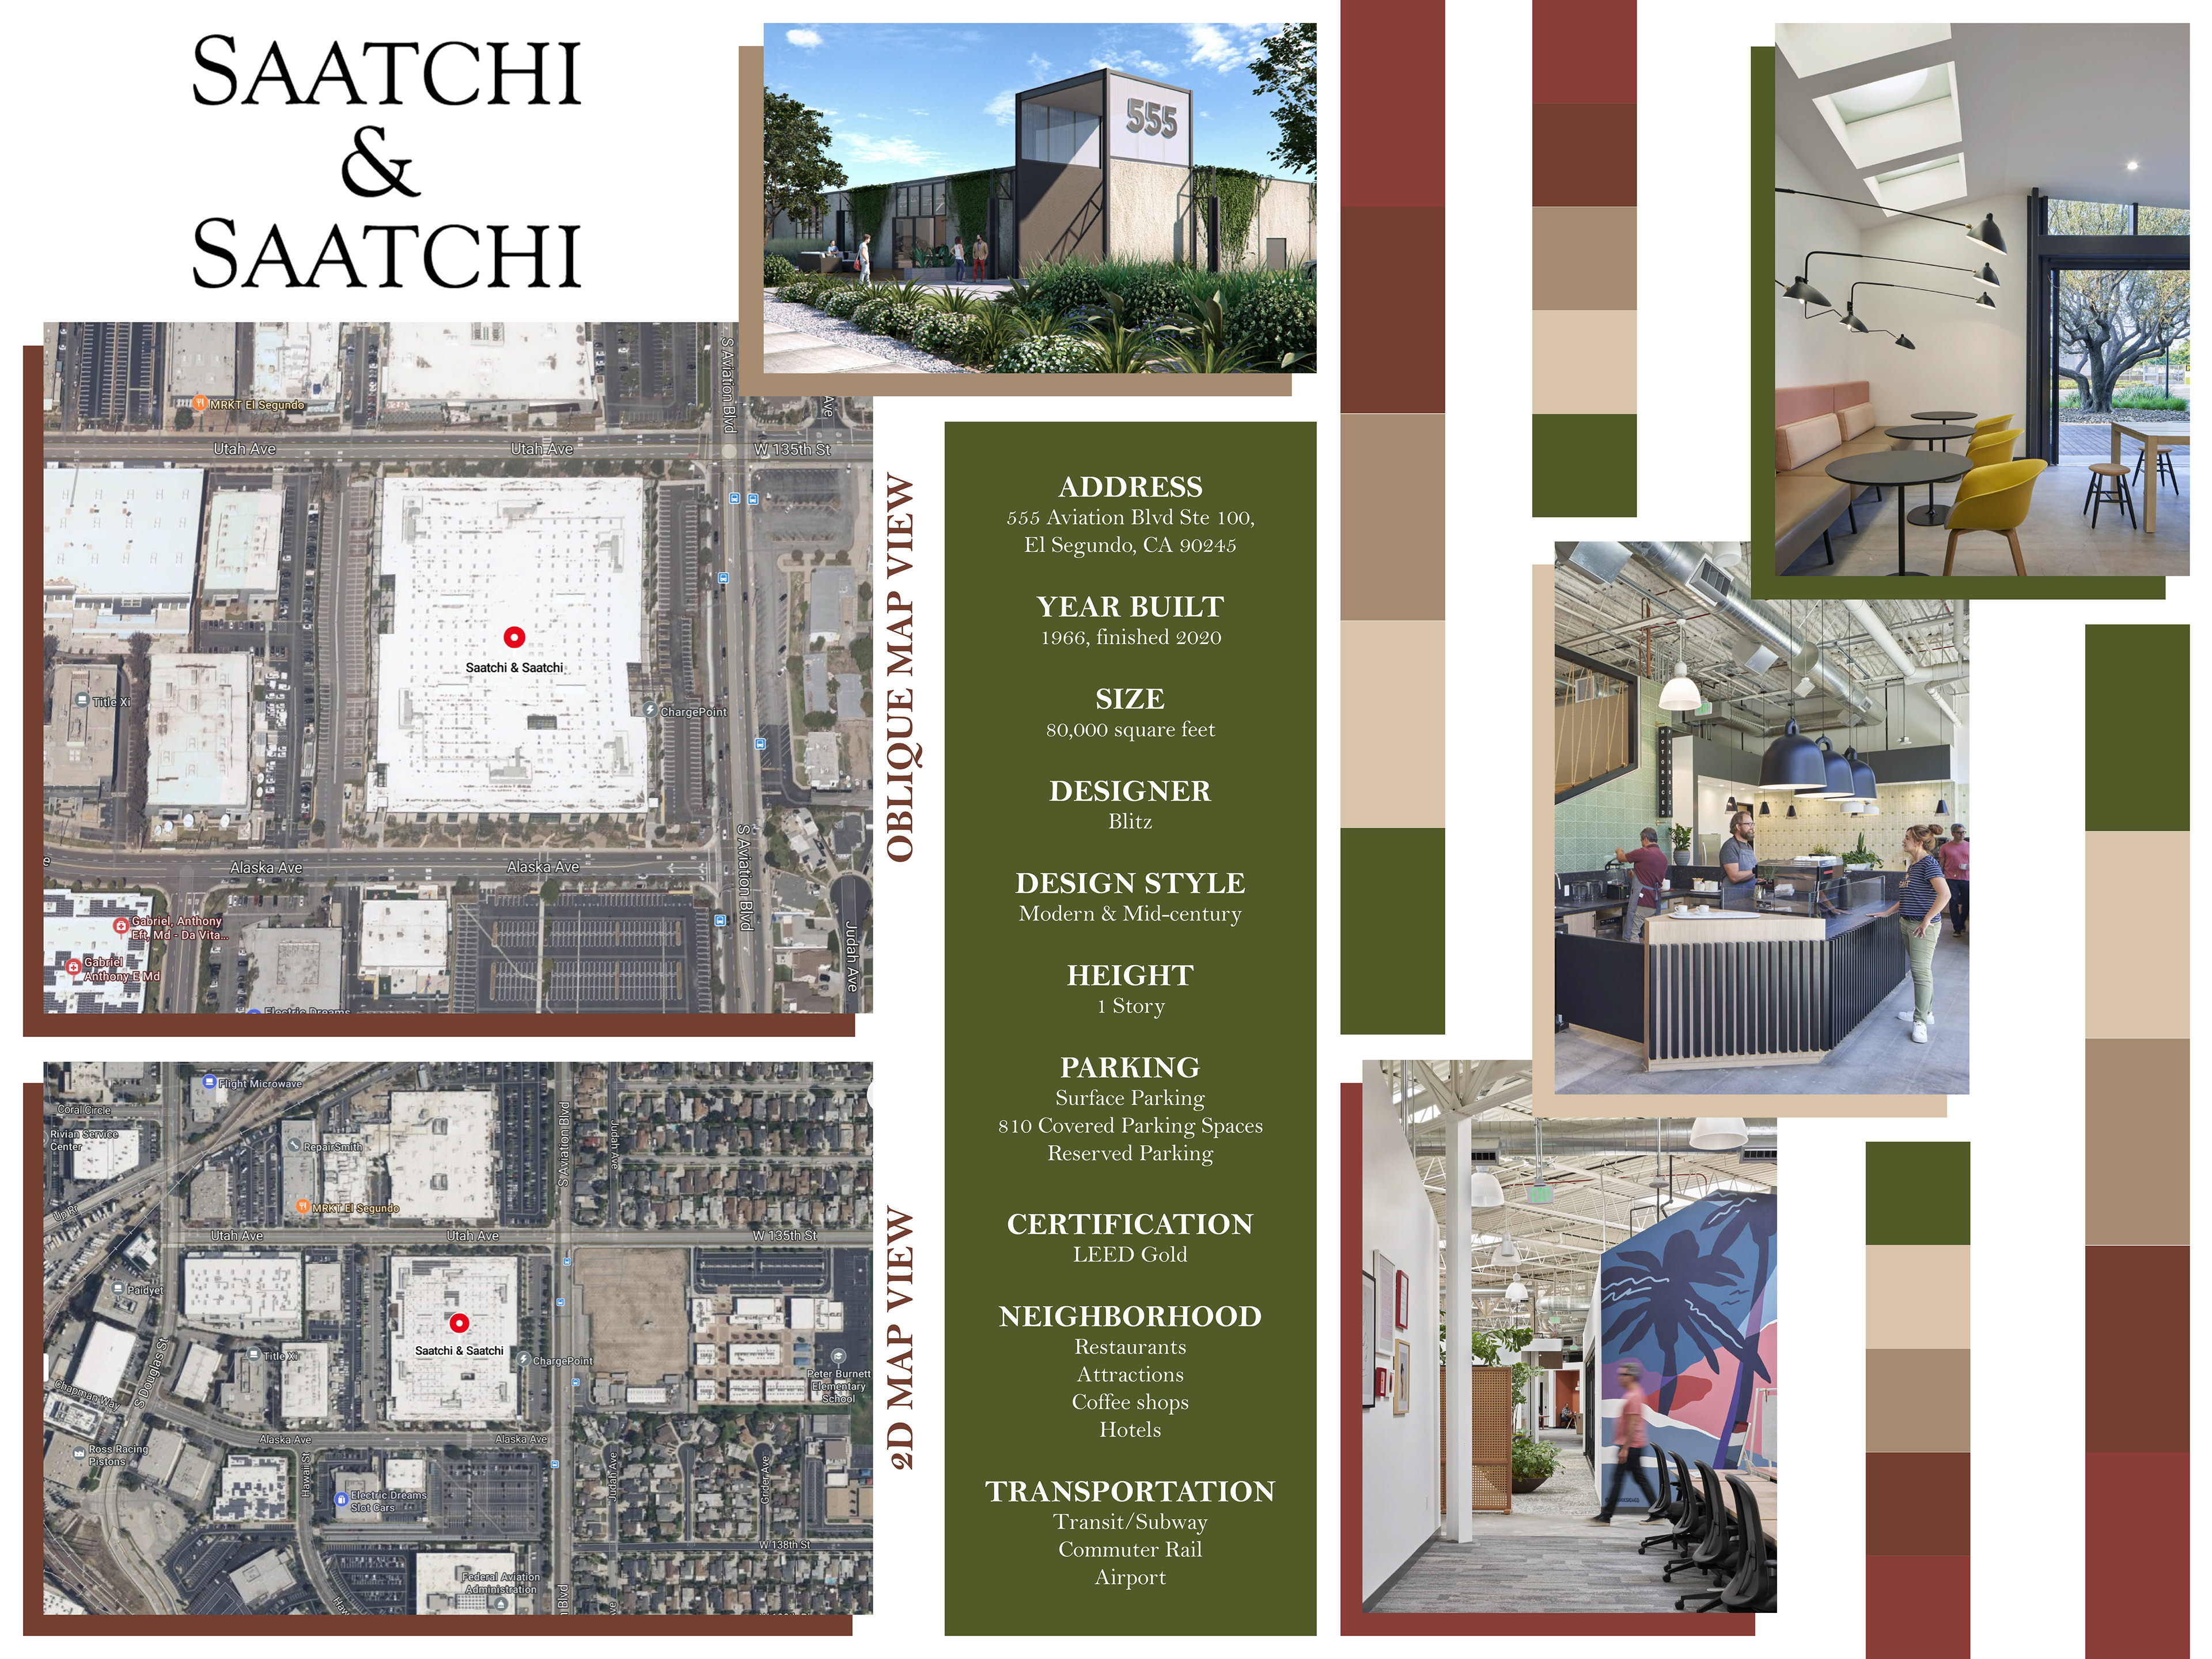
Saatchi & Saatchi Presentation - Page 1
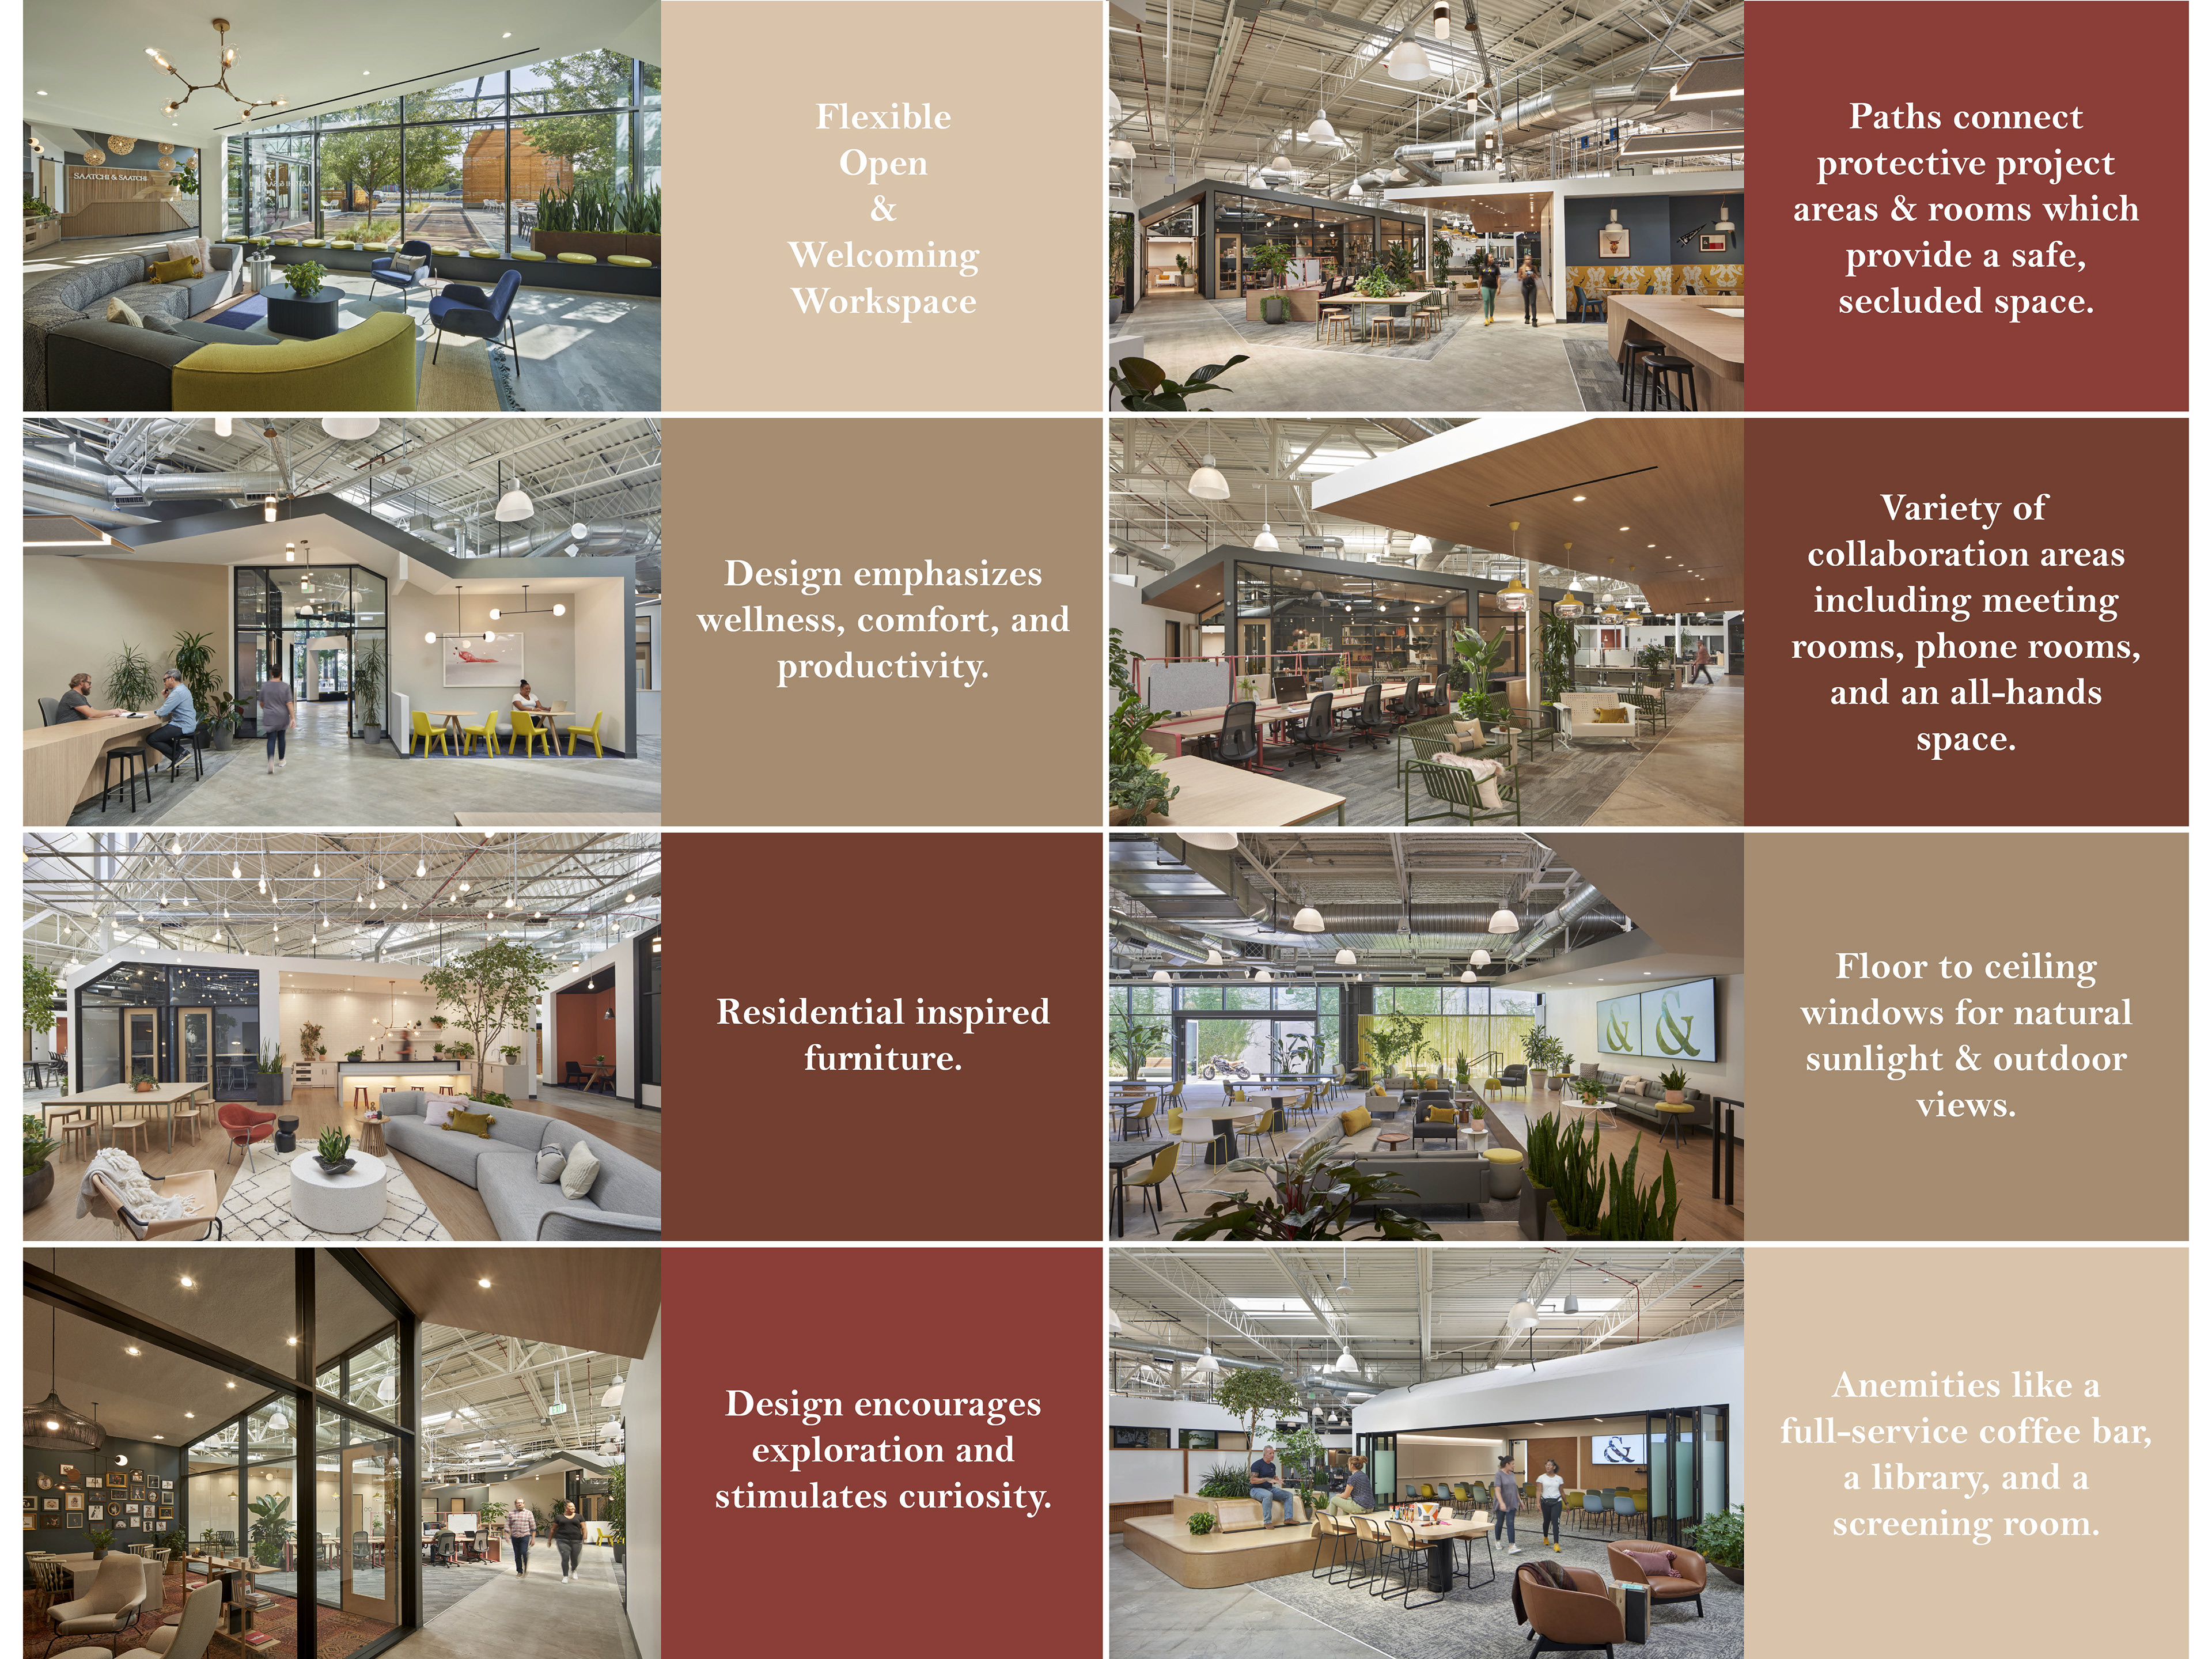
Saatchi & Saatchi Presentation - Page 2
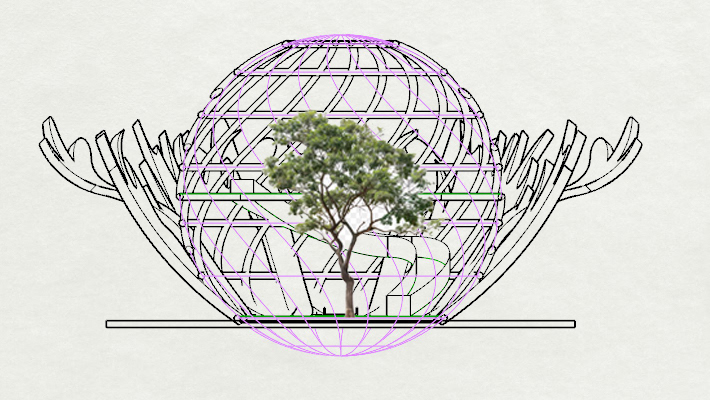
PHASE 1_WORKSESSION 04_CONCEPT V1
Using the information gathered from the site, existing building, precedent research, cultural insights about the client, and the provided program, I have developed a concept narrative to serve as my guide and design driver throughout the semester. This concept is presented through a combination of photos, collages, reference images, and gestural models, accompanied by a written narrative and formatted on a 36" x 48" InDesign layout.
PHASE 2_WORKSESSION 05_Space Requirements and Programming
Using a program spreadsheet template provided, I started inputting the programmatic information to the best of my ability. Since Steelcase is sponsoring the design competition, I reviewed their website to explore various office layout types that could fit the footprints and accommodate the required headcount of directors and employees. Additionally, I began curating a catalog of potential workstation and benching layouts, private office solutions, and meeting spaces that align with my evolving concept and design drivers while coordinating with the square footage outlined in my program.
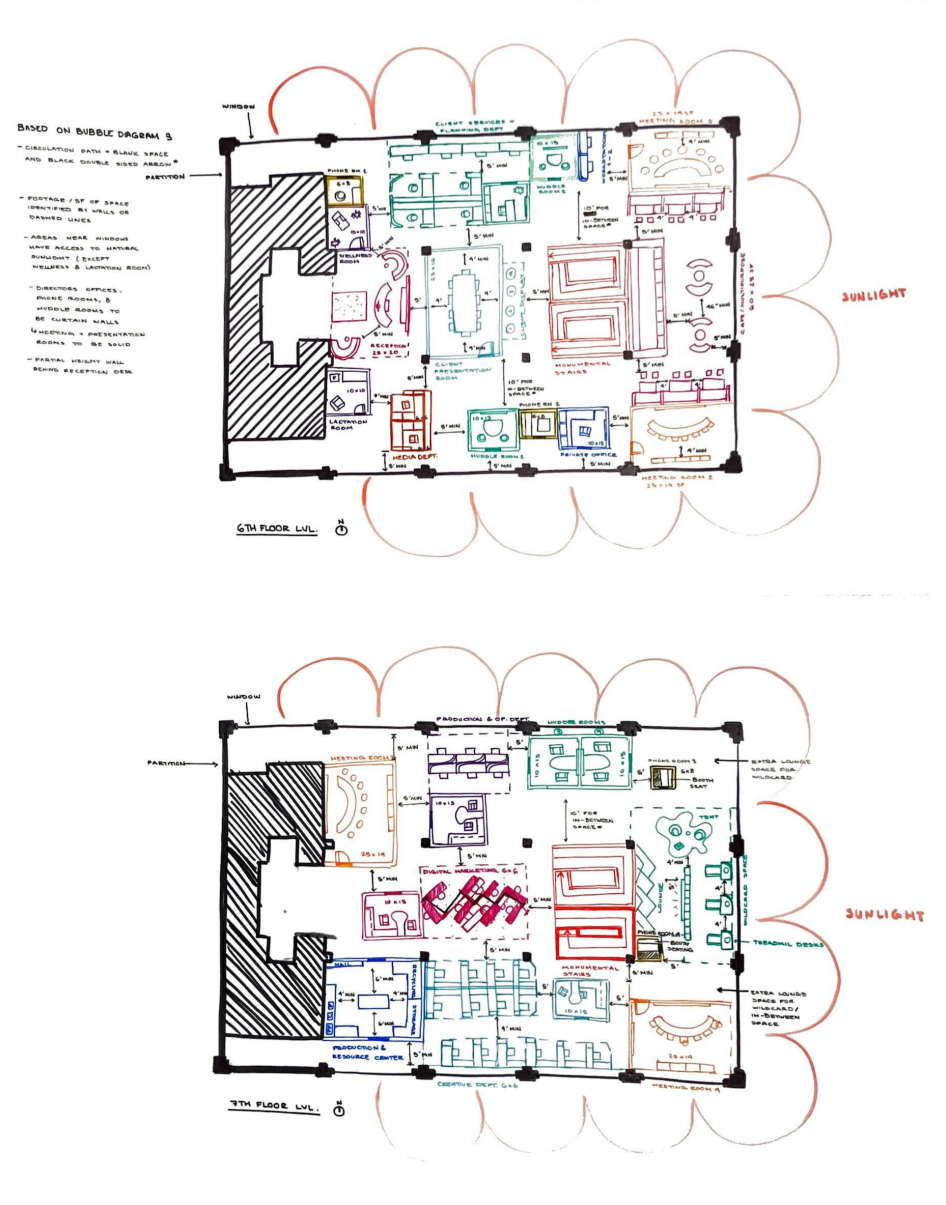
PHASE 2_WORKSESSION 06_PROGRAM DIAGRAMS
I created three 11" x 17" bubble diagrams that map out spatial requirements, adjacencies, and circulation on the provided floor plan. These diagrams prioritize access to natural daylight and views, support collaboration, well-being, and productivity, and identify impactful design moments. Multiple iterations using hand sketches and digital tools were used to explore square footage relationships and refine the layouts.
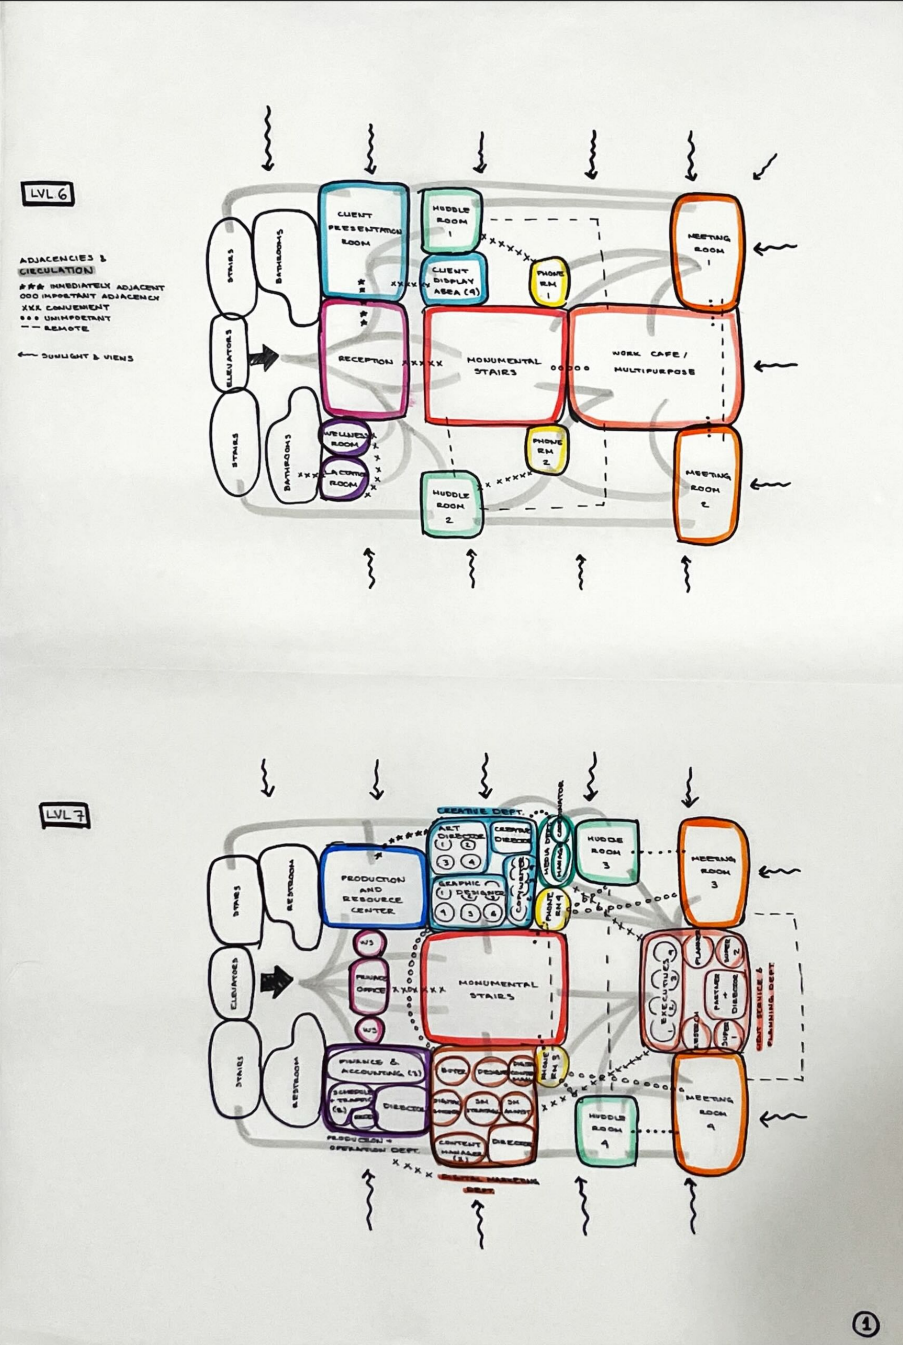
bubble diagram 1
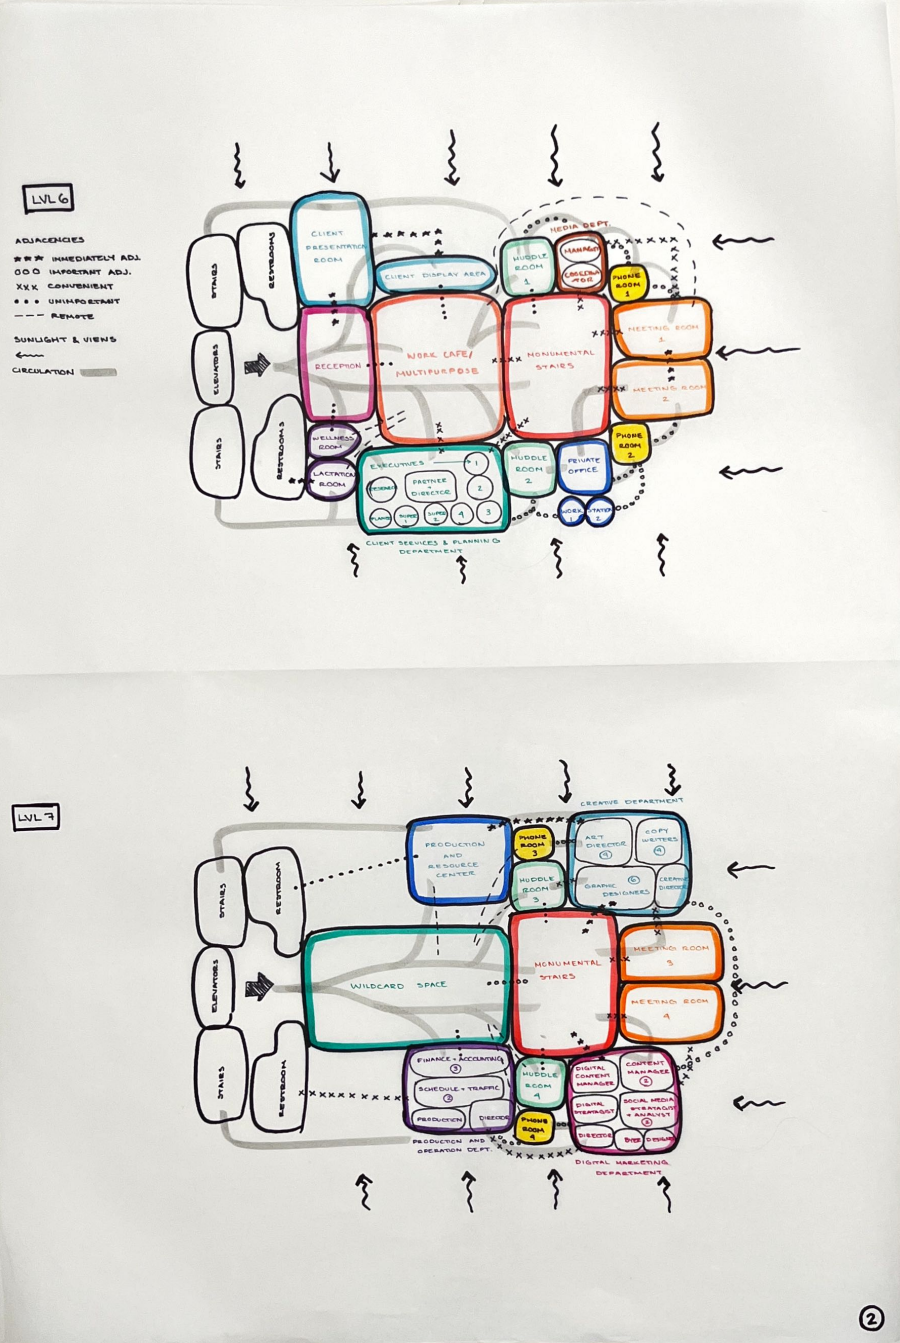
bubble diagram 2
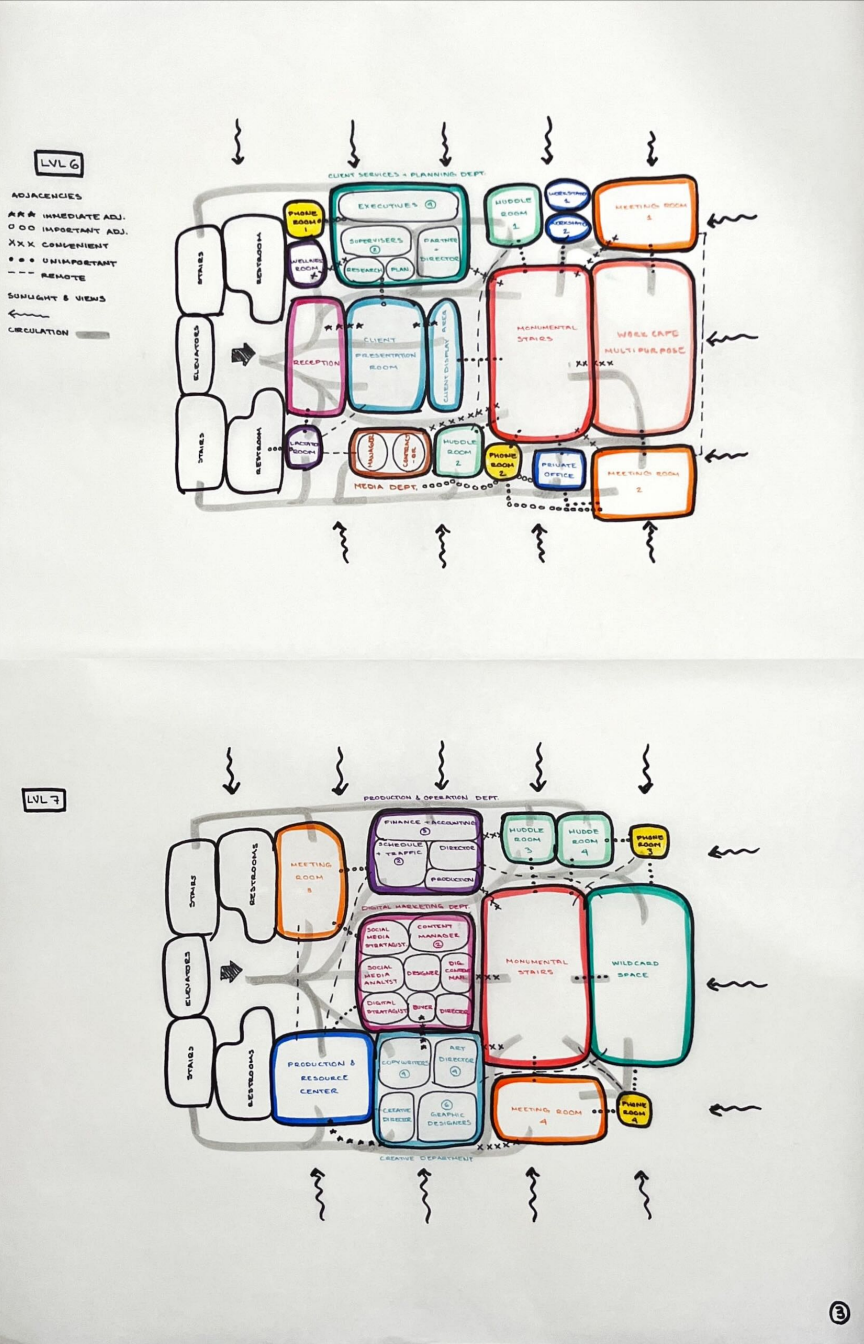
bubble diagram 3
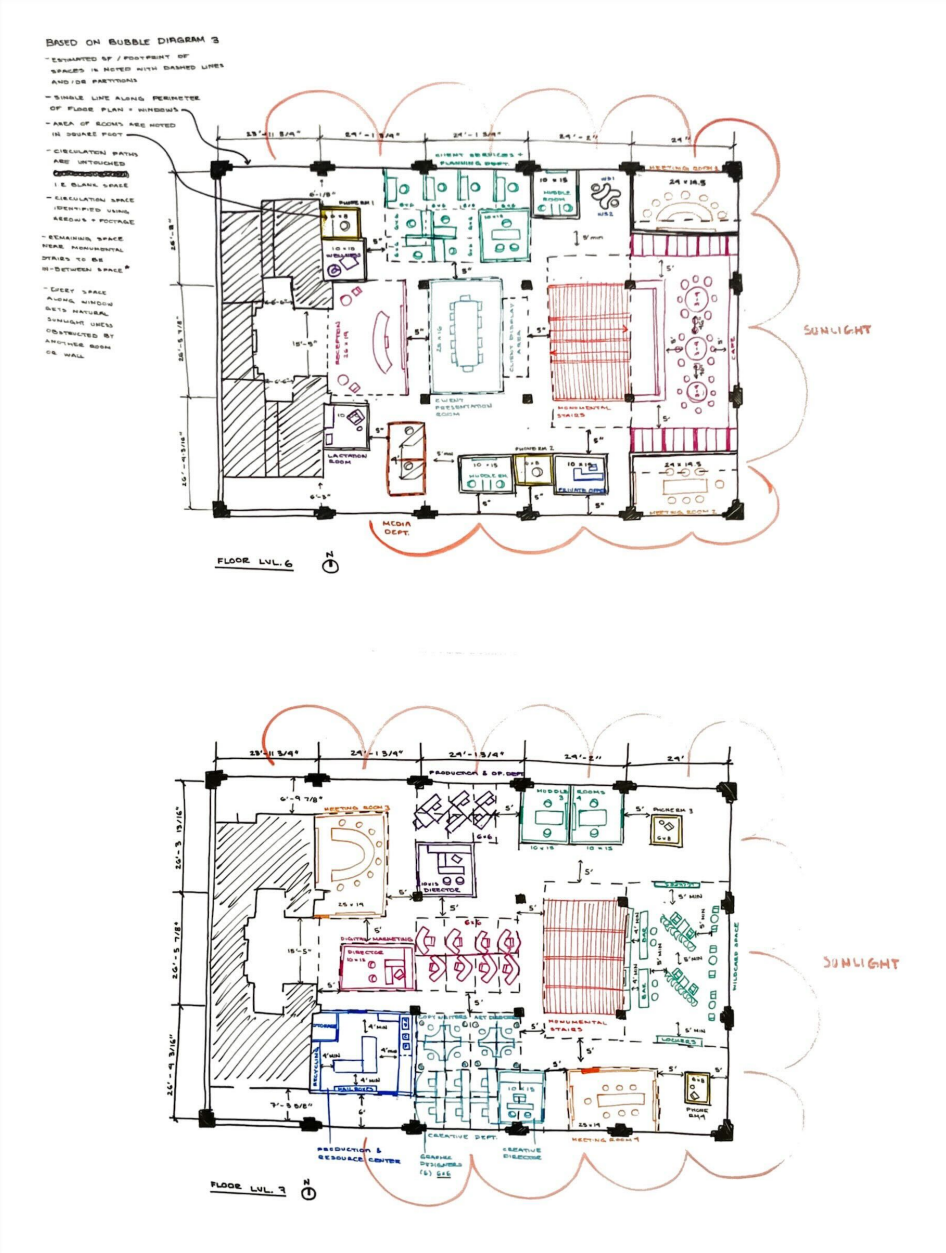
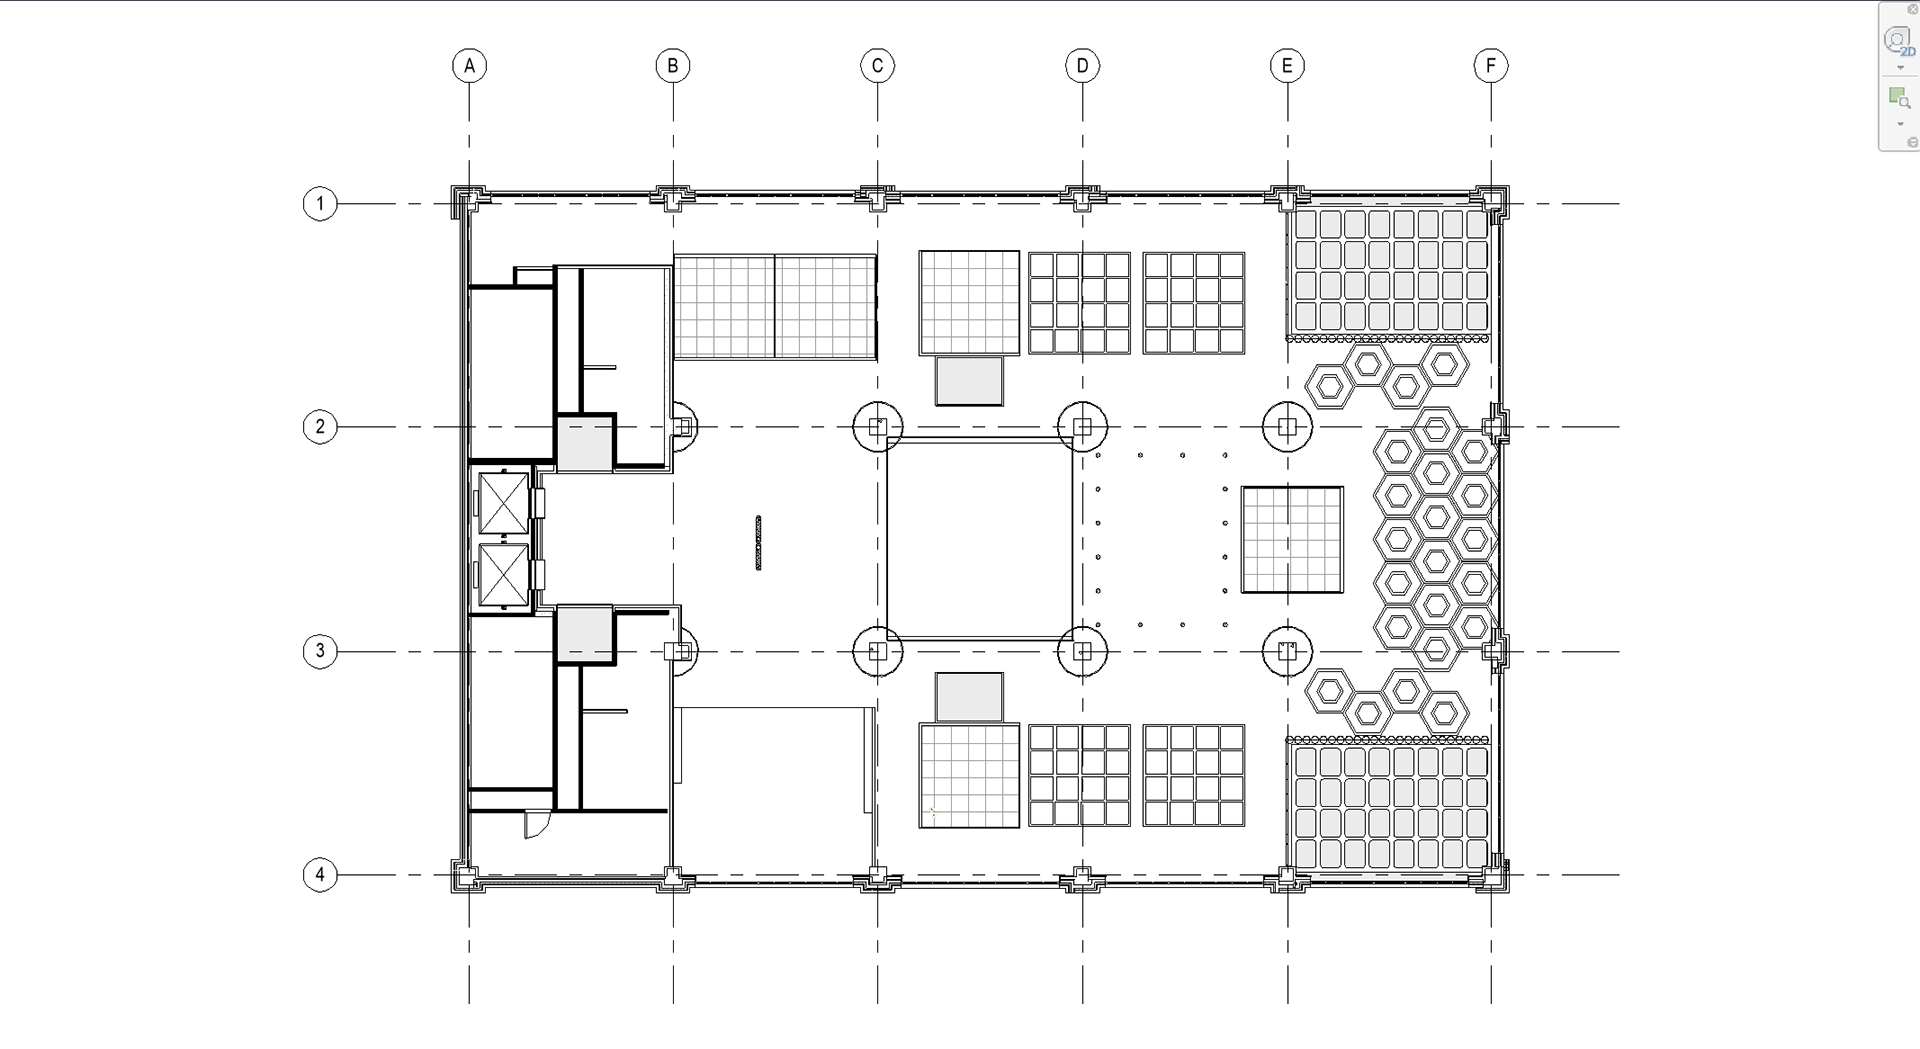
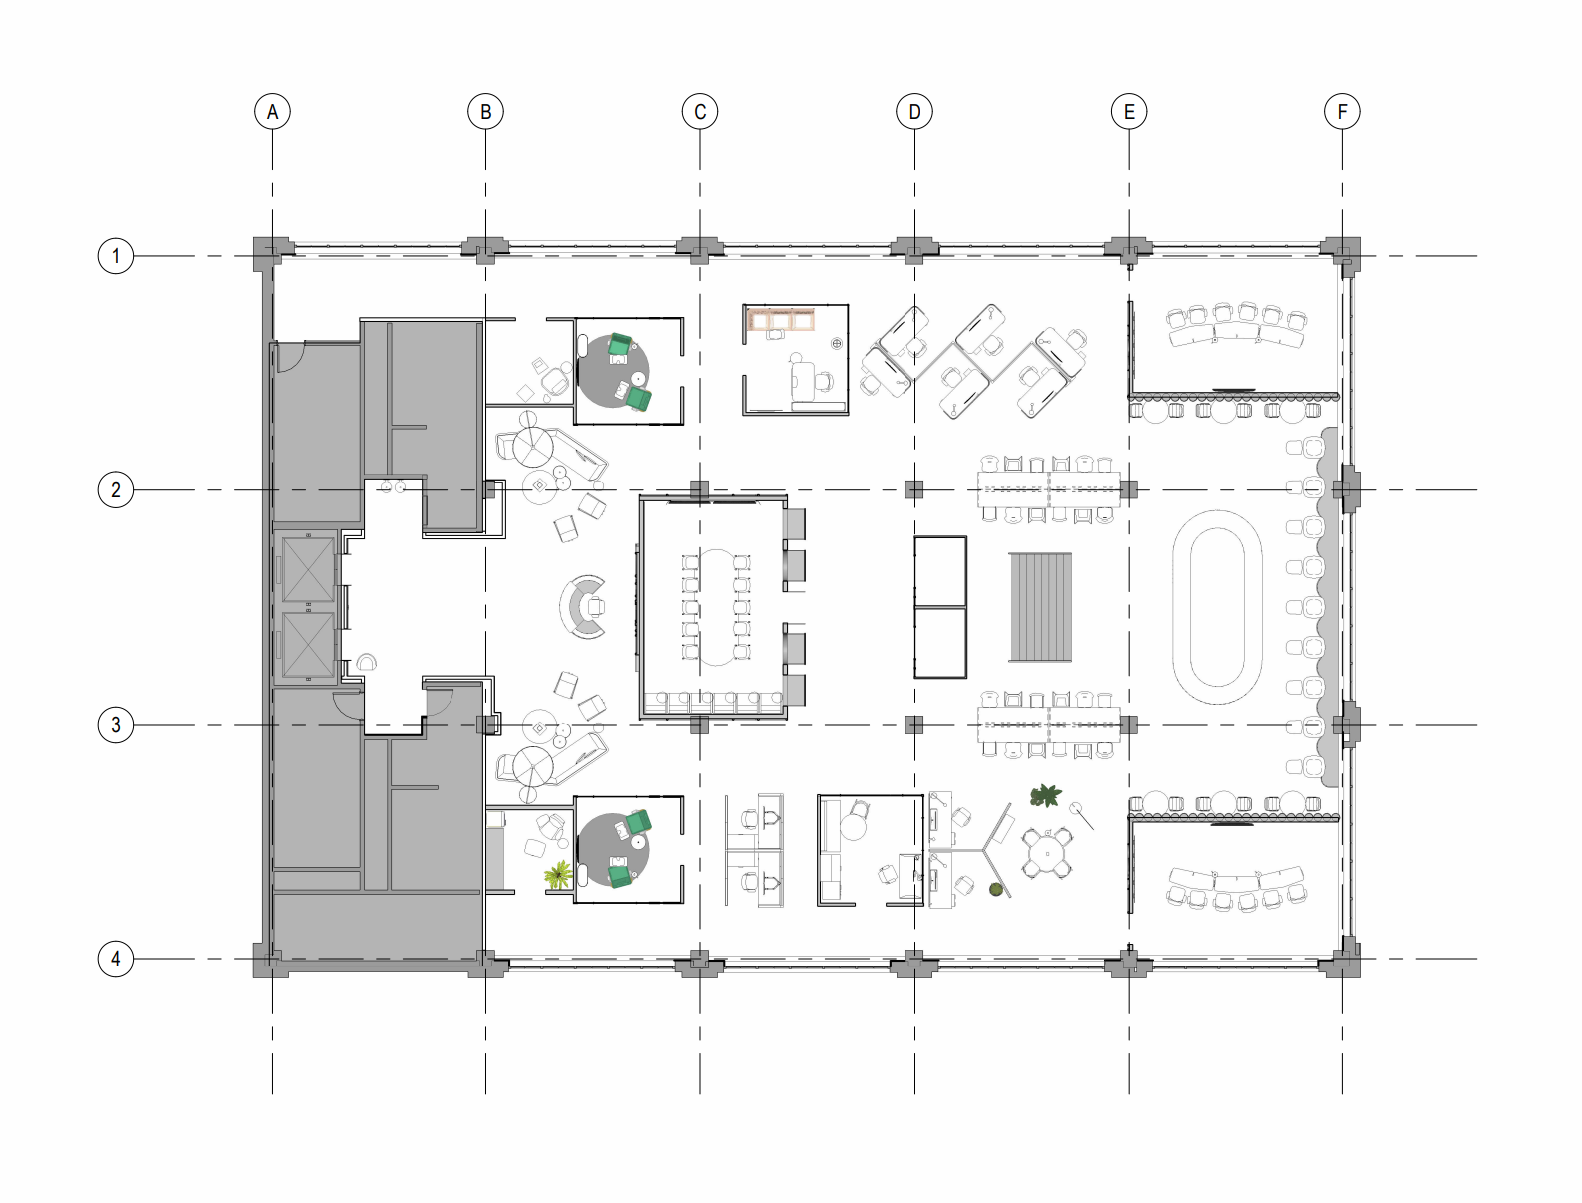
PHASE 2_WORKSESSION 07_Test Fits
As you can see from the images below, I developed a detailed layout addressing client goals, employee needs, department adjacencies, and spatial relationships, incorporating workstations, offices, and meeting spaces while optimizing views, natural light, and circulation. I labeled the function of each space and explained decisions based on lecture insights, including circulation, workflow, and well-being considerations. On the third test fit, I created a circulation diagram showing user movement and ensuring compliance with codes for exits, elevators, and flow. All three diagrams show how views and natural light enhance user experience, prioritizing open spaces over enclosed rooms near windows. Likewise, I used both hand sketches and digital tools to iterate, refine, and verify my design layout.
Test Fit 1
Test Fit 2
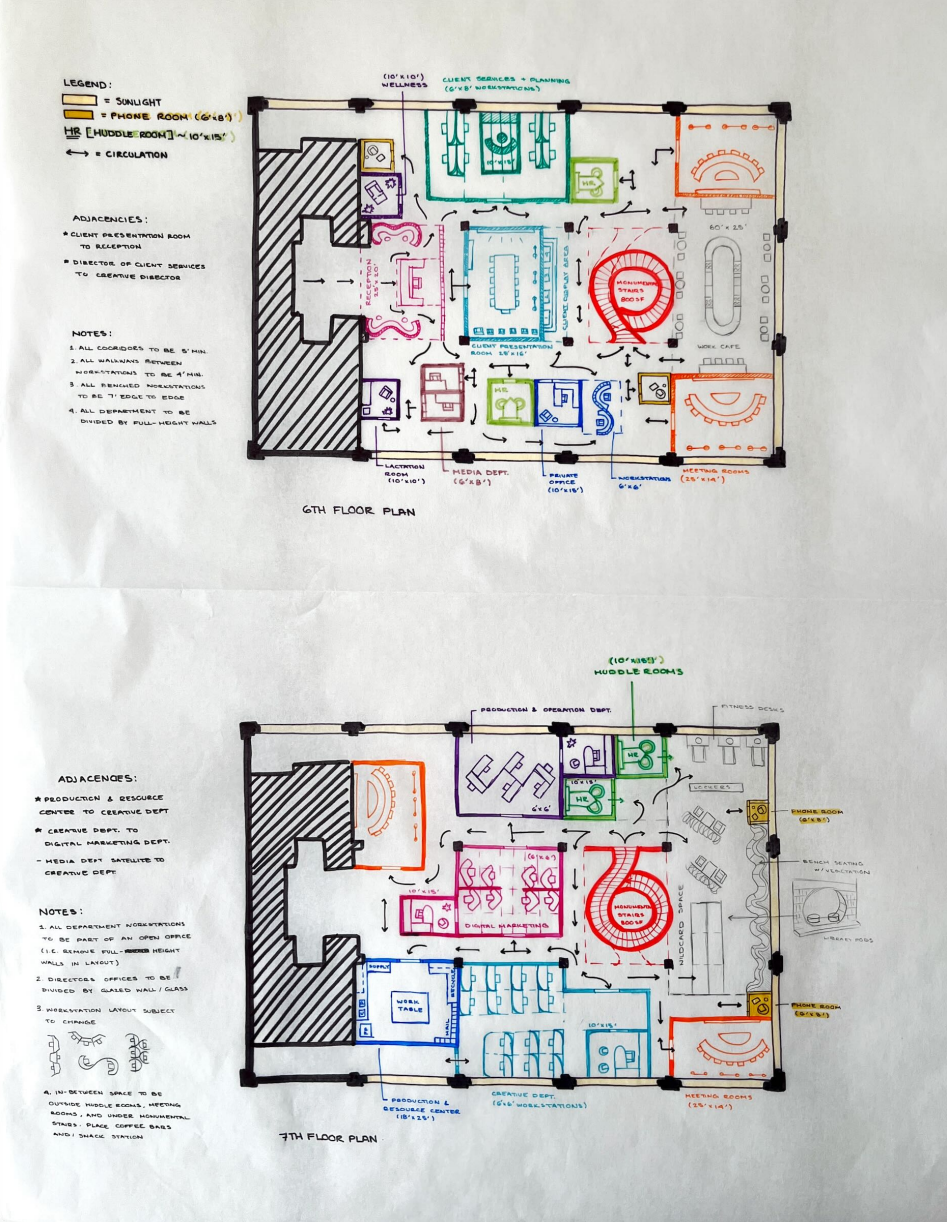
Test Fit 3
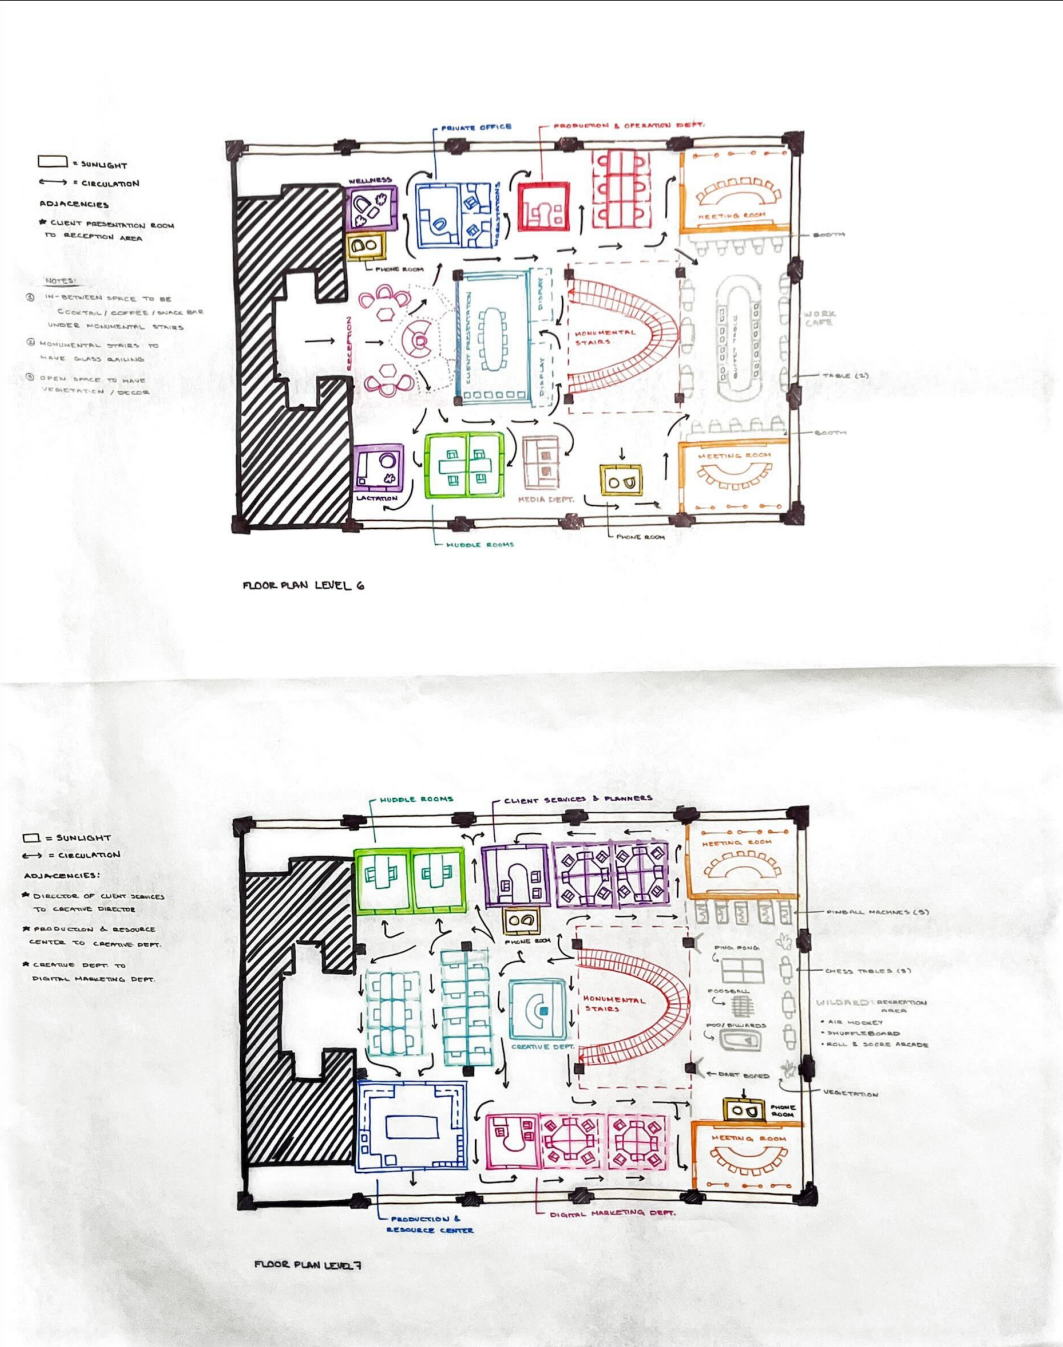
Test Fit 4
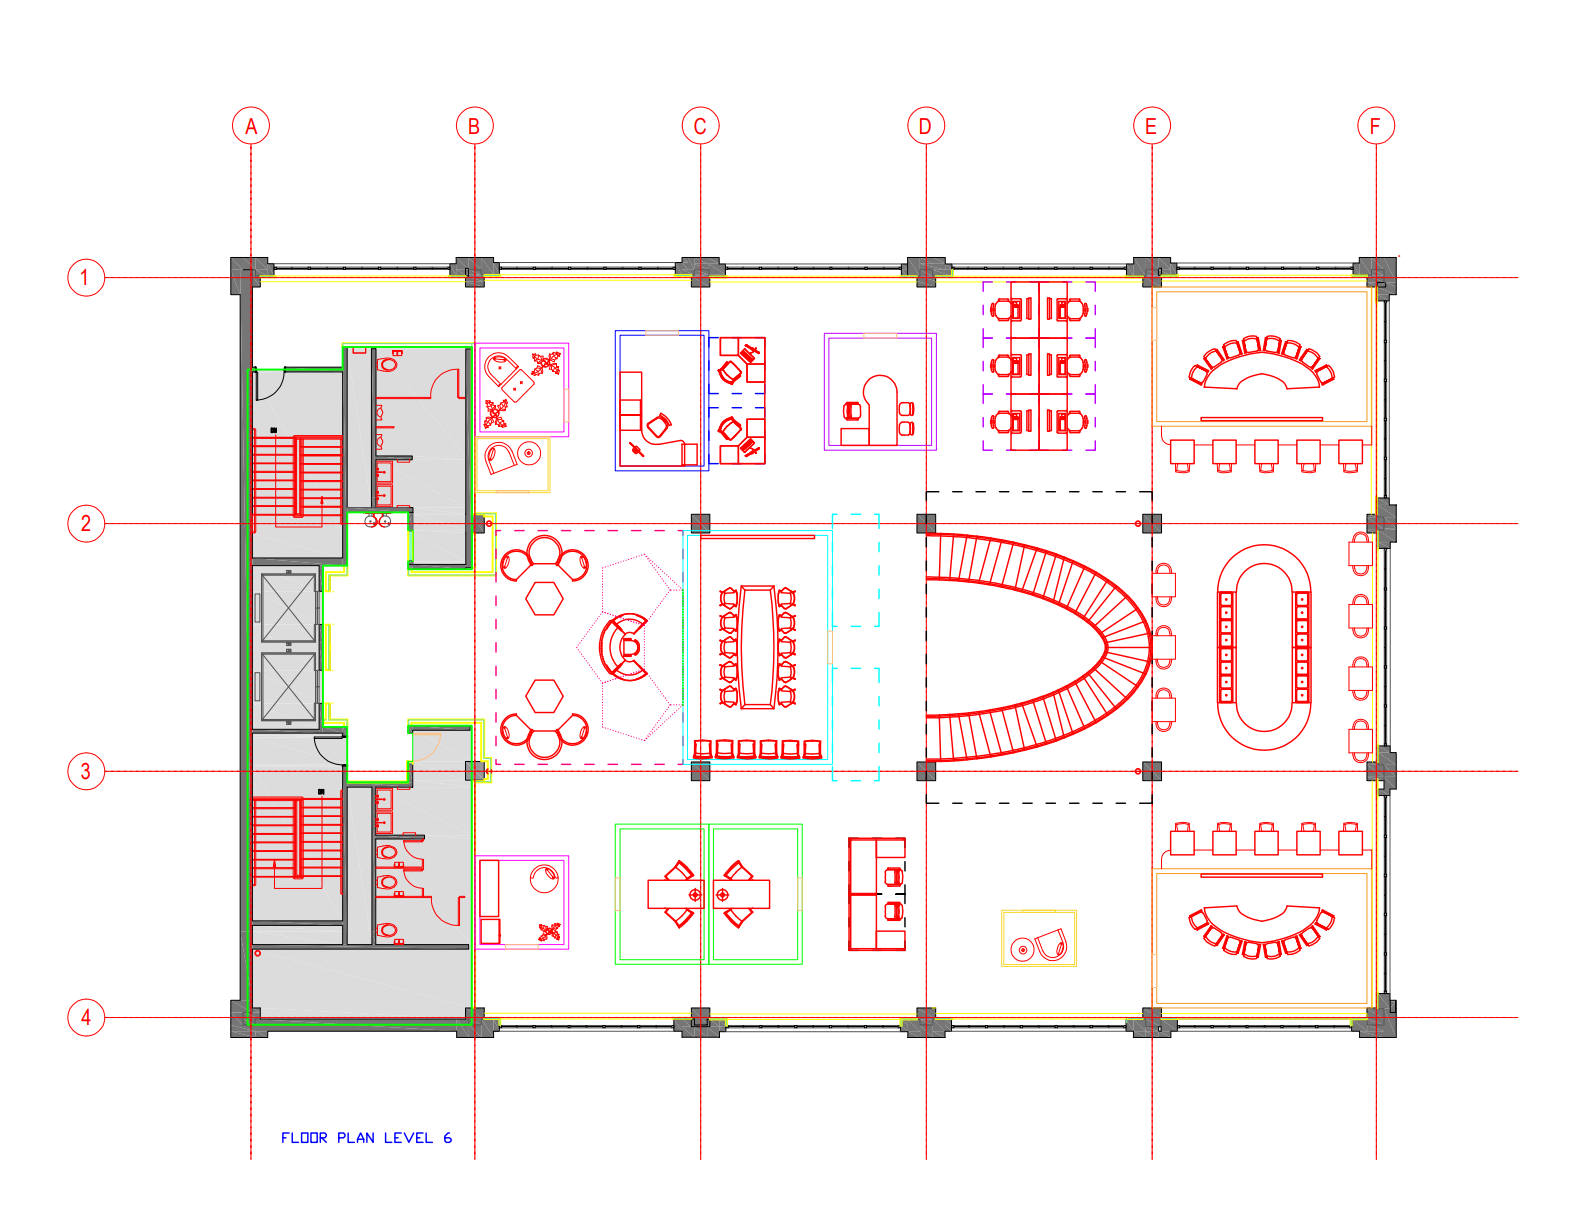
Test Fit 4 - Level 6 (AutoCAD)
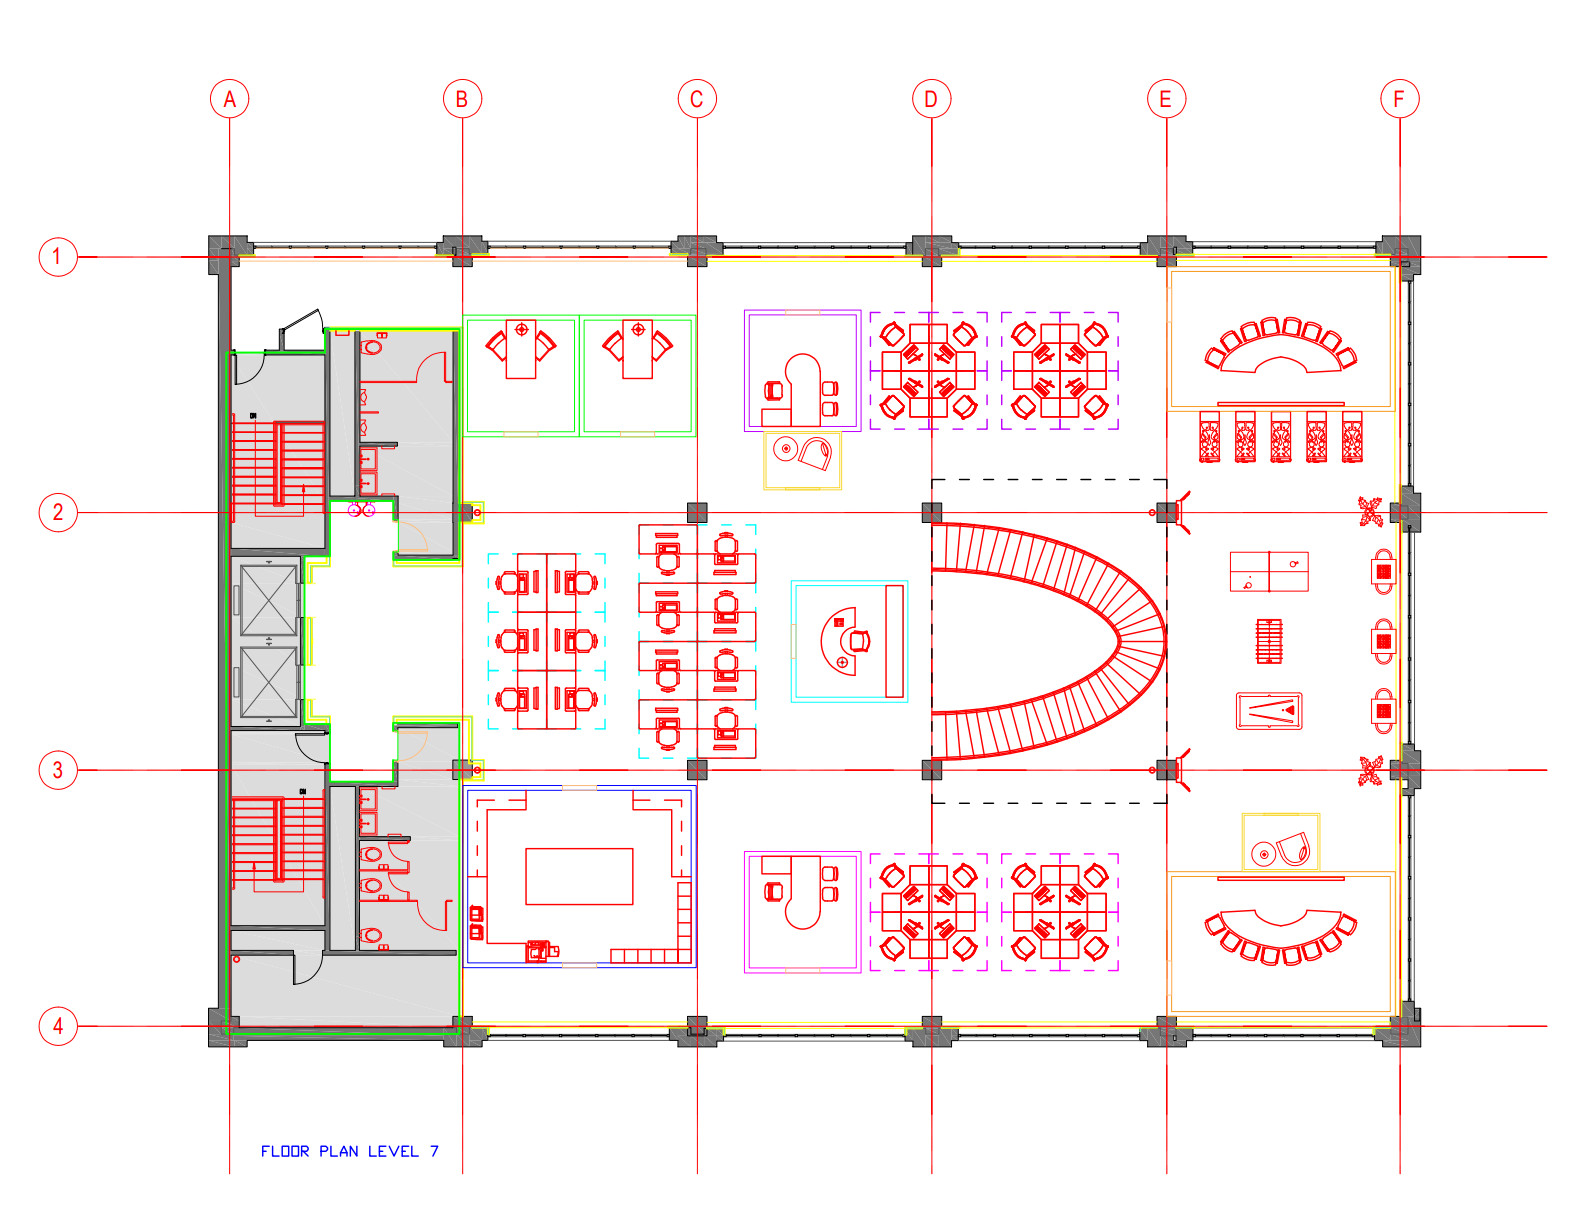
Test Fit 4 - Level 7 (AutoCAD)
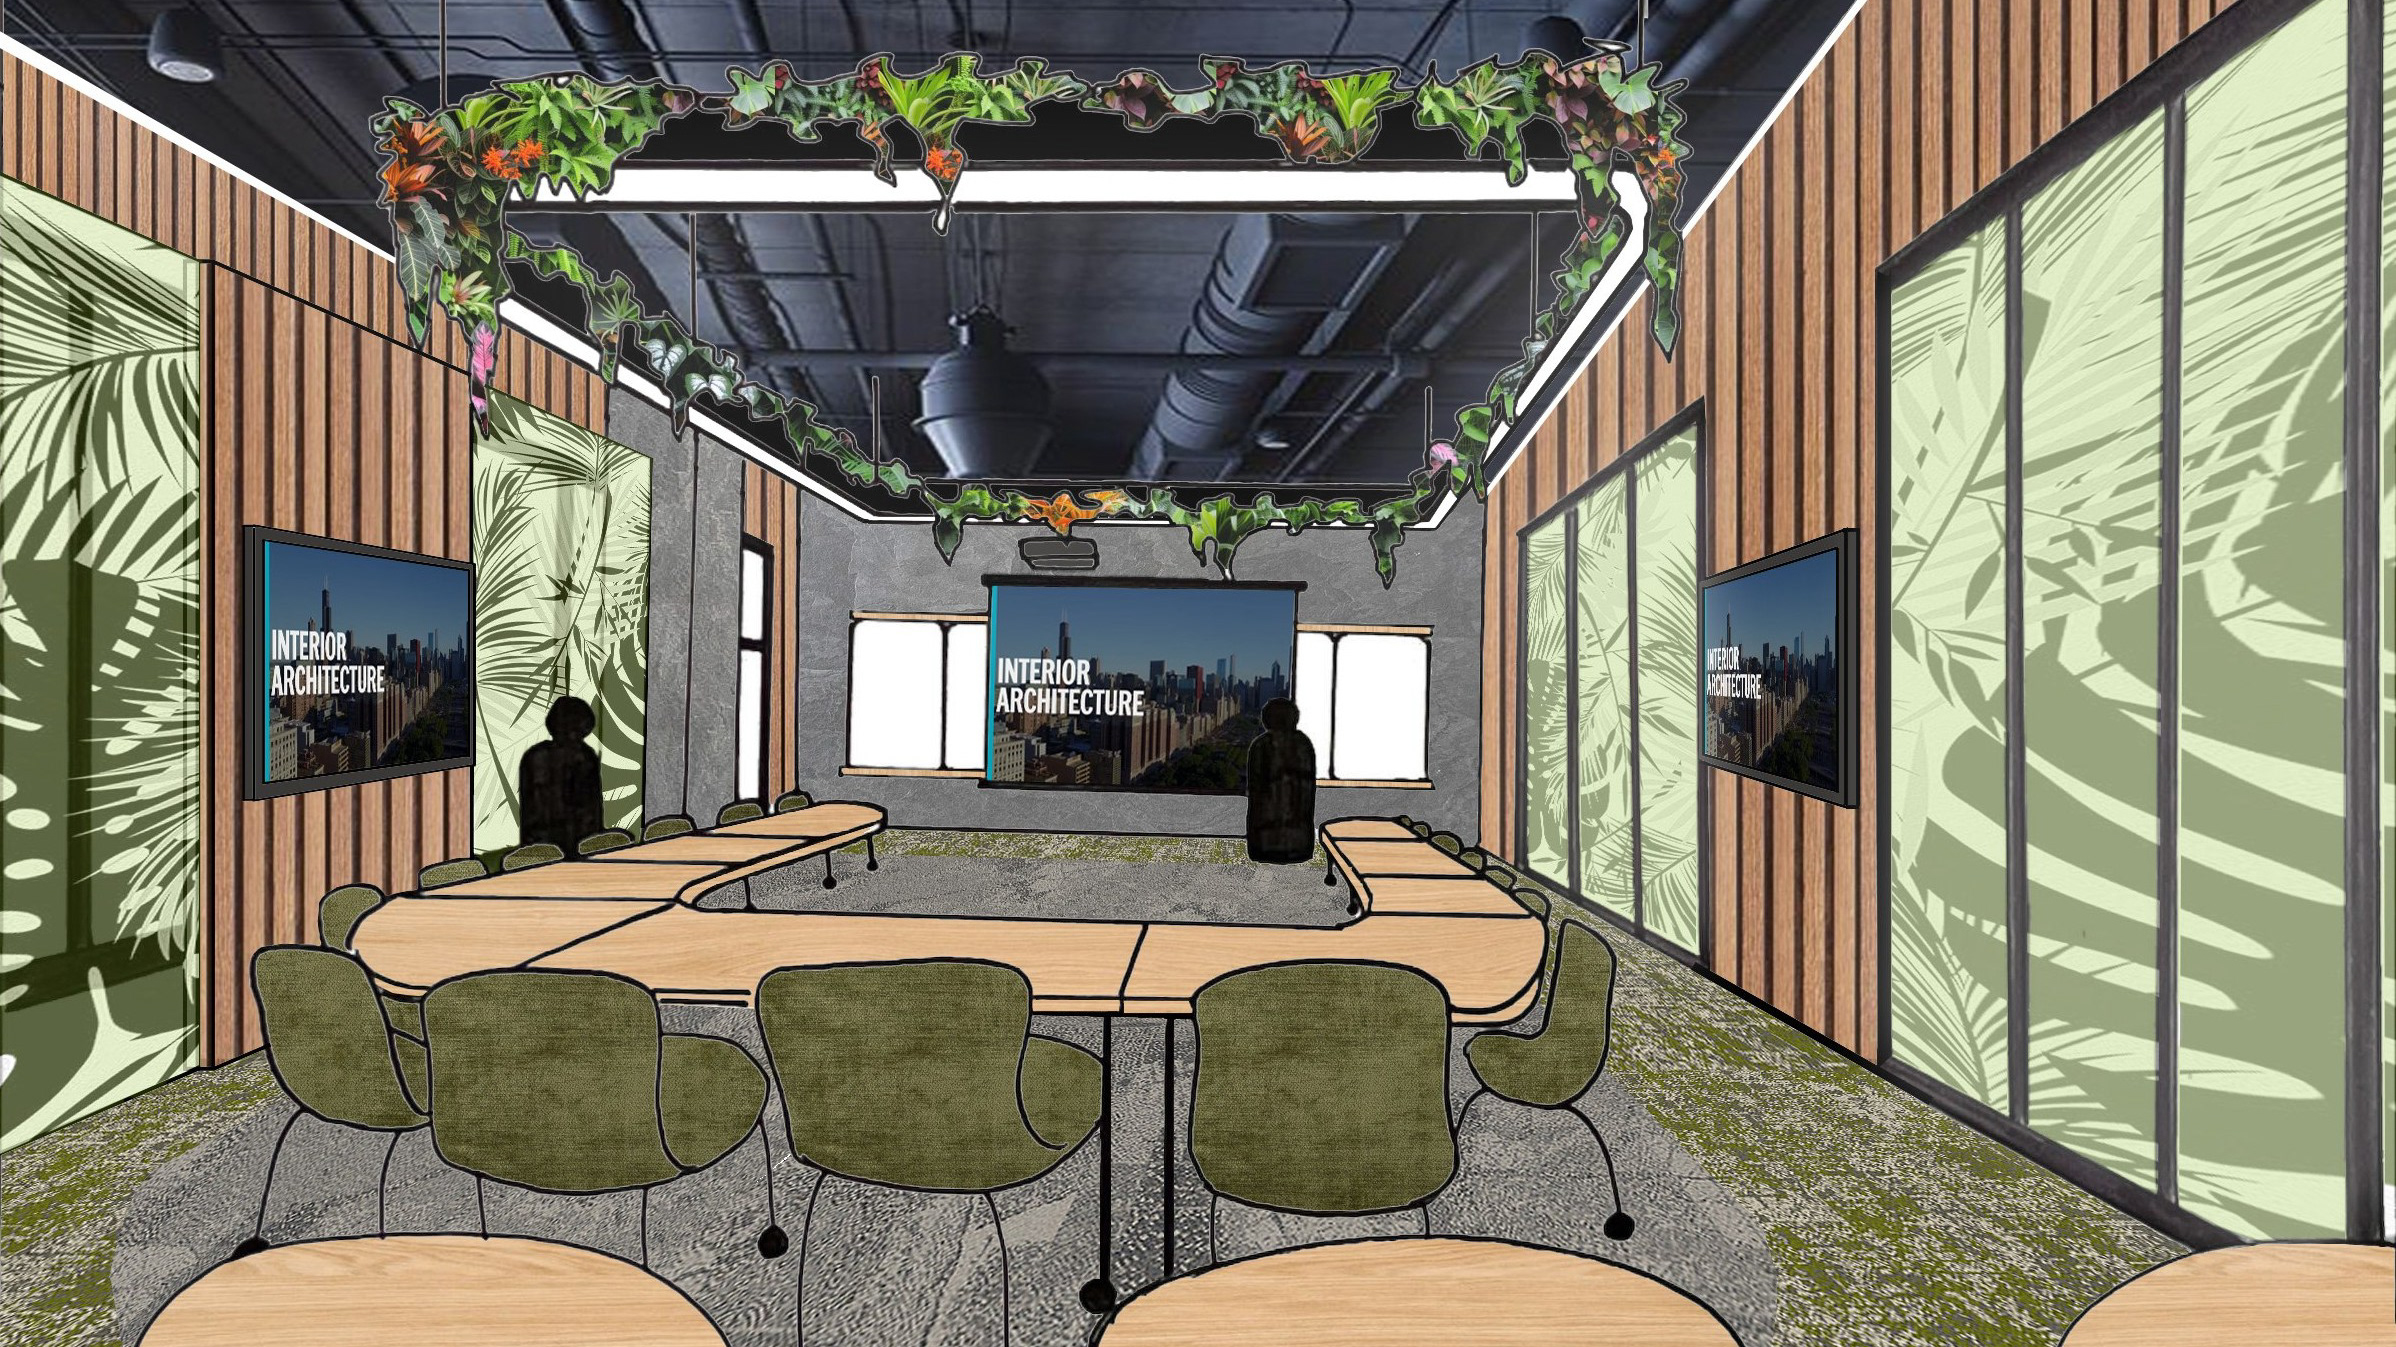
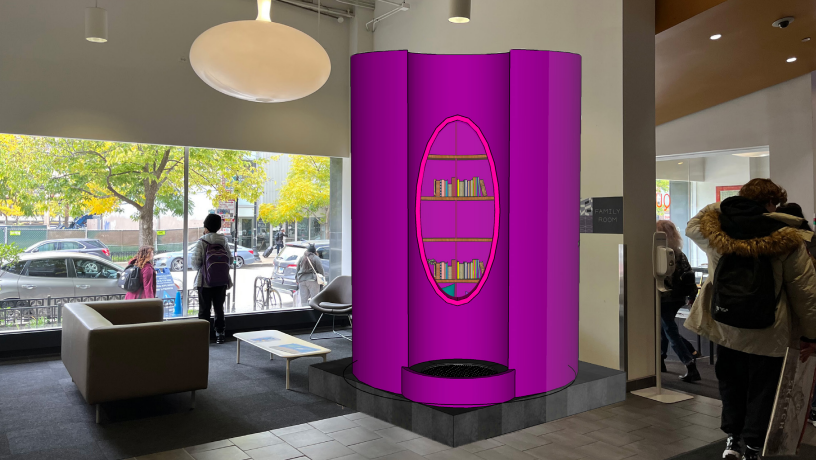
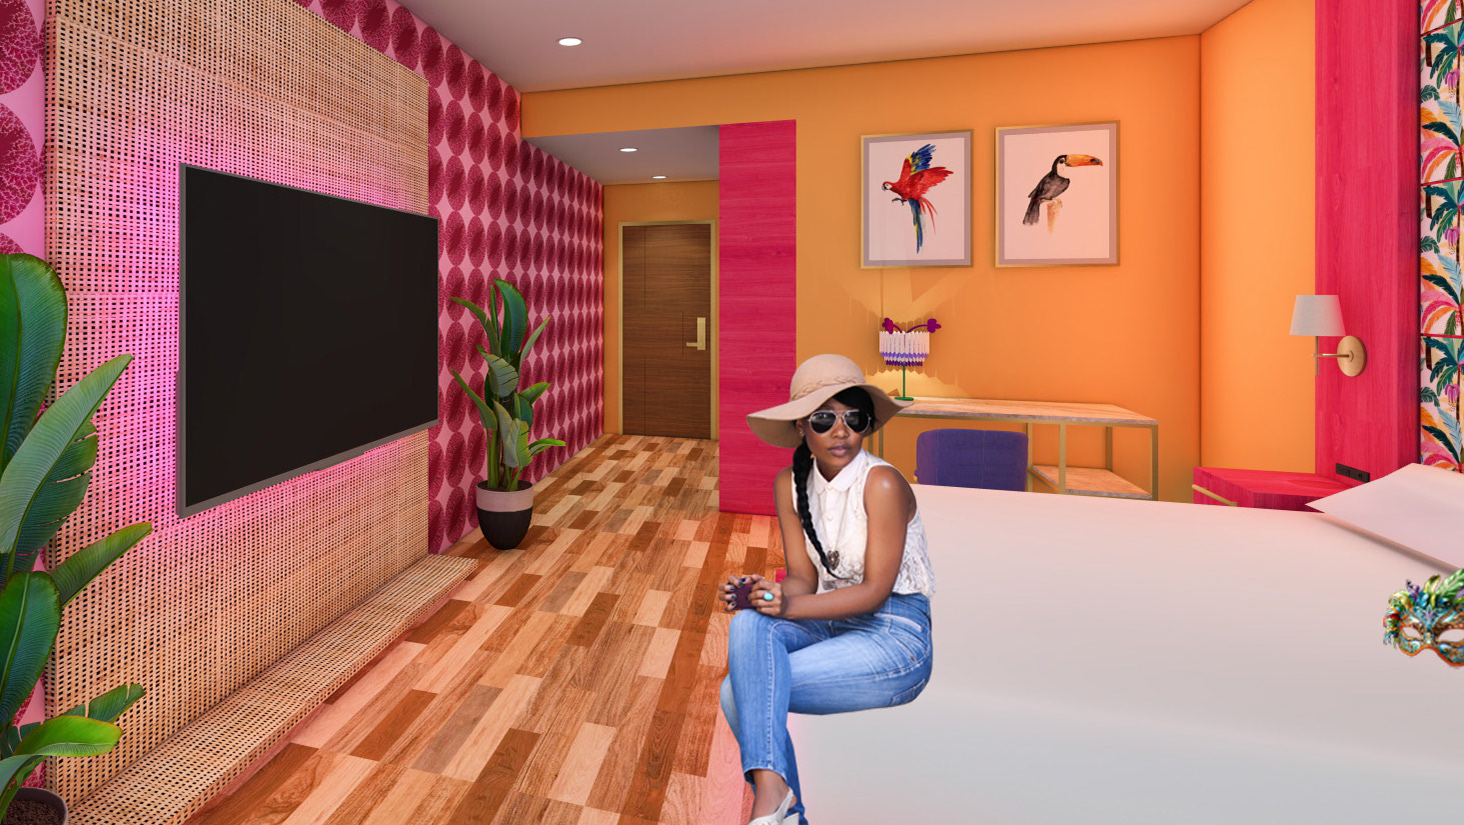
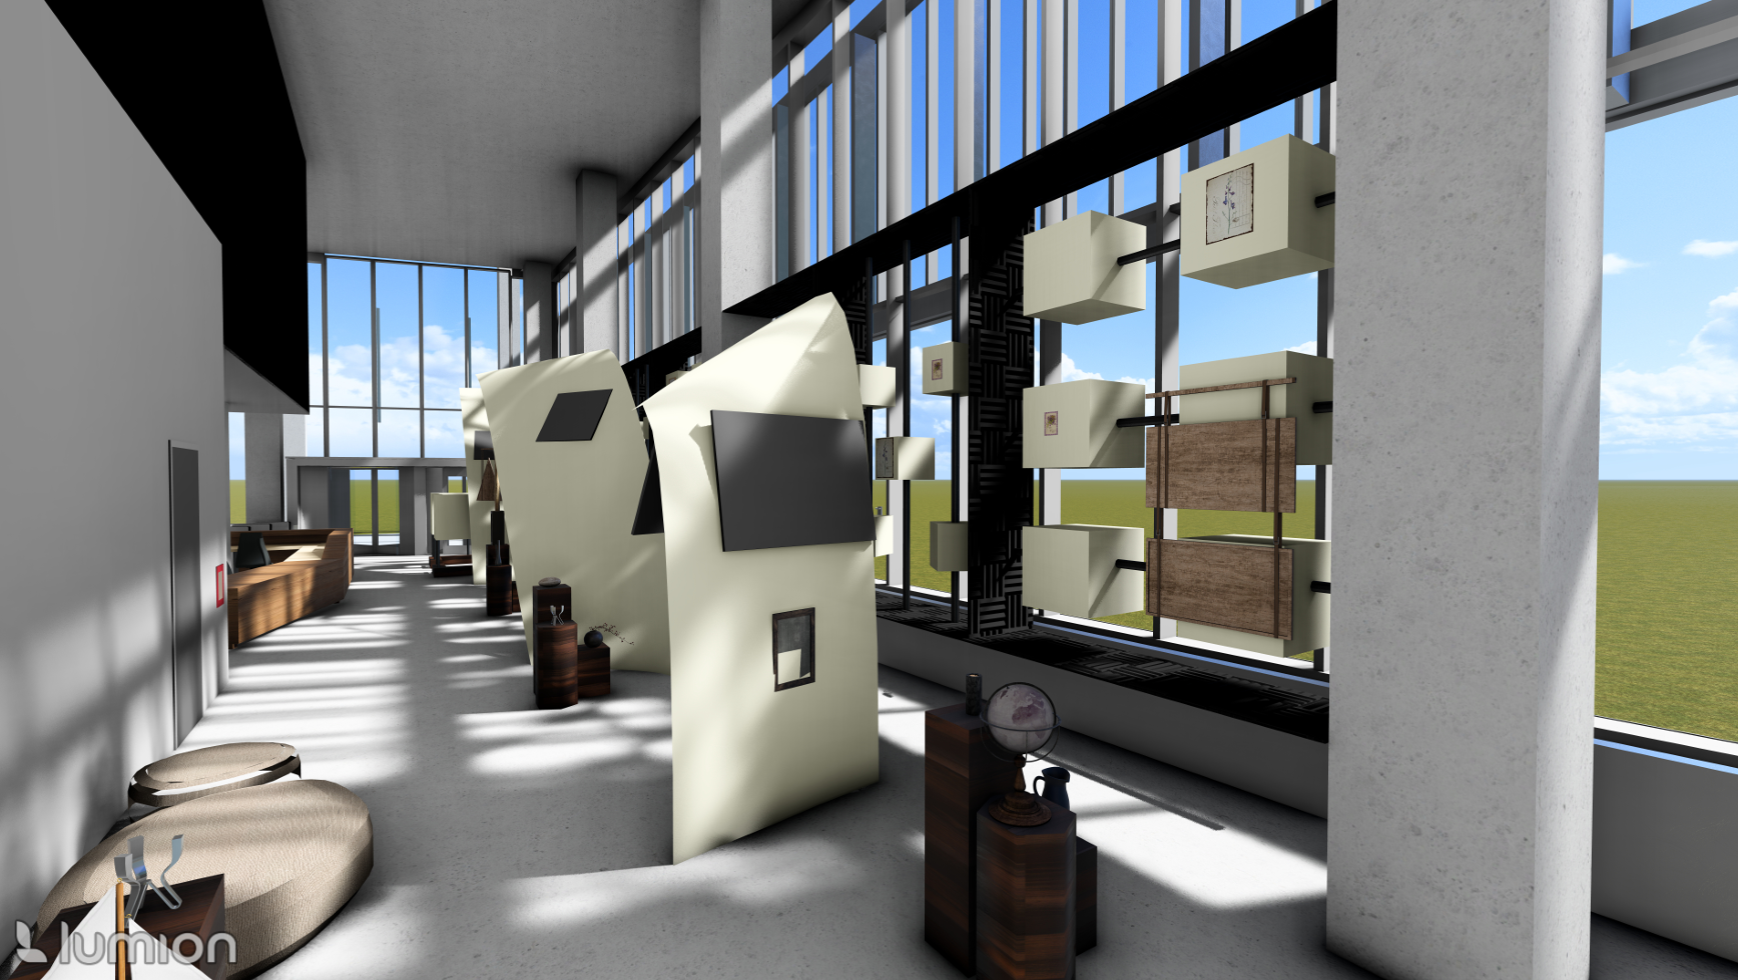
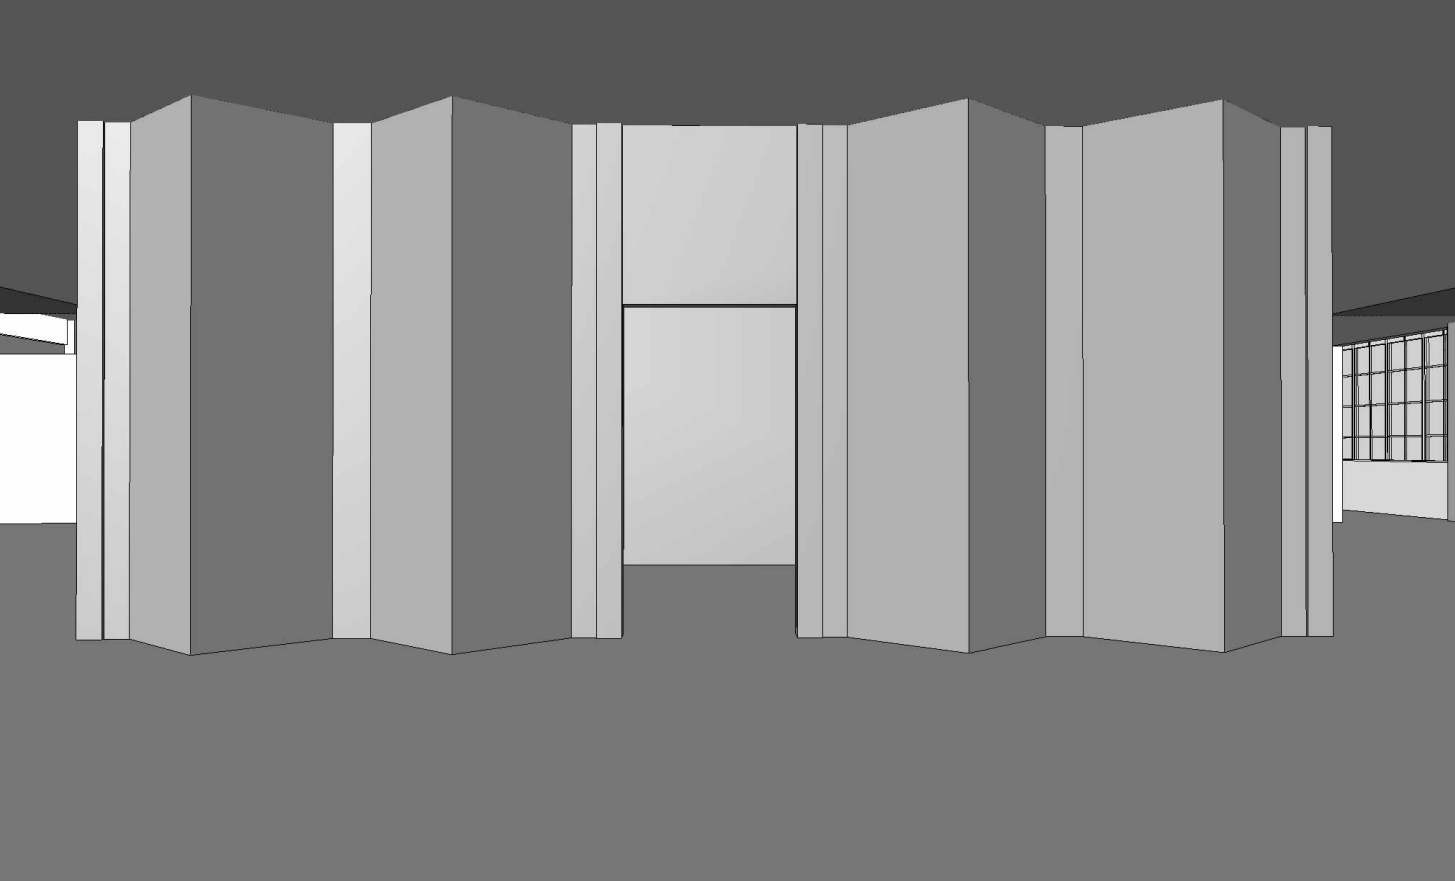
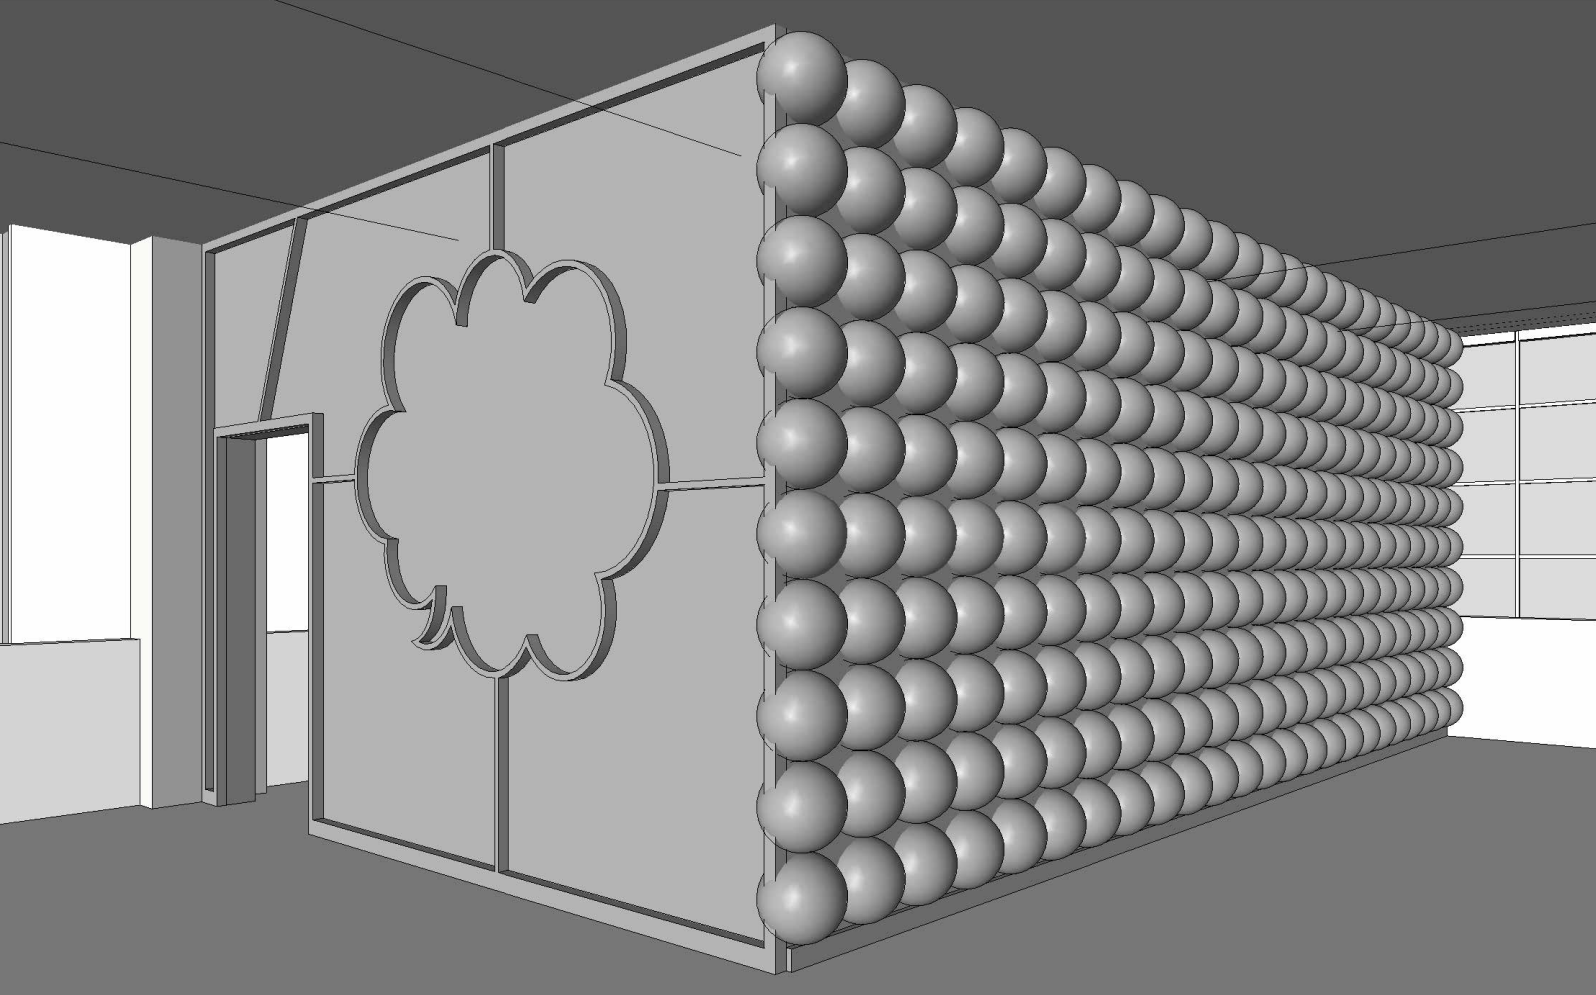
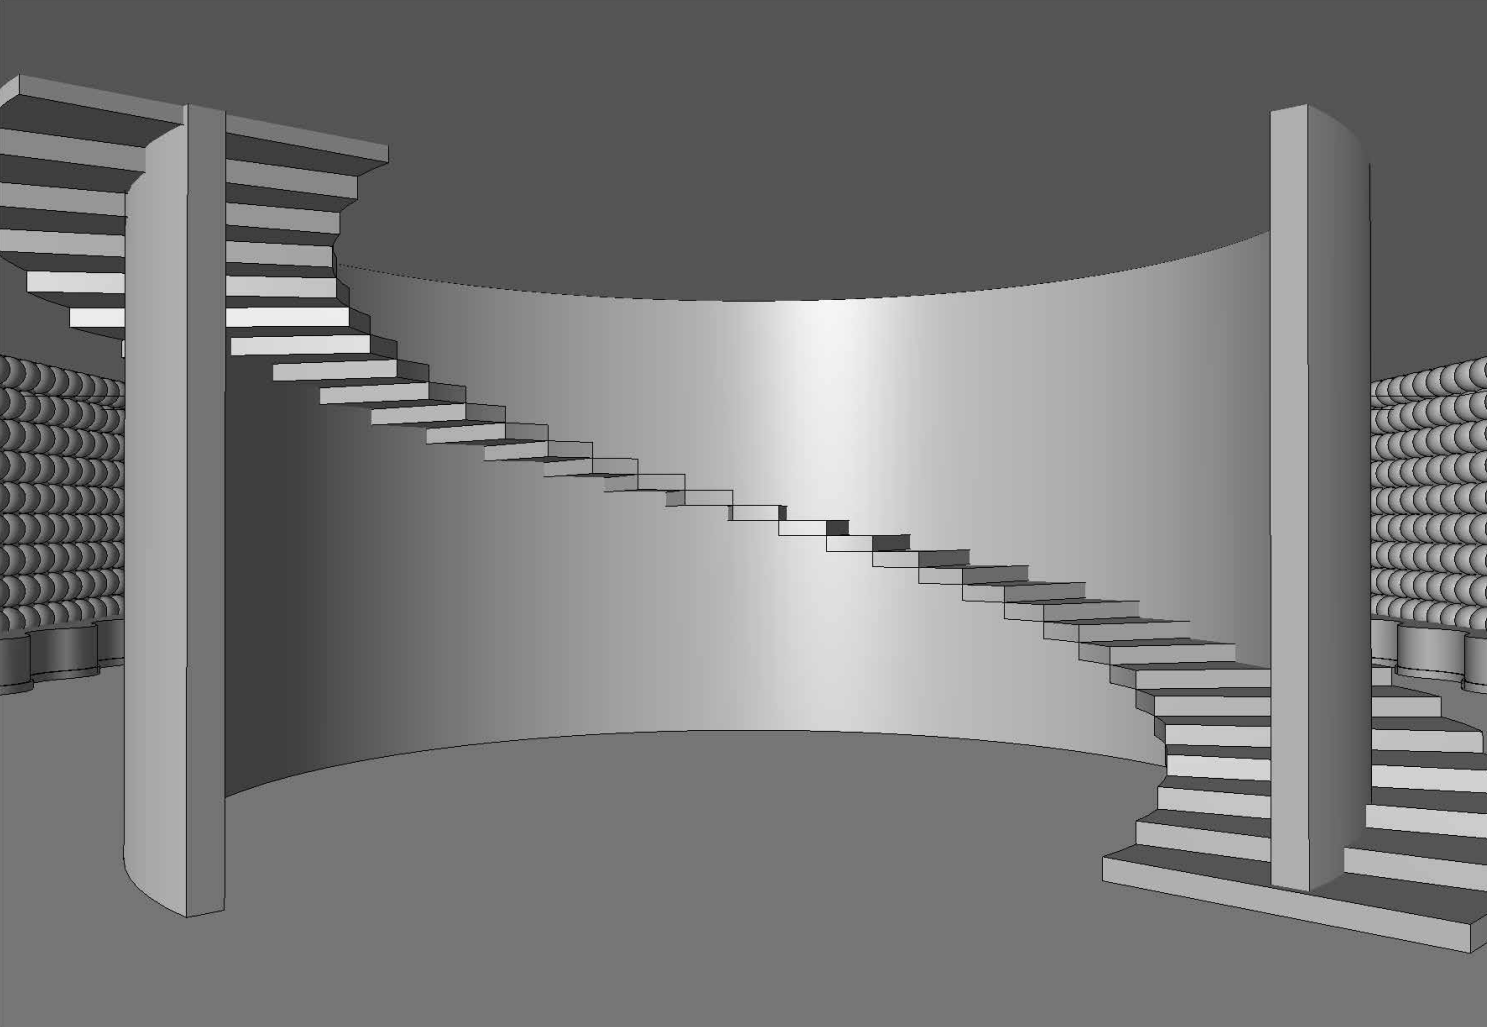
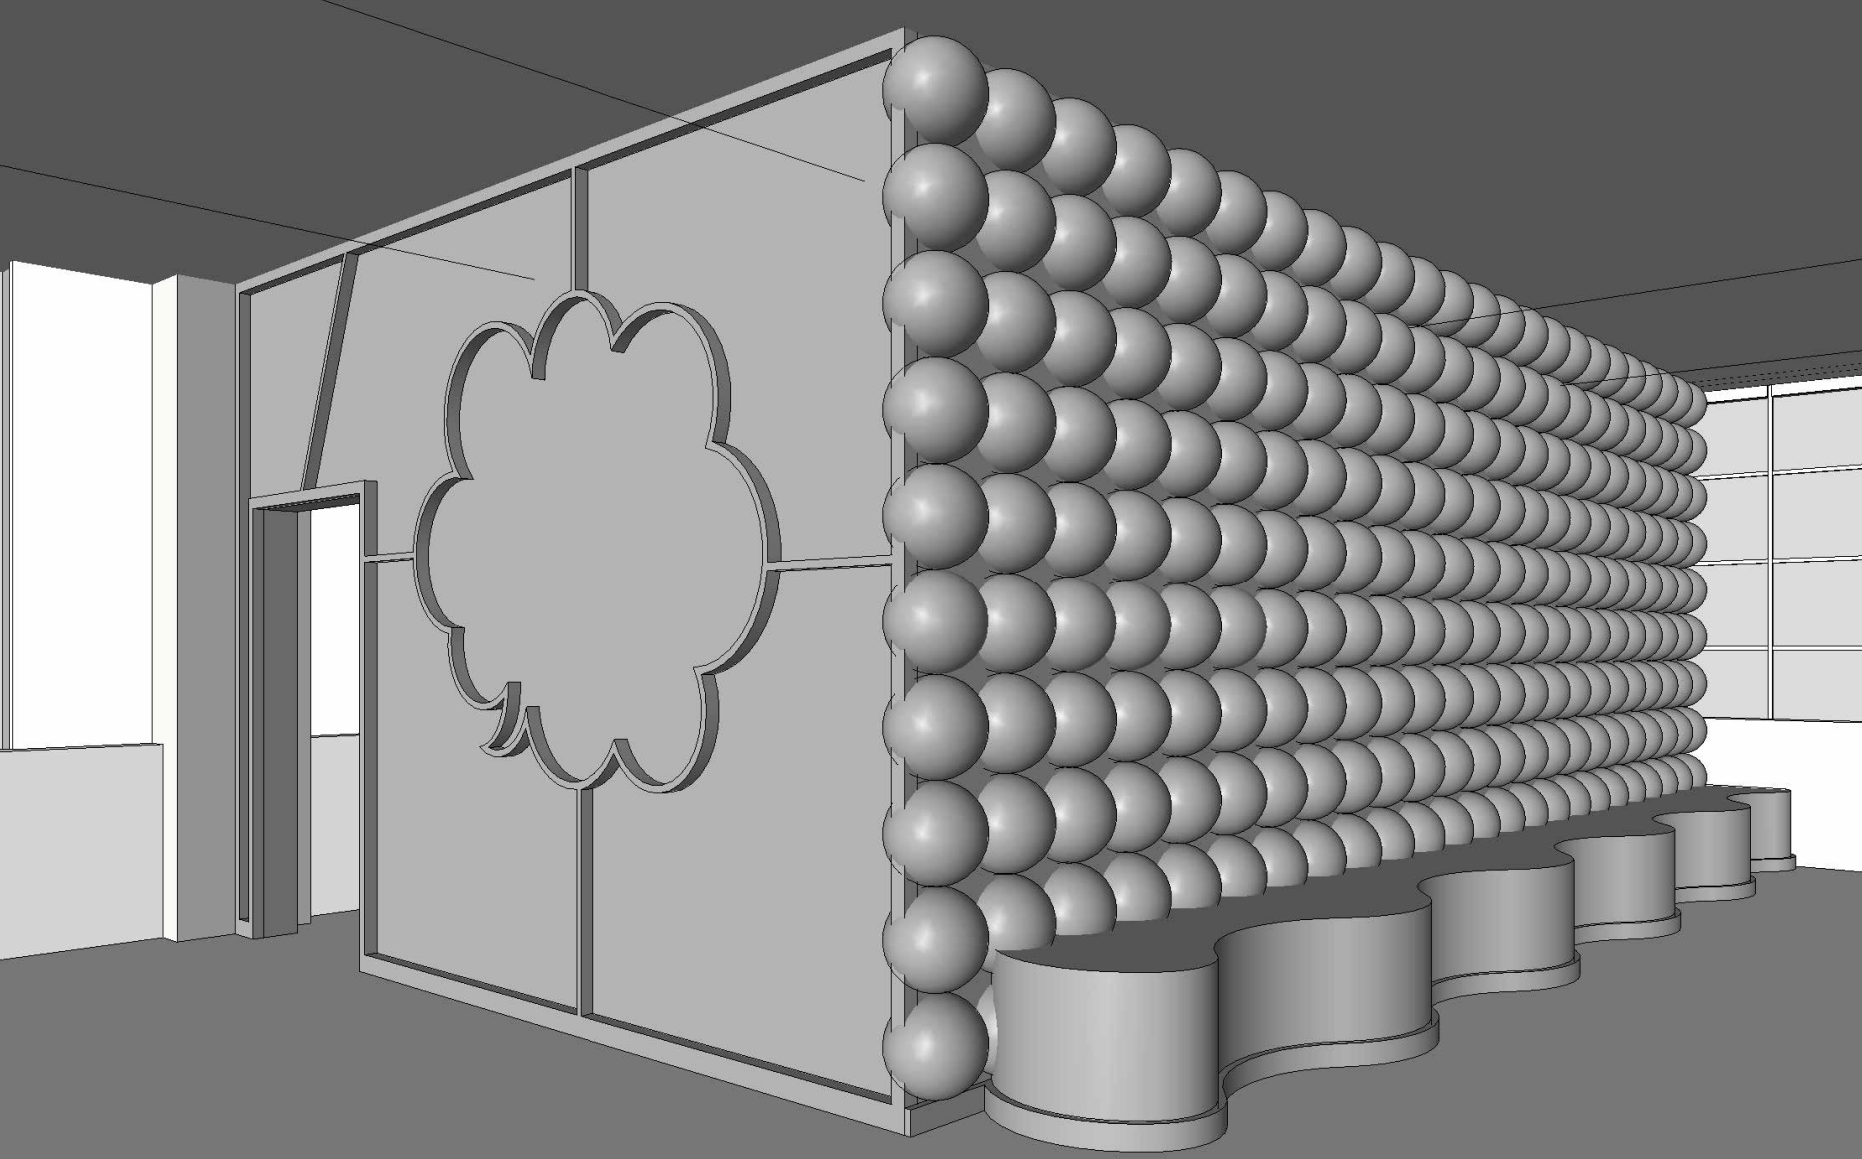
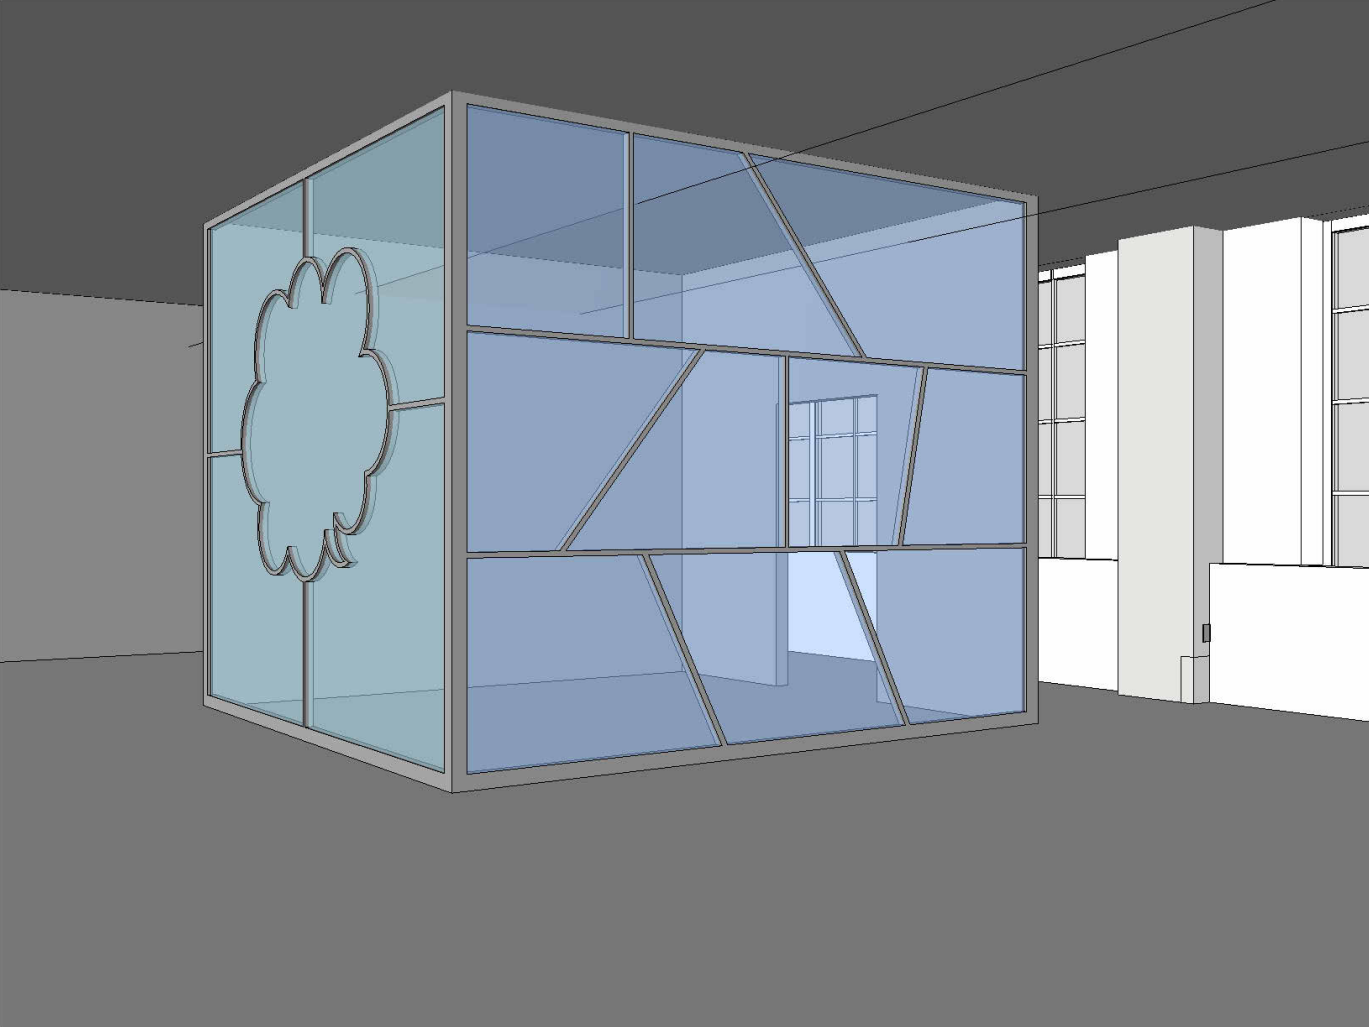
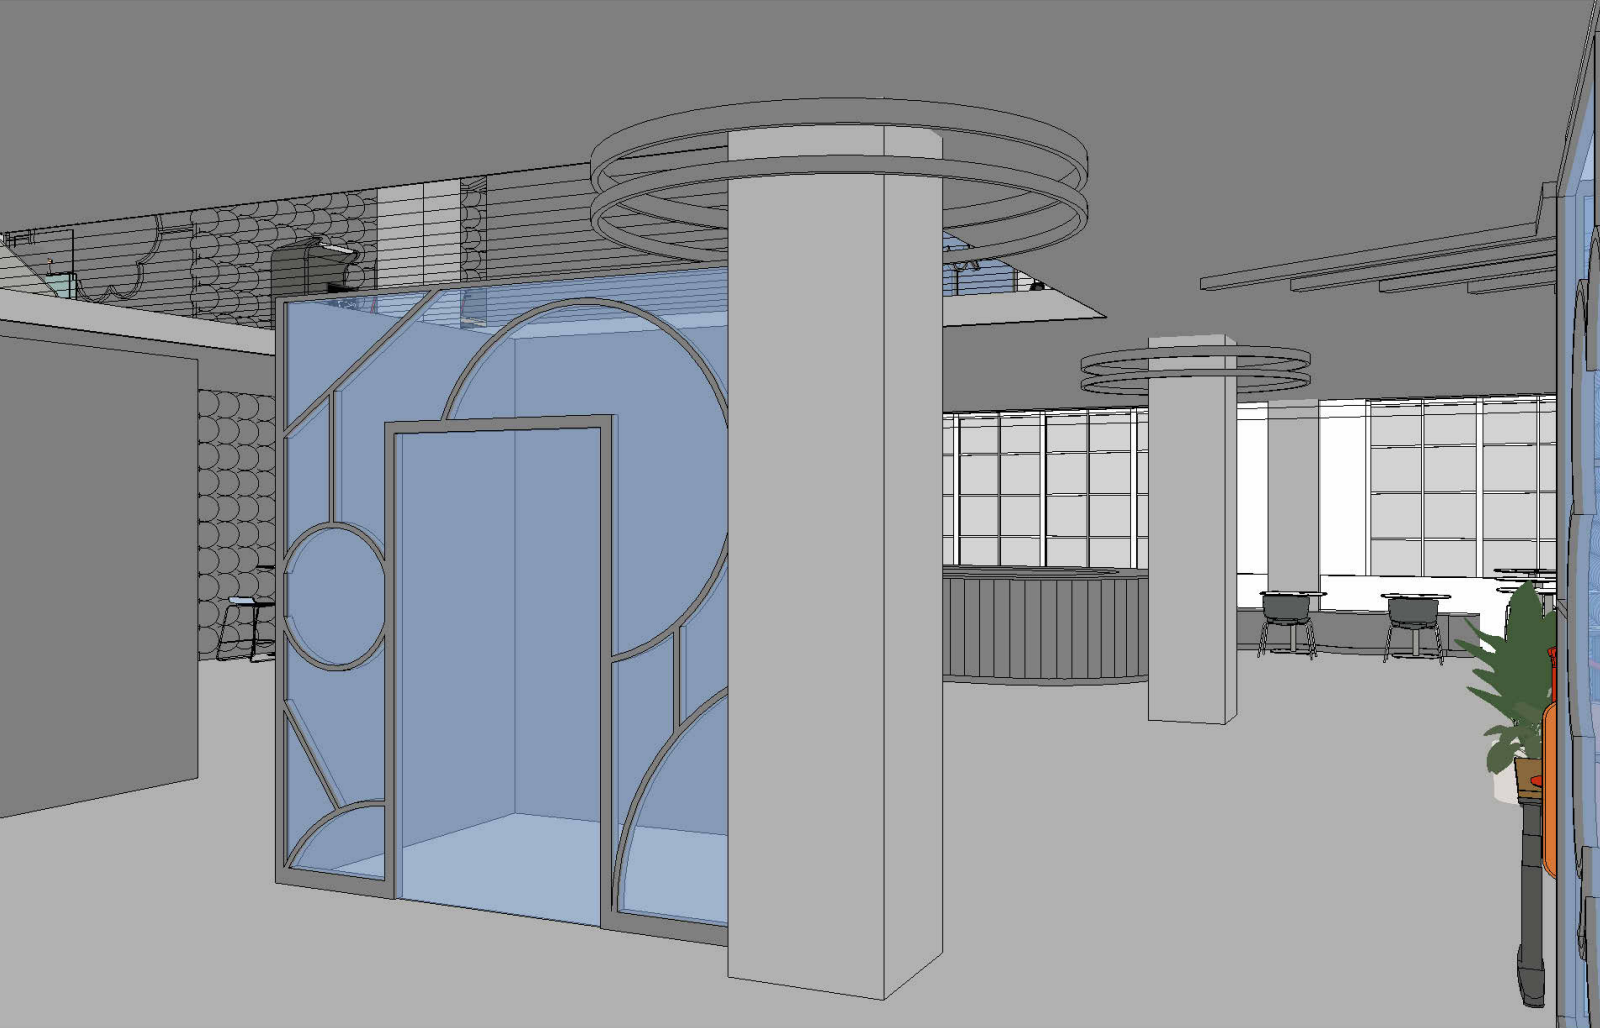
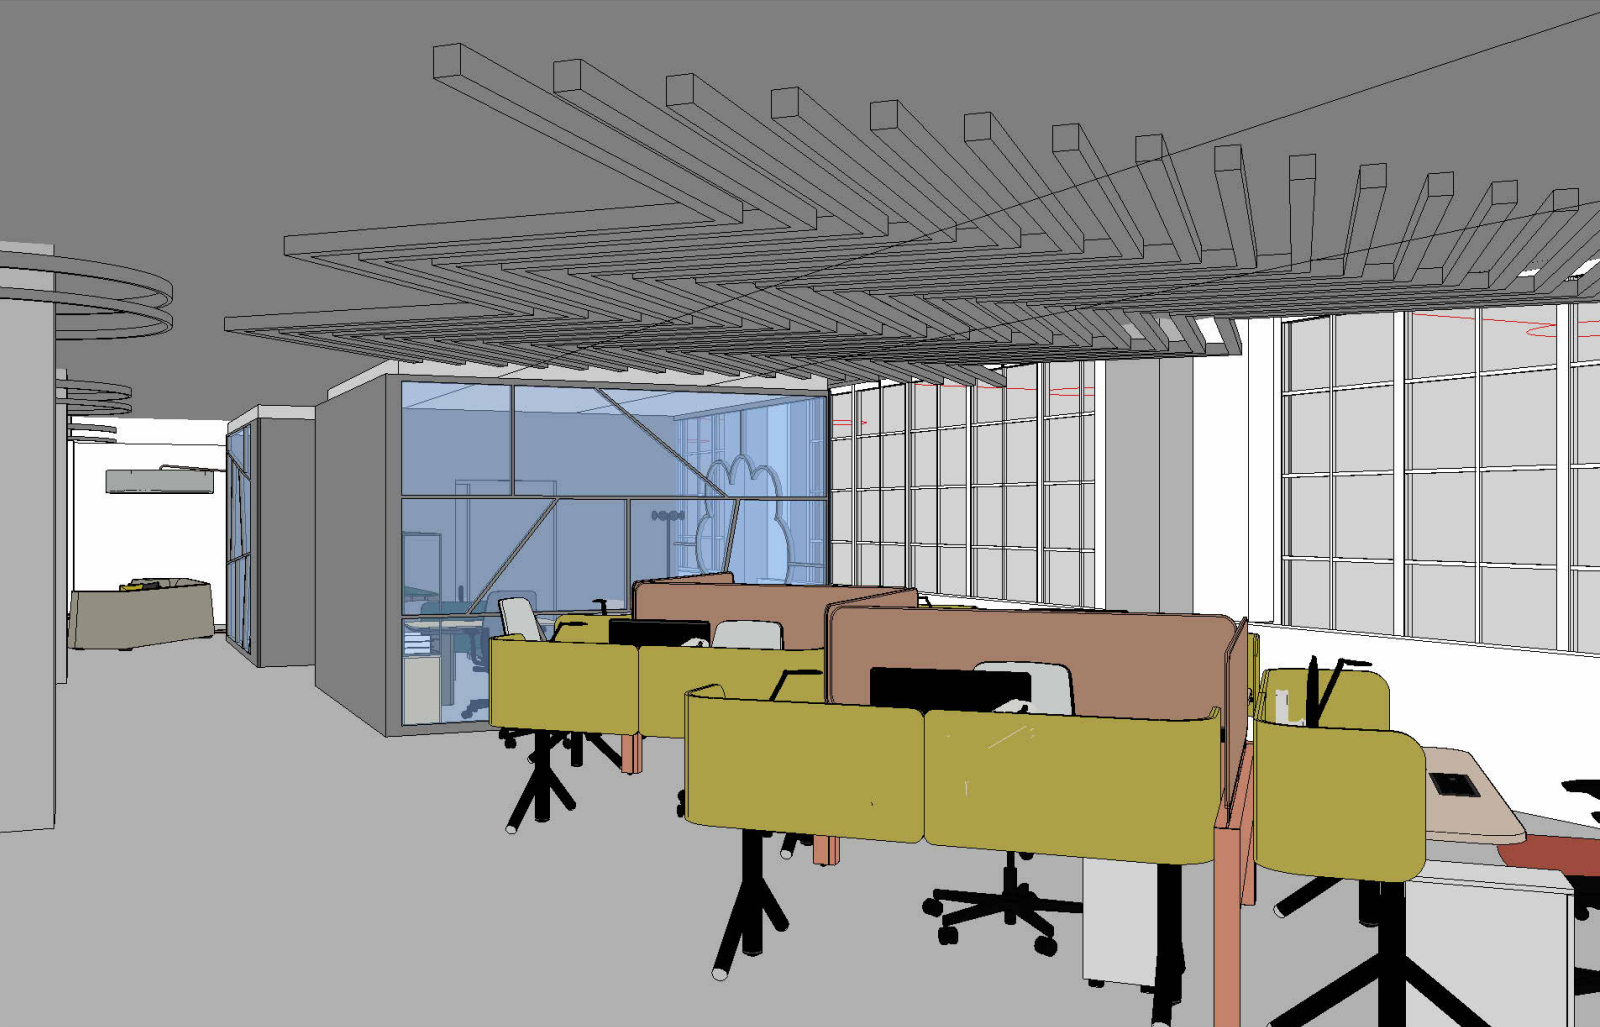
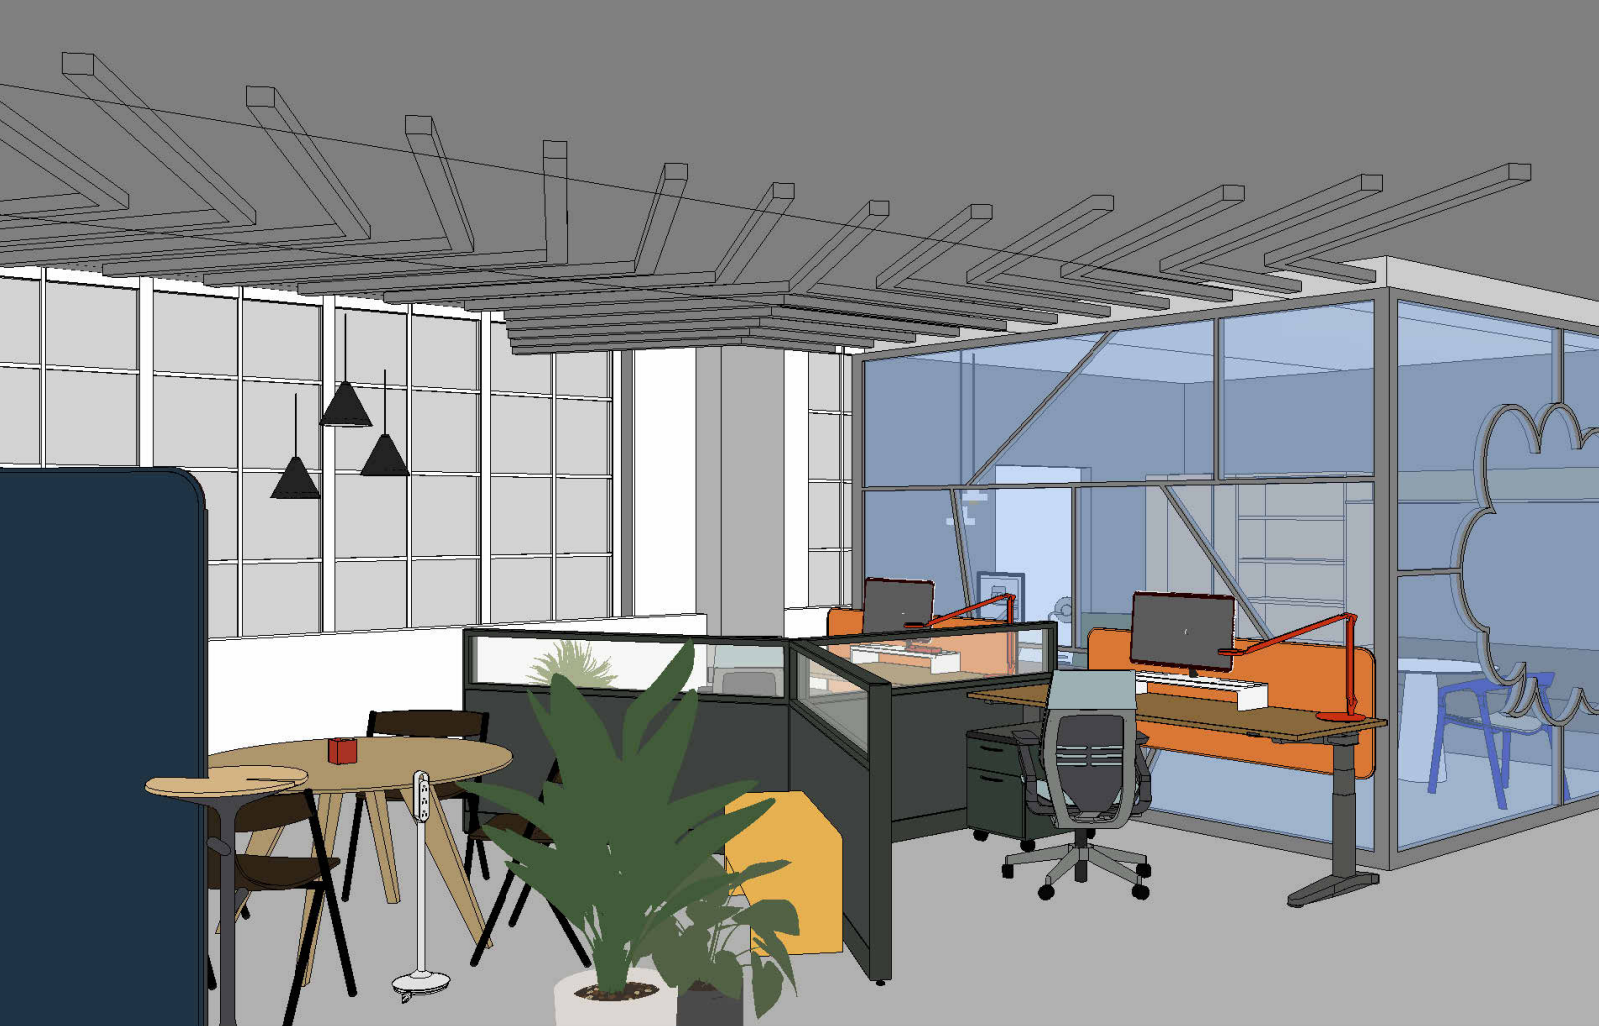
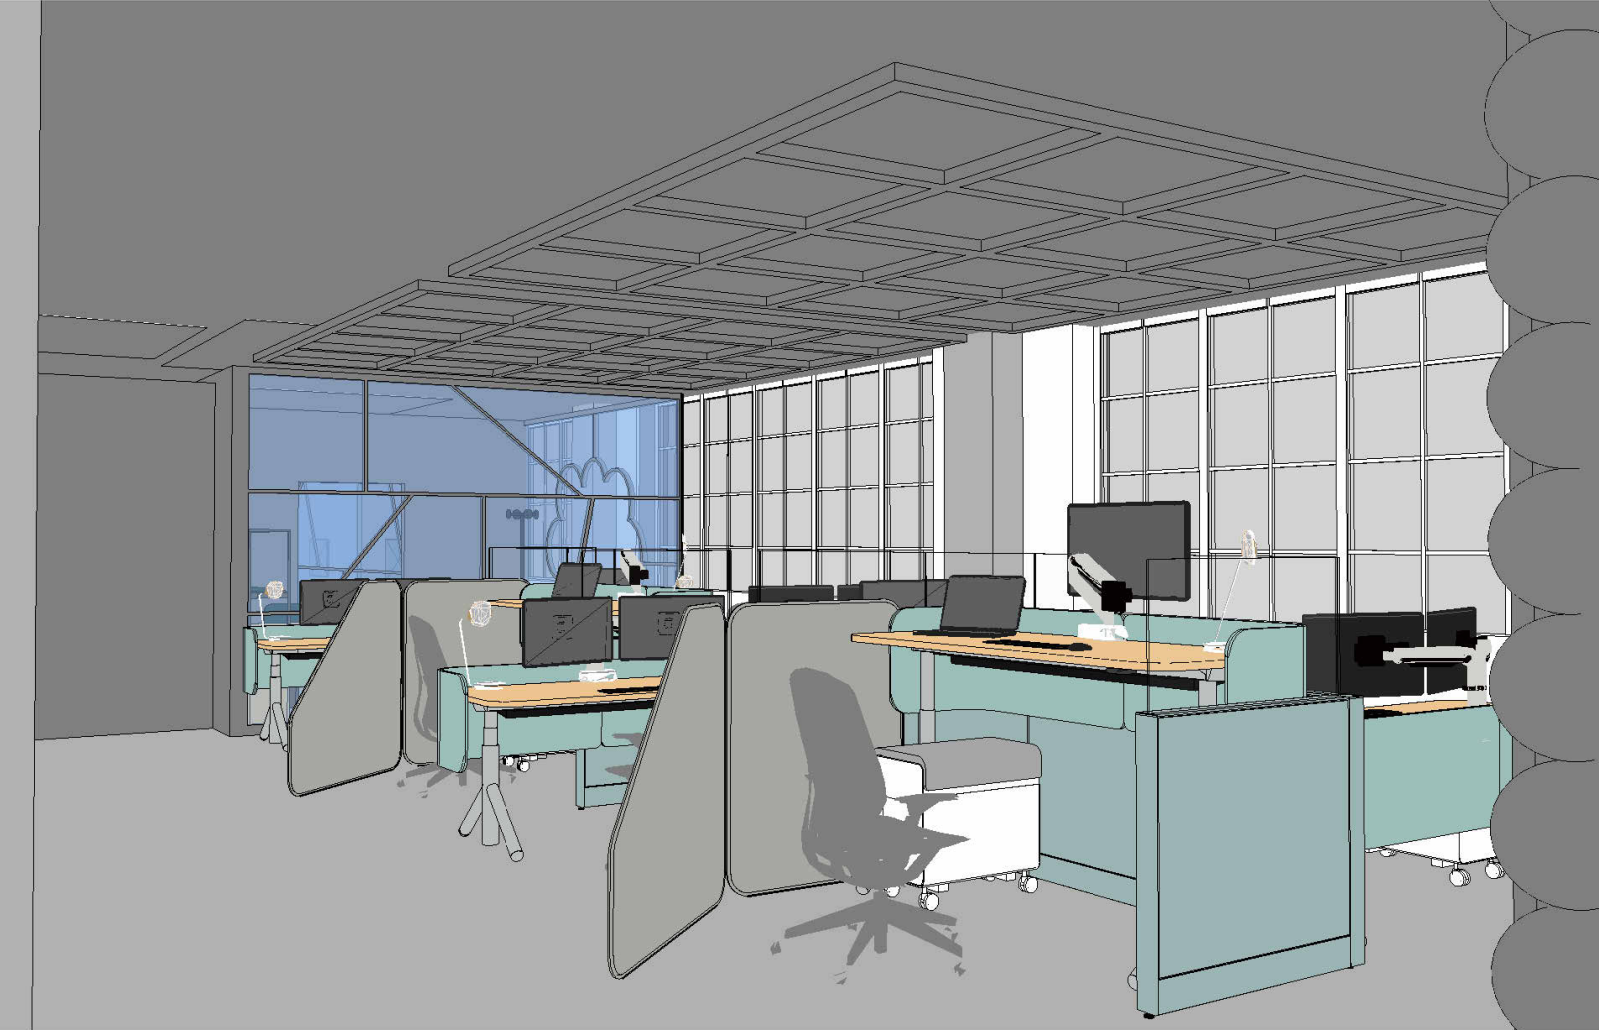
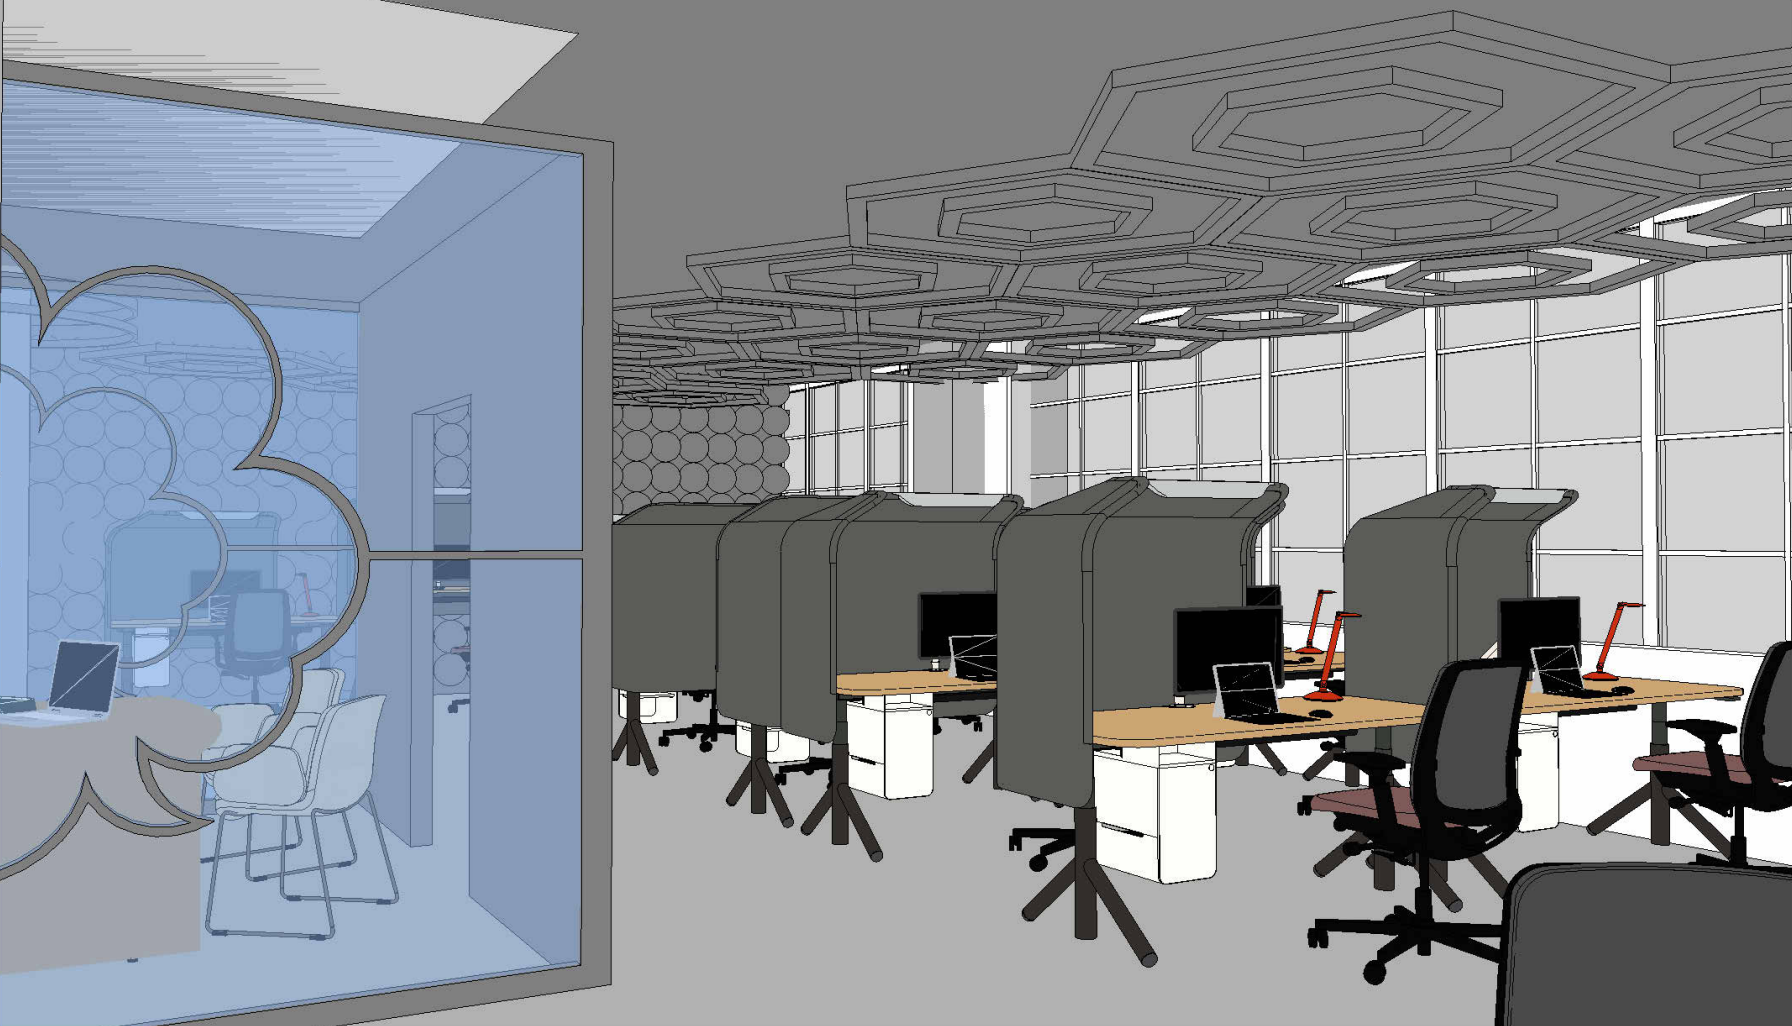
PHASE 2_WORKSESSION 08_Schematic Design: my Concept in 3D
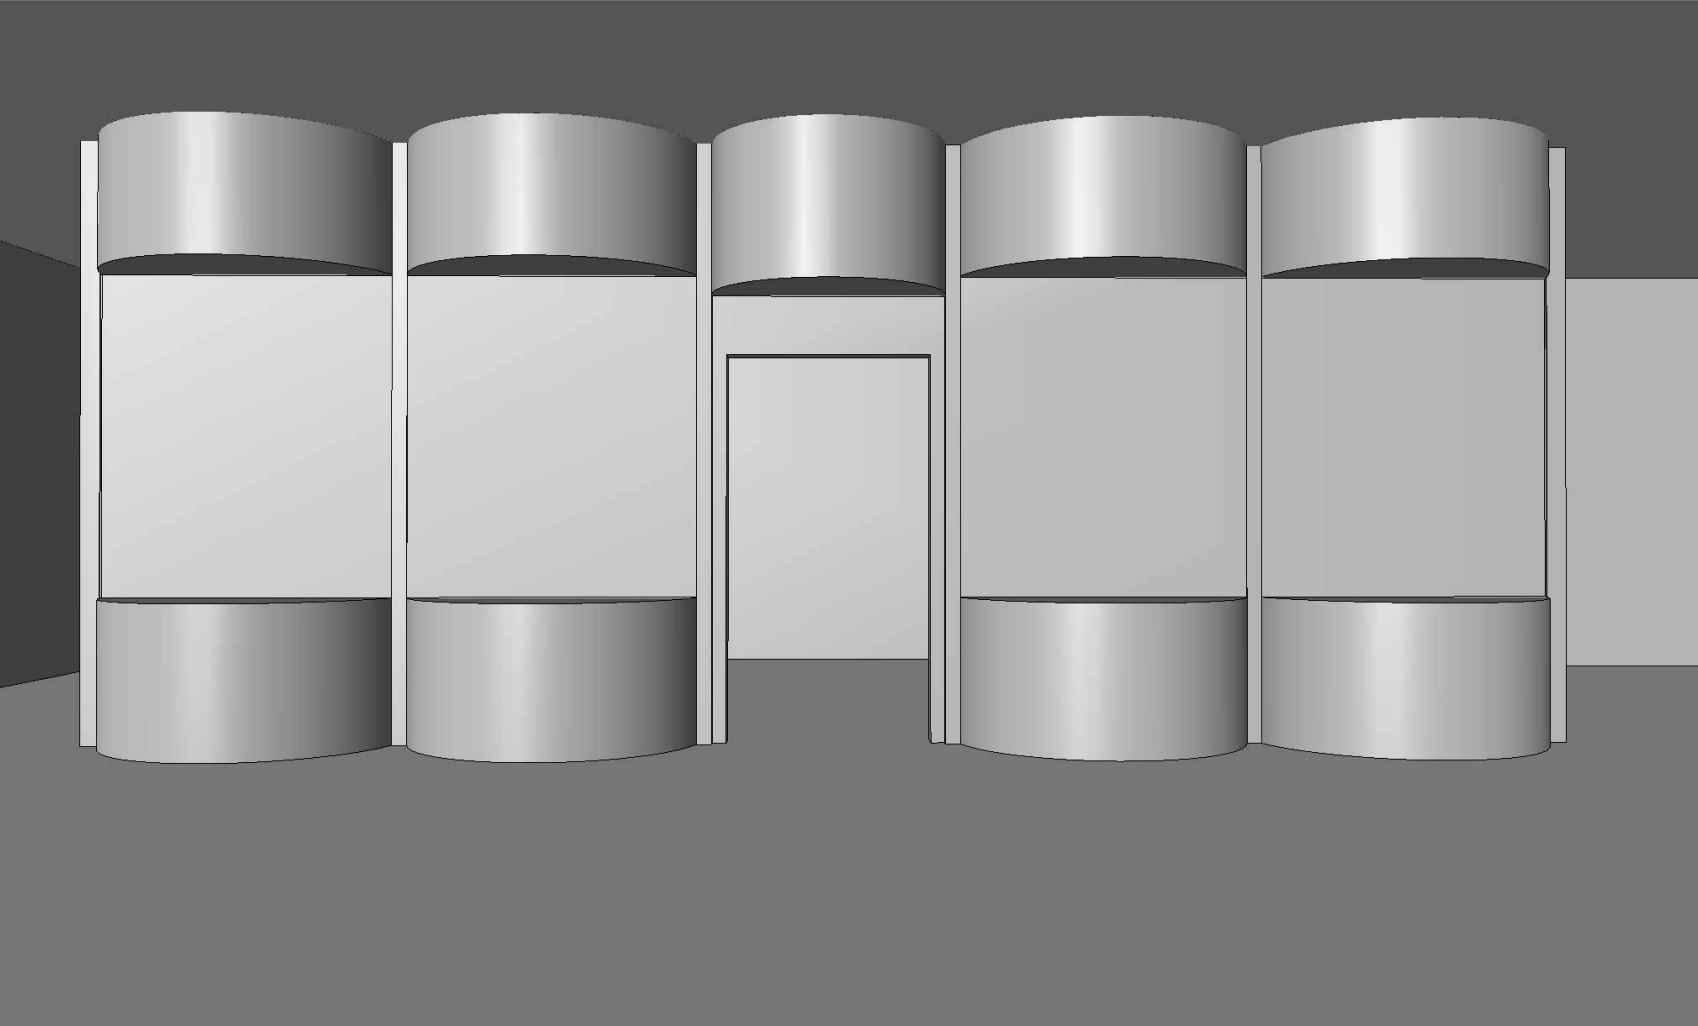
The schematic design stage focuses on transforming my concept into a three-dimensional experience through sketches, digital views, and renderings. It emphasizes shaping architectural elements like walls, materials, light, and form to create a cohesive interior environment that aligns with my concept and enhances user interaction. This being said, my goal was to start developing architectural interventions as shown in the images below.
Perspective 1 - Client Presentation Room
Perspective 2 - Team Meeting Room
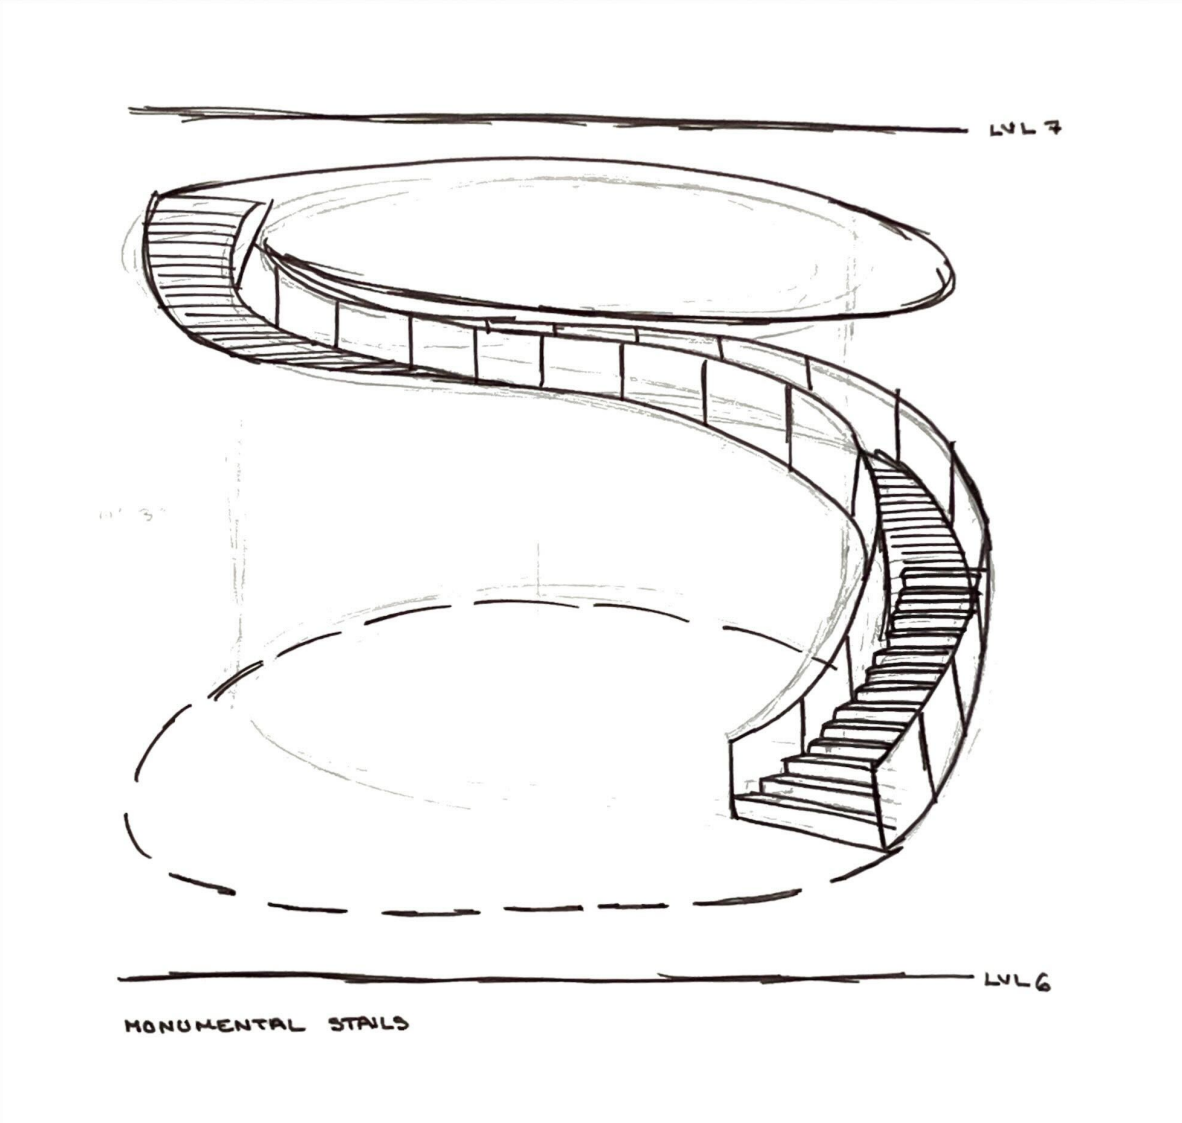
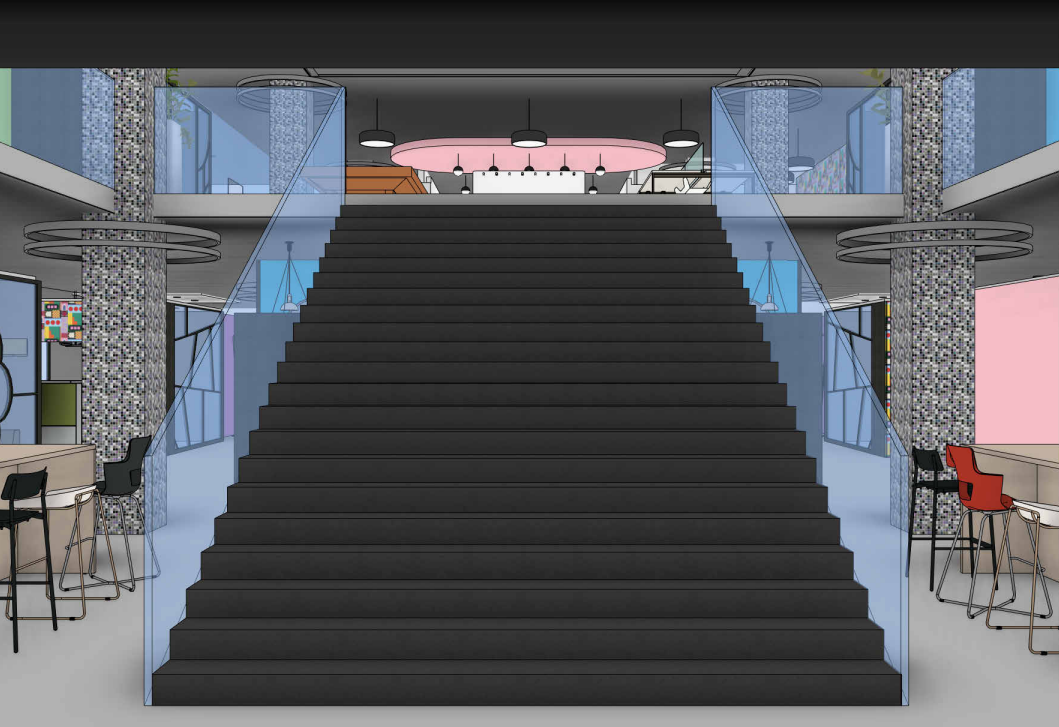
Perspective 3 - Monumental Stairs
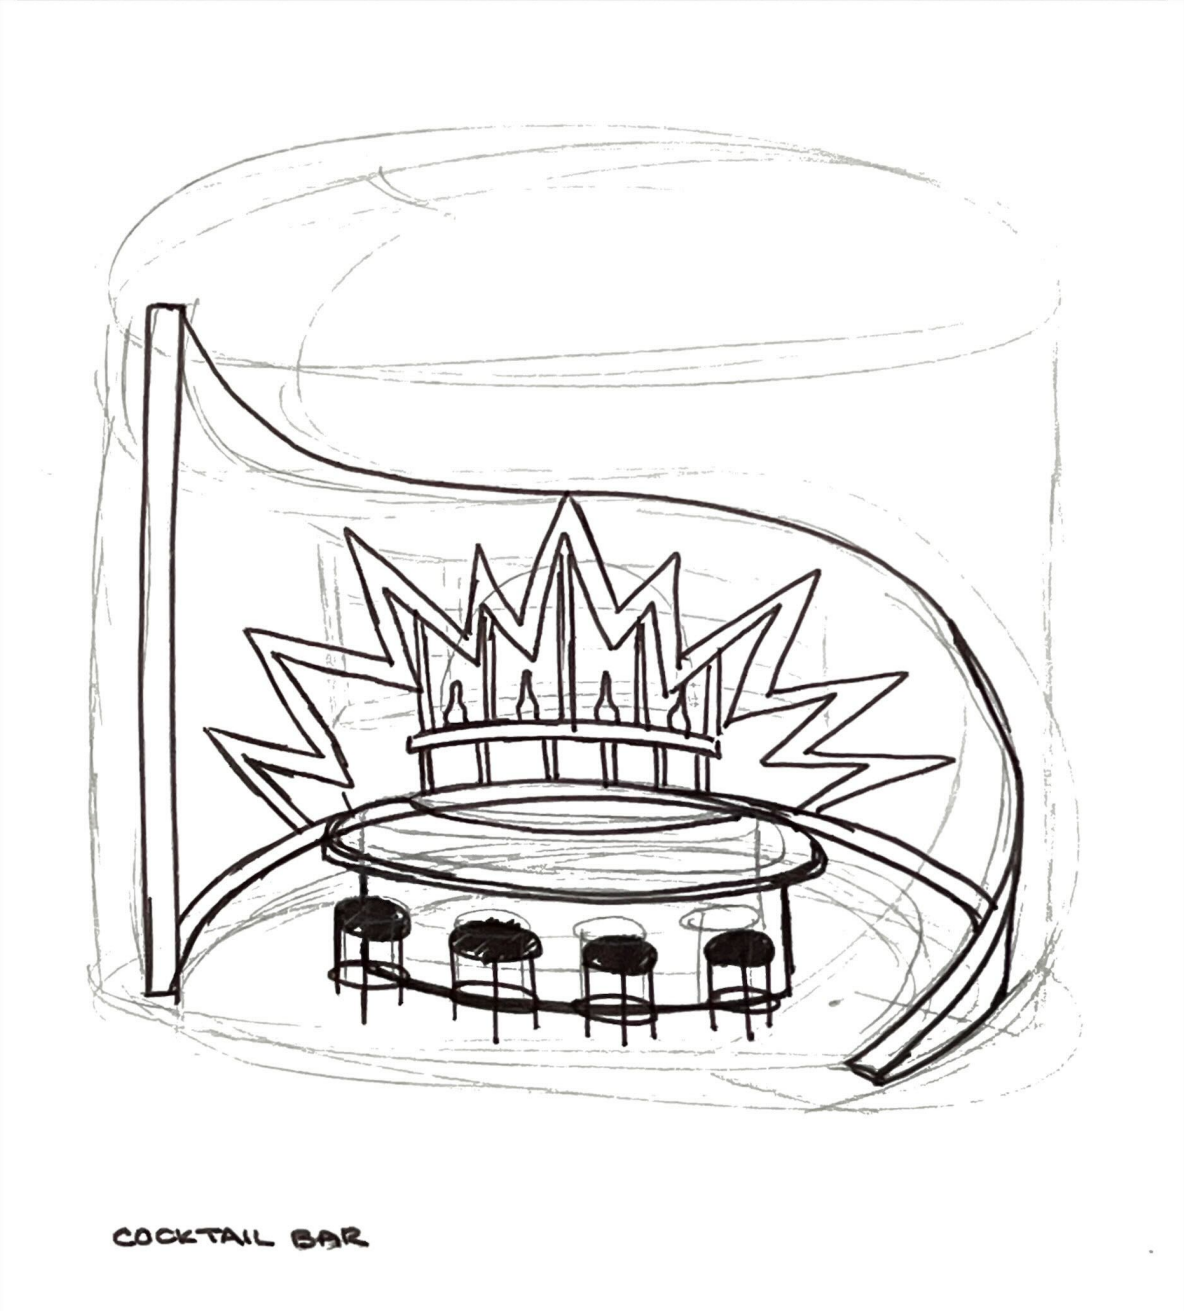
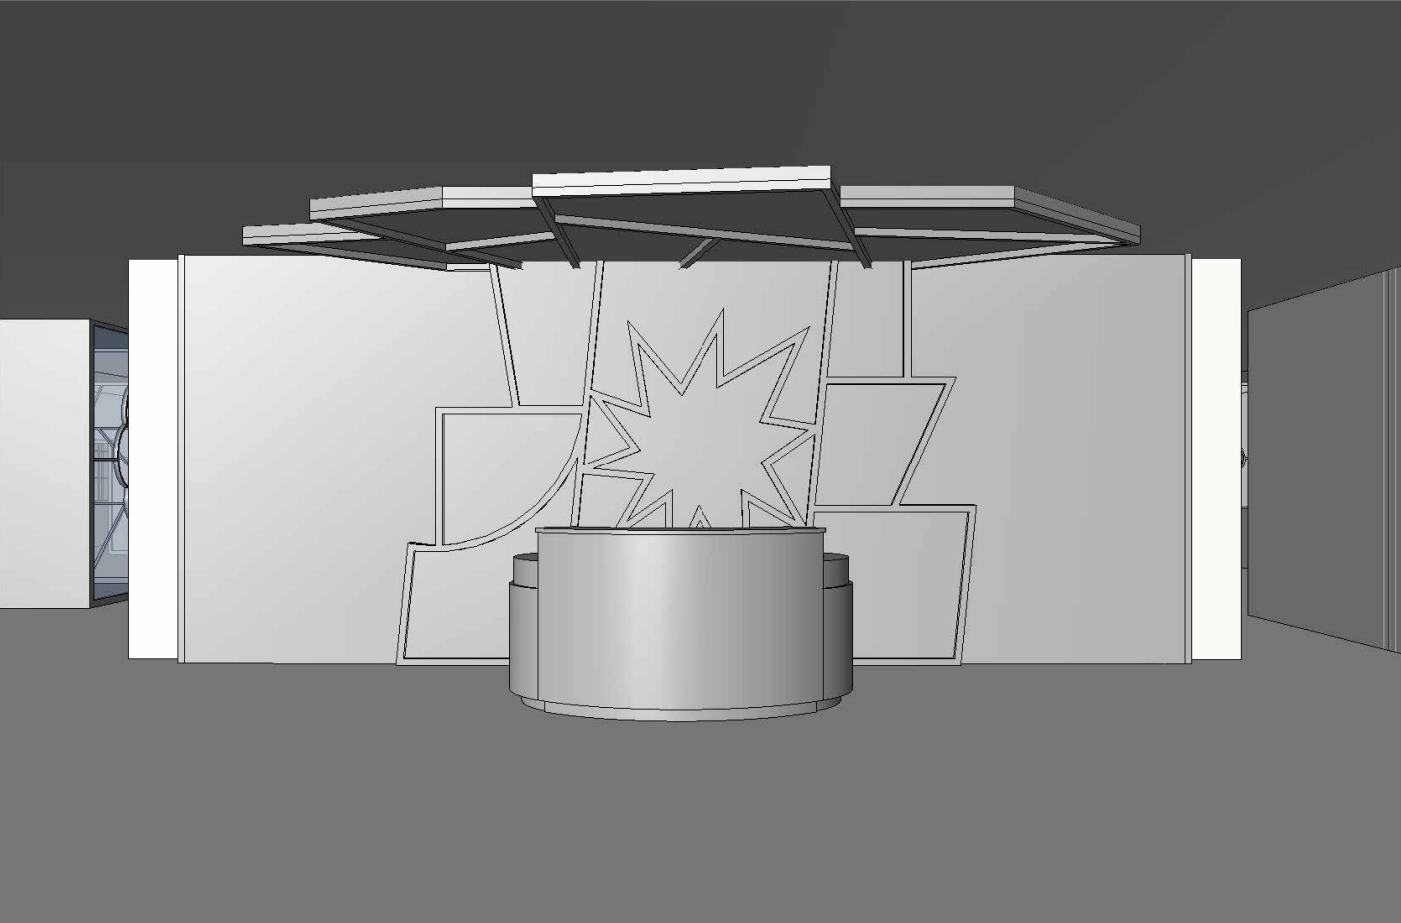
Mocktail Bar Unter Monumental Stairs
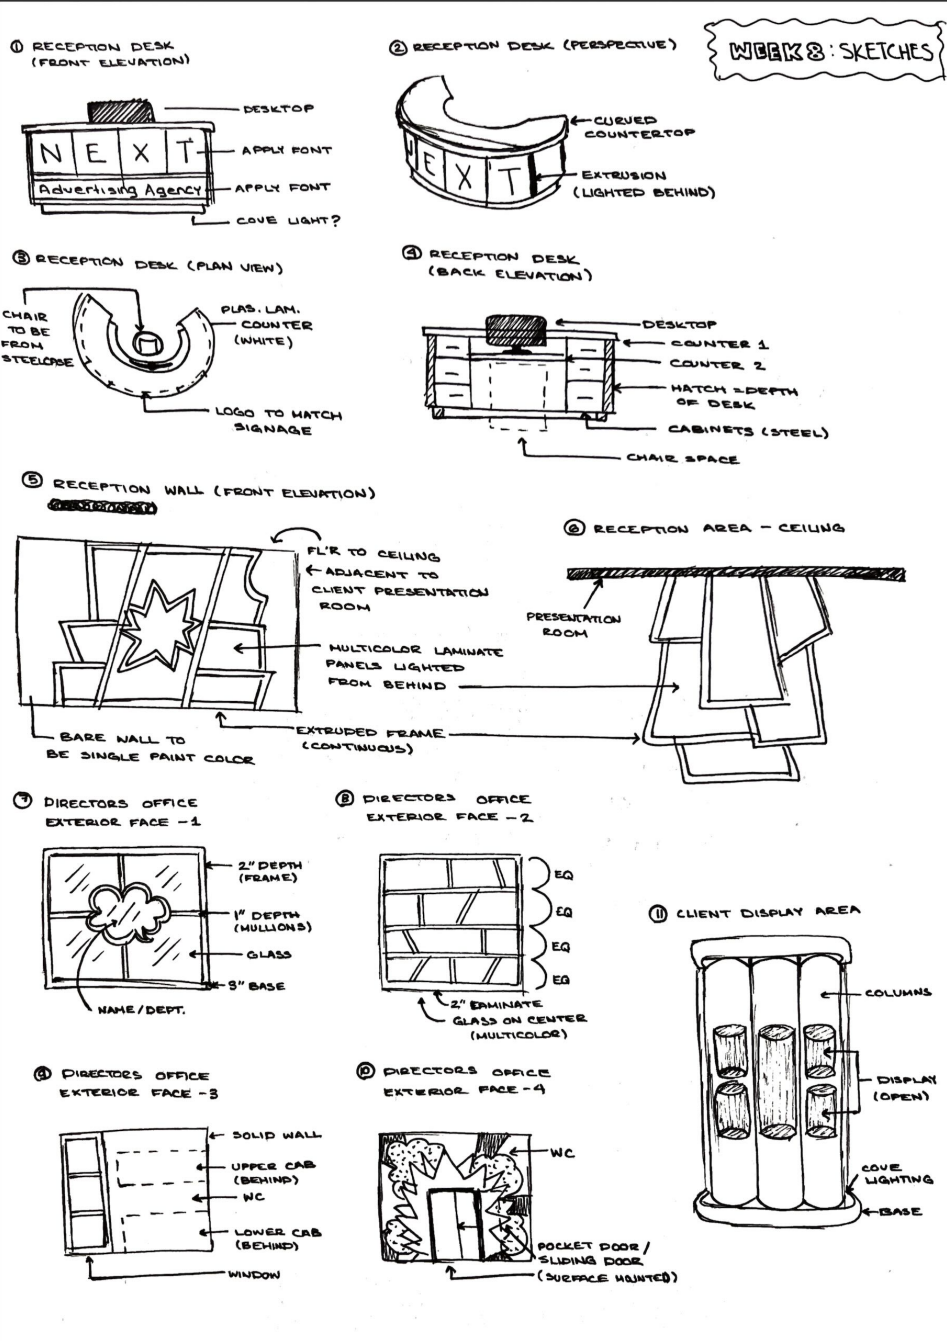
Sketches of architectural features - Page 1
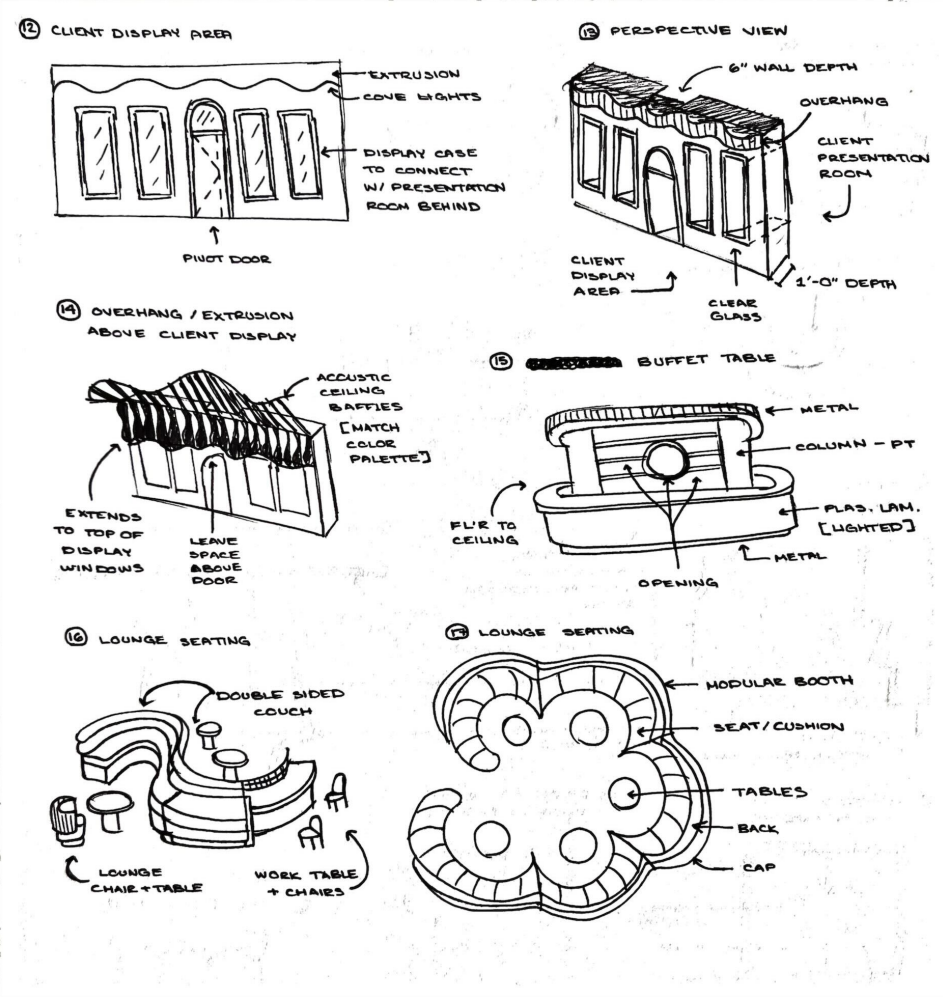
Sketches of architectural features - Page 2
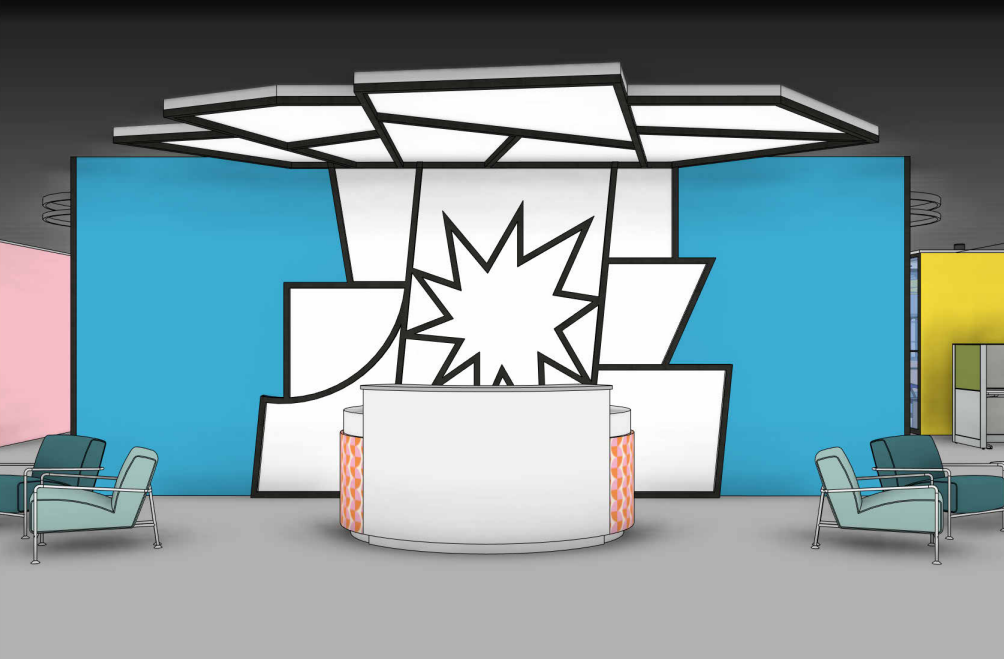
Perspective 4 - Reception Area
Perspective 5 - Client Presentation Room (NEW)
Perspective 6 - Monumental Stairs
Perspective 7 - Team Meeting Room/Cafe Area (EDITED)
Perspective 8 - Director's Office
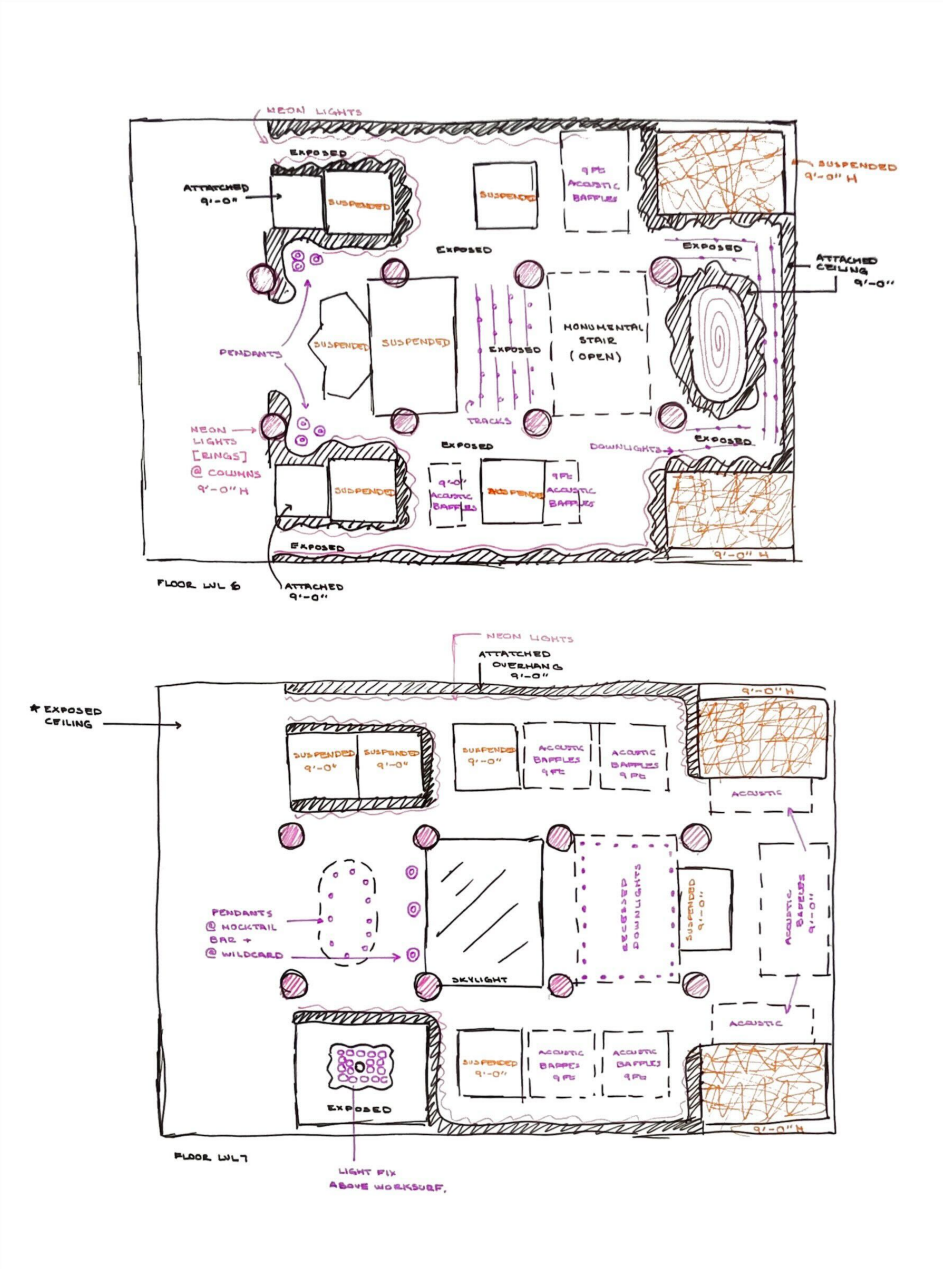
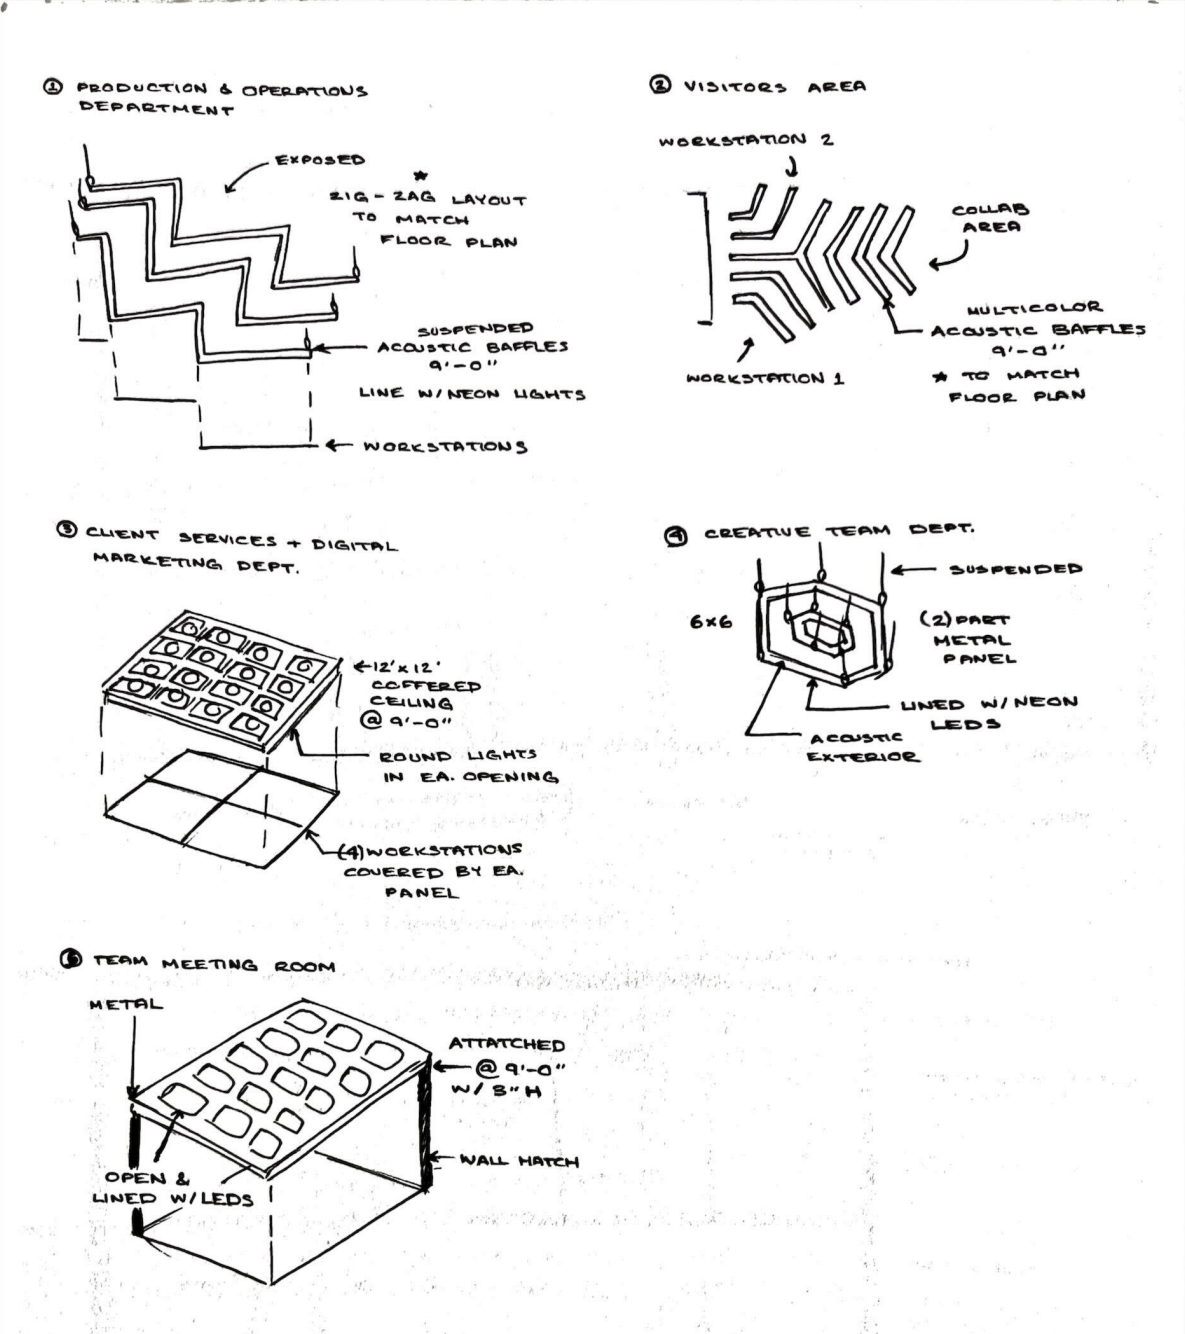
PHASE 2_WORKSESSION 09_Ceilings
The ceiling plane is often overlooked in design, but I deliberately focused on creating features that align with my project concept while supporting the client's goals and functional needs. My vision for the ceiling design aims to establish a dynamic and engaging environment by incorporating neon lights, geometric shapes, and suspended fixtures. Bold, playful colors in the lighting and ceiling elements will contrast with the industrial aesthetic of the exposed plenum above, adding vibrancy and energy to the space.
Part 1: Diagramming
Part 1: Annotated Areas
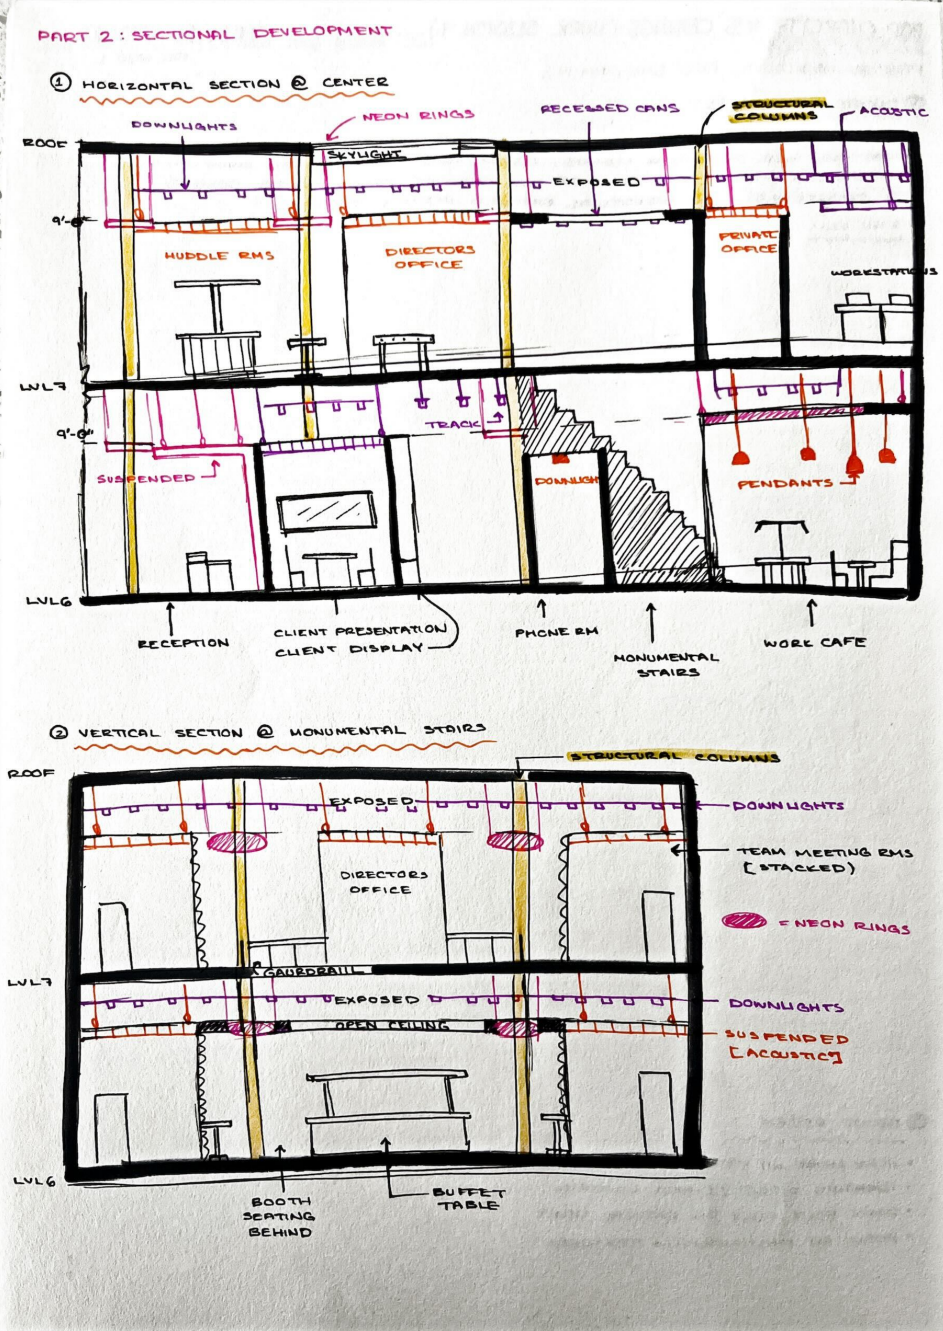
Part 2: Sectional Development
Part 3: Ceiling Plan Refinement - Level 6
Part 3: Ceiling Plan Refinement - Level 7
Part 3: Evolved 3D View - Phone Room
Part 3: Evolved 3D View - Production & Operations Dept.
Part 3: Evolved 3D View - Visitor's Area
Part 3: Evolved 3D View - Client Services & Planning Dept.
Part 3: Evolved 3D View - Creative Dept.
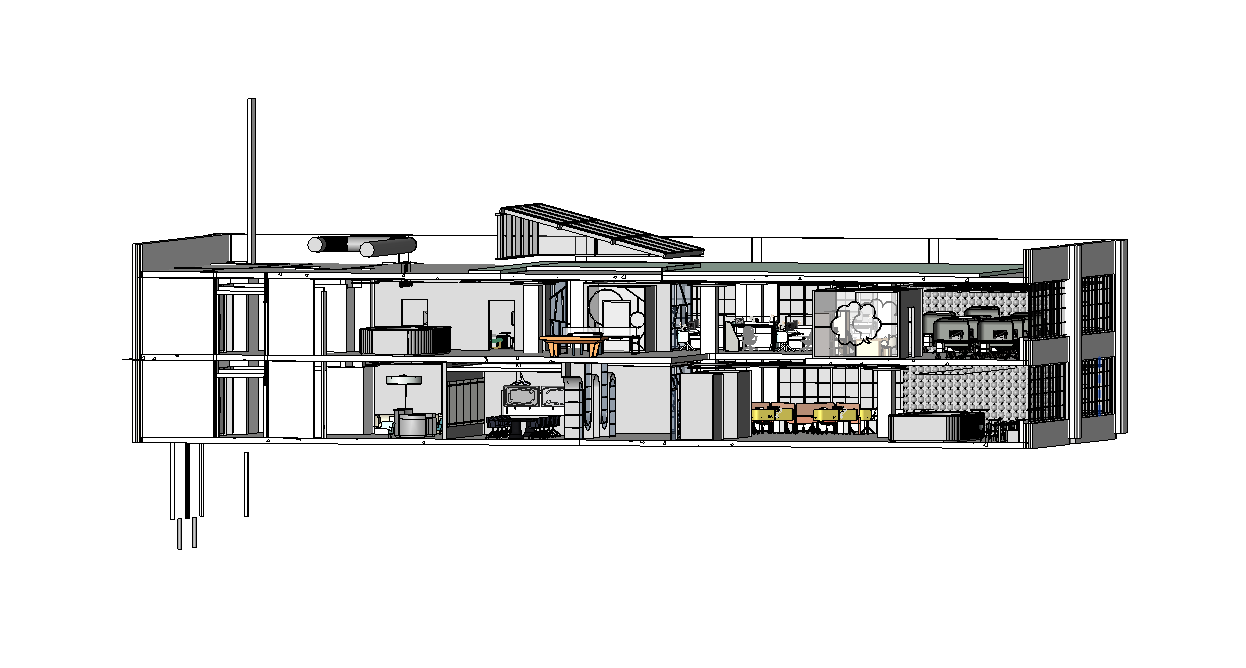
Part 3: Sectional View - Horizontal

Part 3: Sectional View - Vertical
PHASE 3_WORKSESSION 10_Furniture
I further developed and refined the architectural interventions in alignment with the client's needs and my concept statement. Additionally, I delved deeper into exploring furniture solutions—both custom designs and carefully selected pieces from appropriate manufacturers. This process involved creating detailed sketches and Revit models/renderings, which I communicated through plans and axonometric studies.
Annotated Floor Plan: Level 6
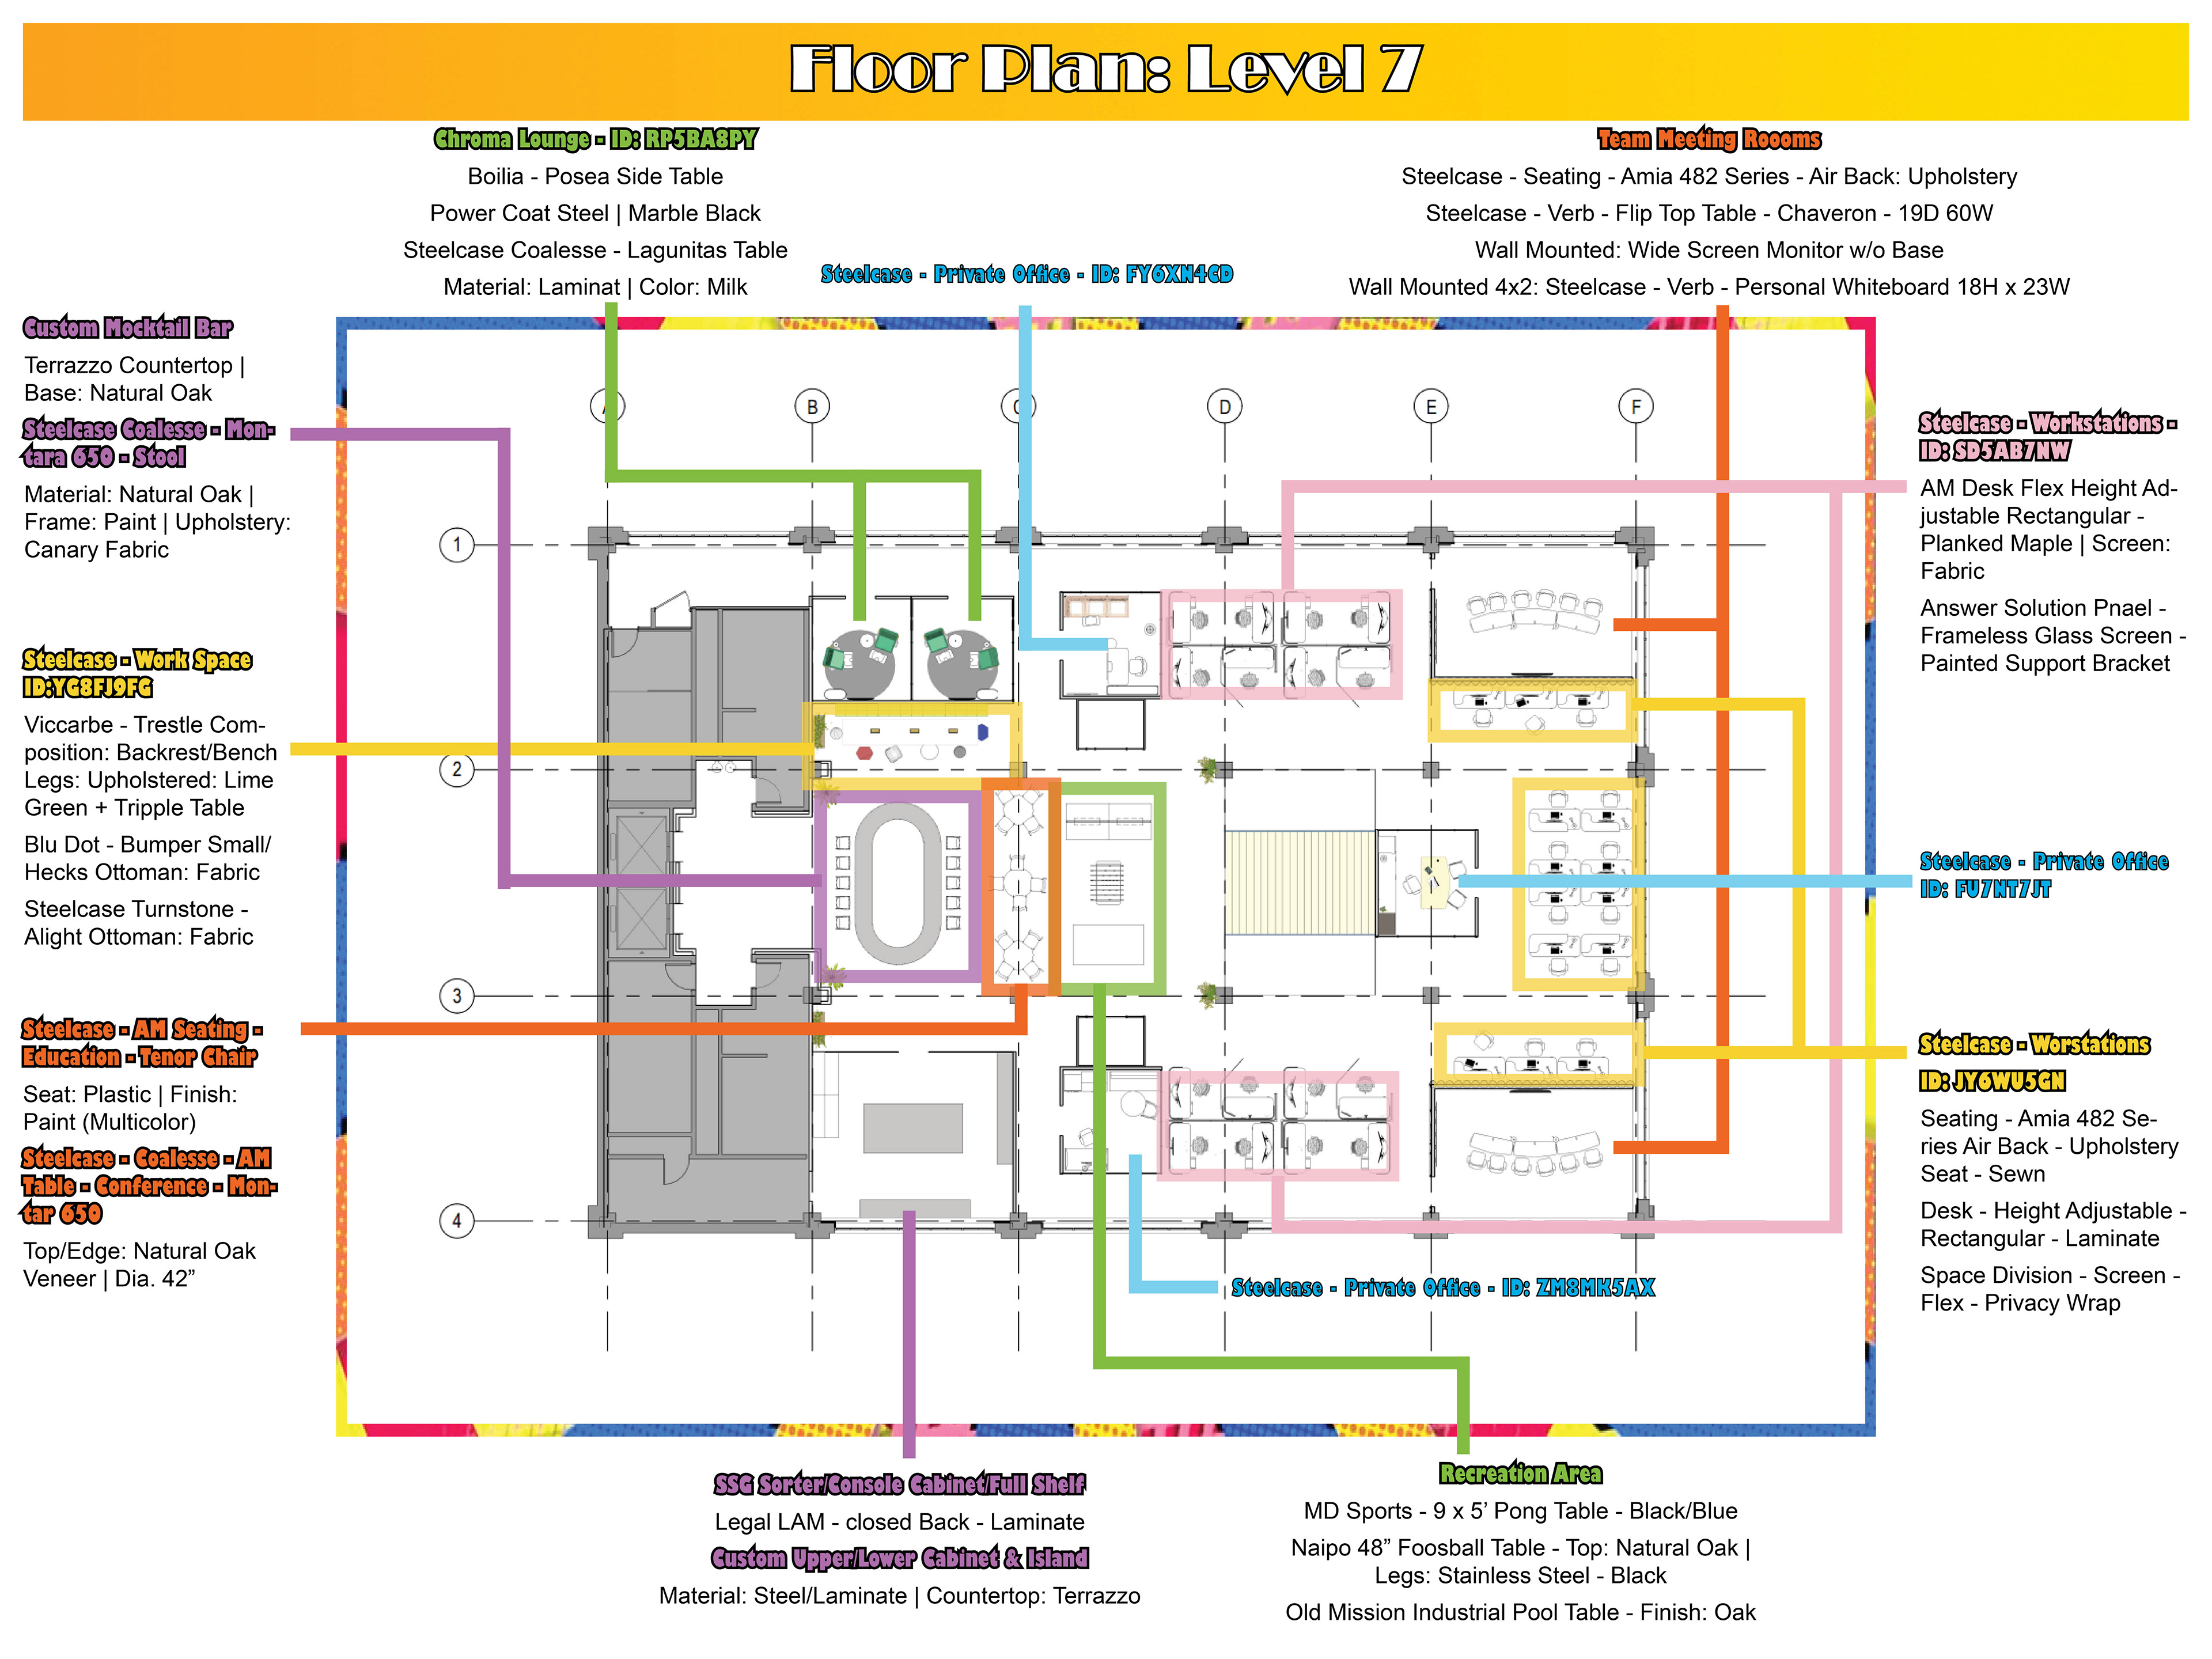
Annotated Floor Plan: Level 7

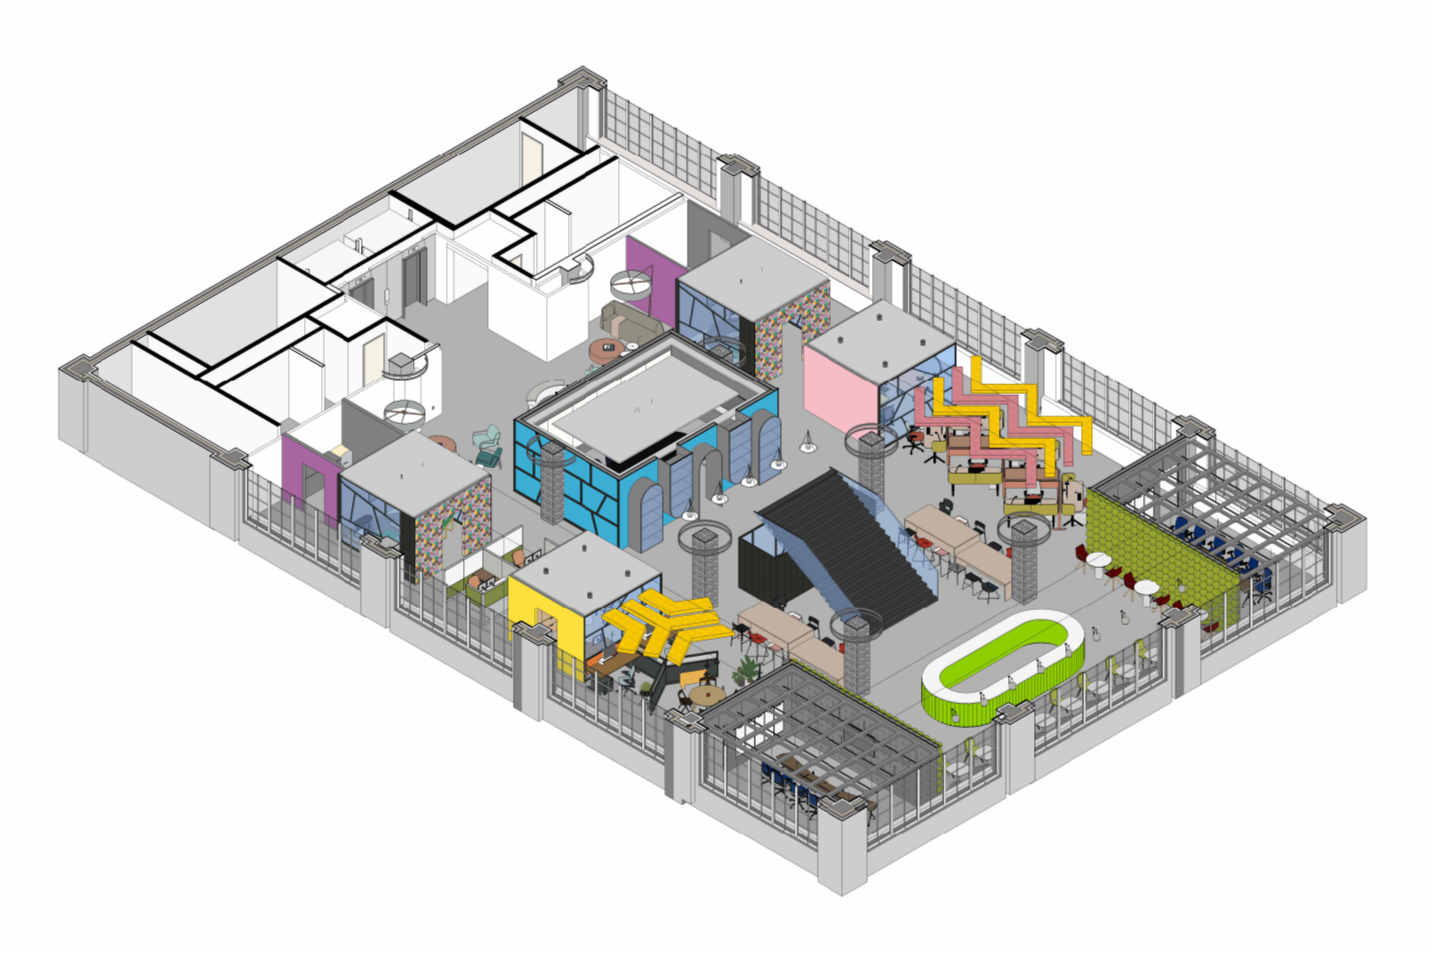
Axonometric/birds eye view: Level 6
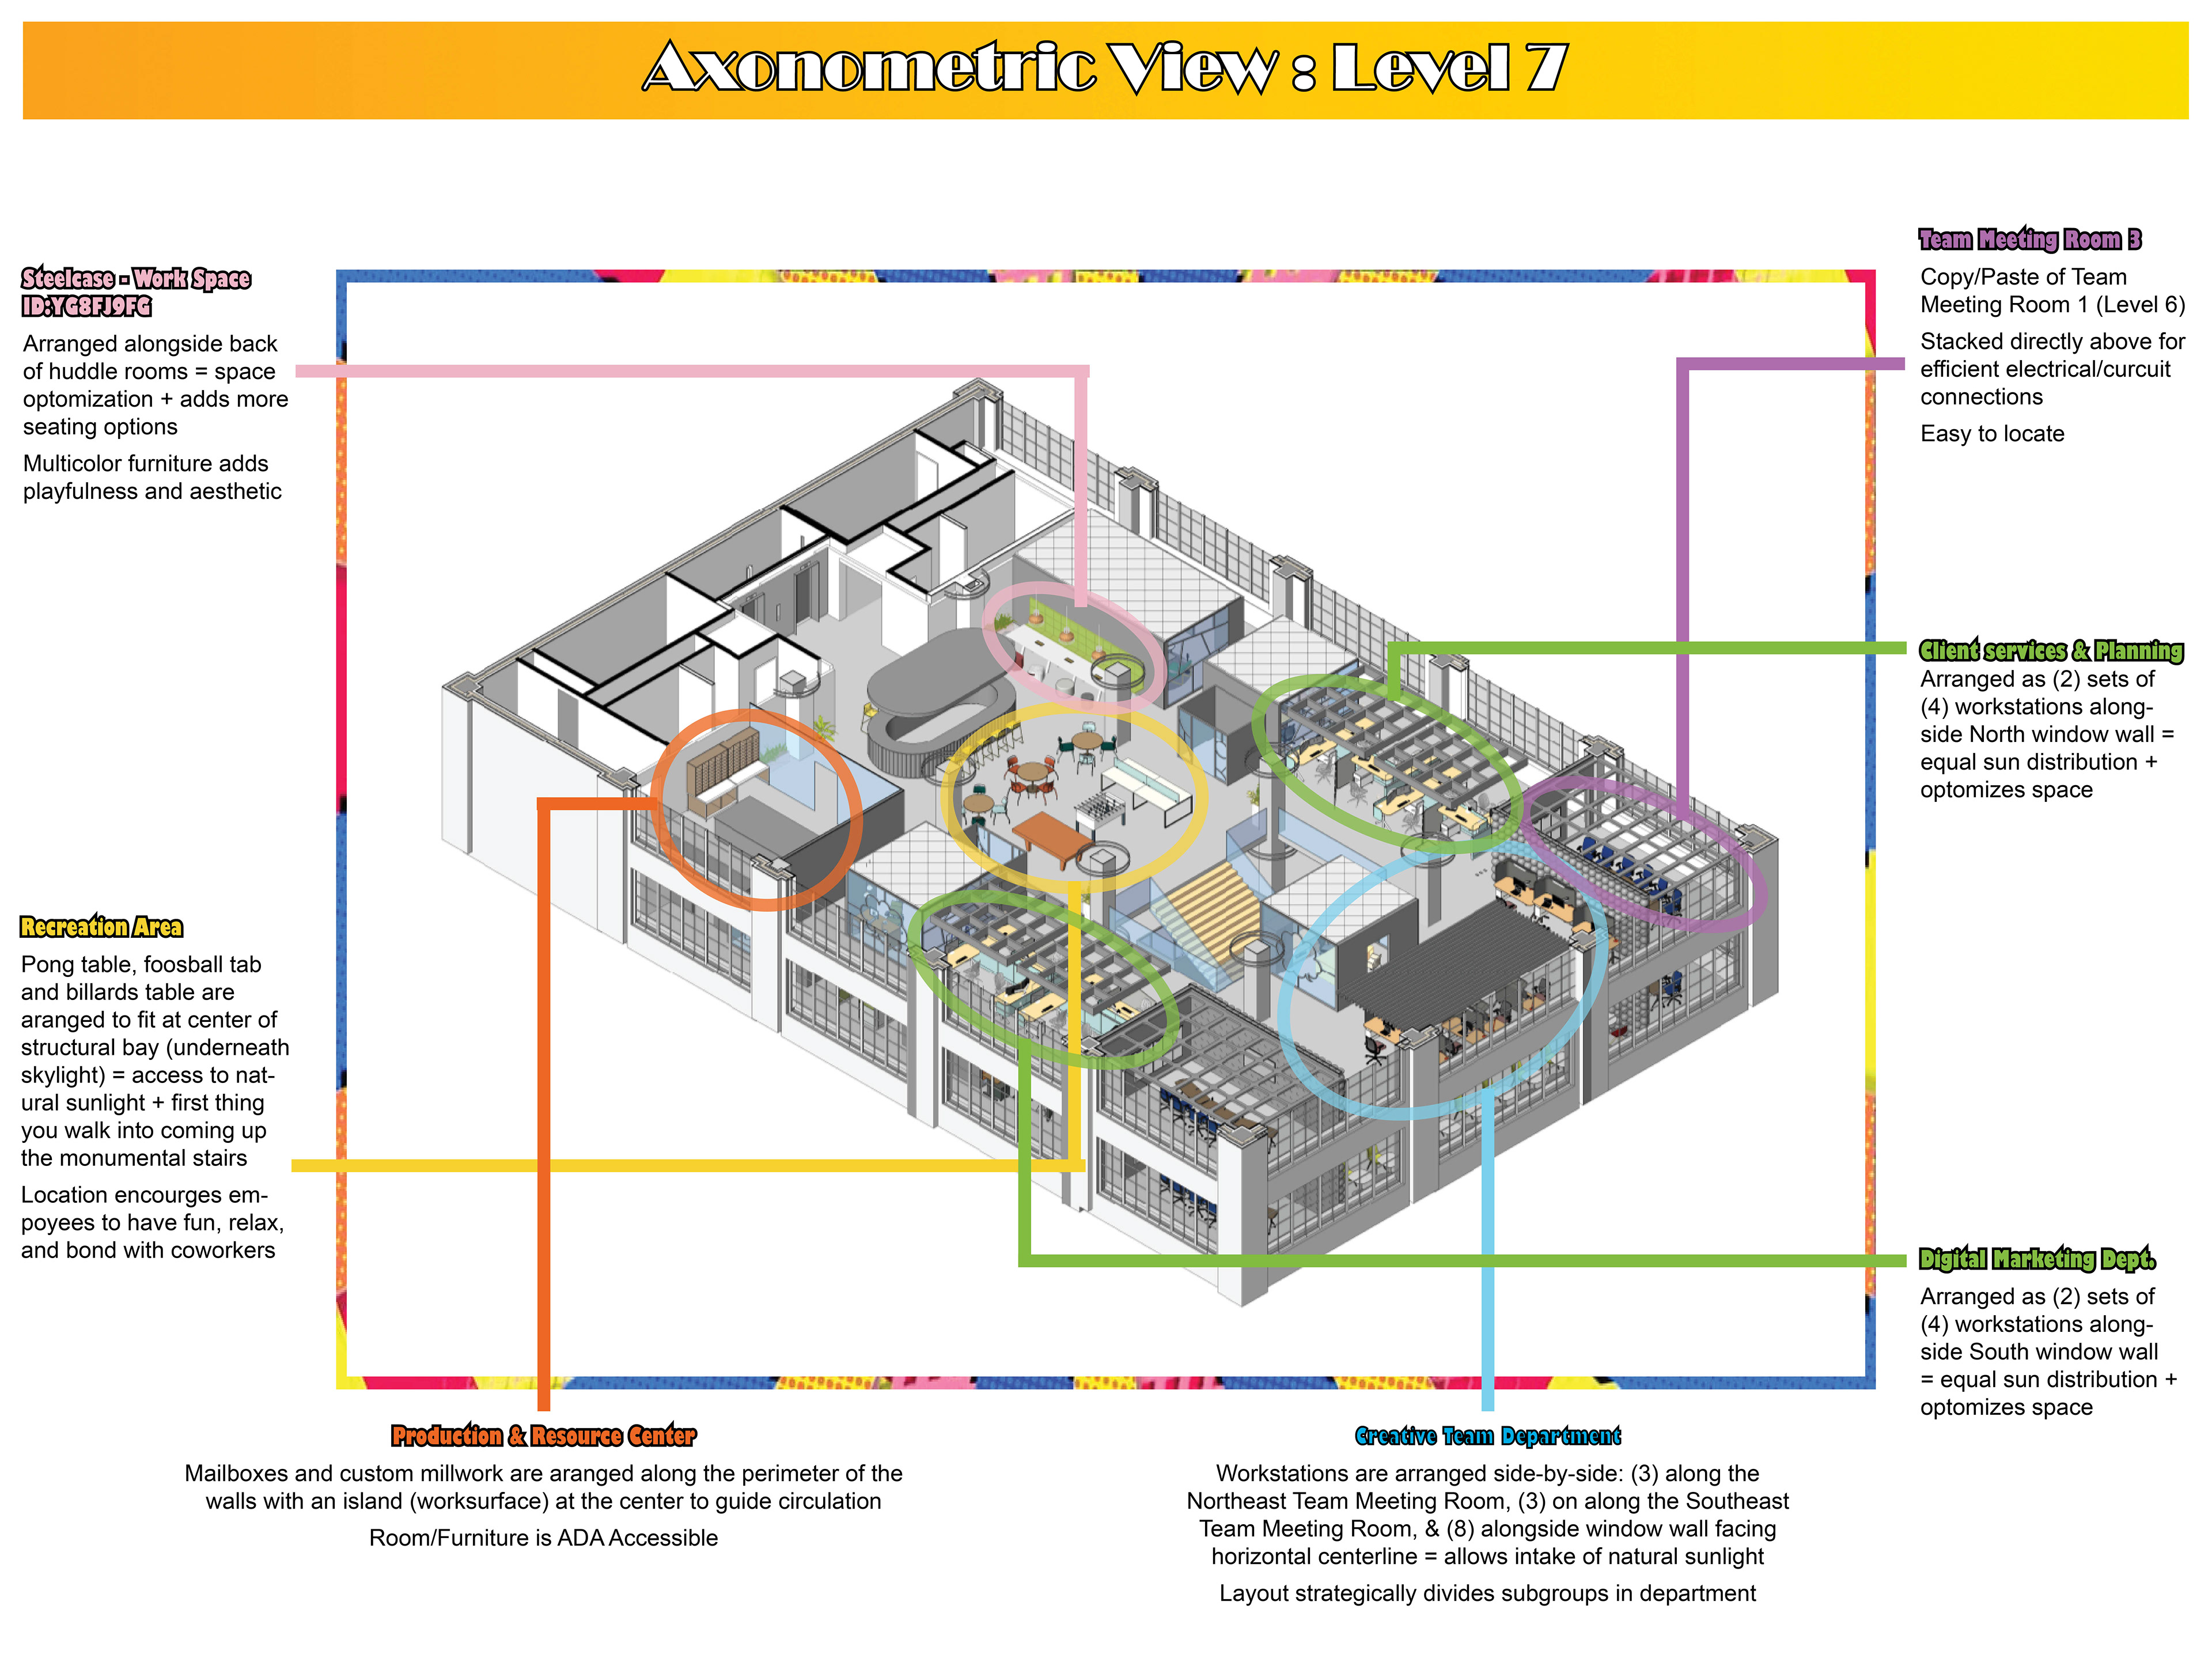
Axonometric/birds eye view: Level 7
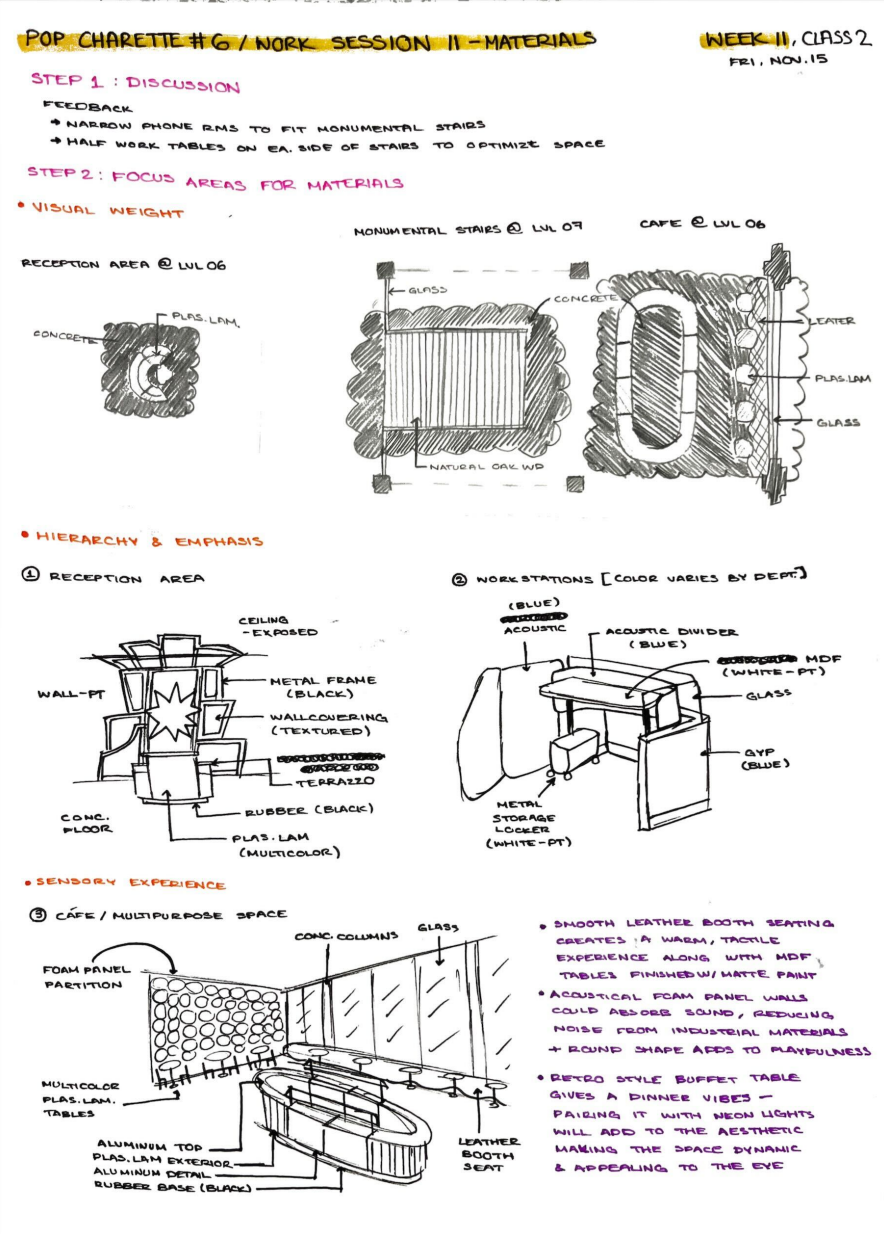
Phase 3_WORK SESSION 11_MATERIALS
I actively considered material choices as an extension of my concept and the client's identity. Through sketches and Revit explorations, I began experimenting with materials, laying the groundwork for cohesive and evocative renderings.
Interactive Exploration
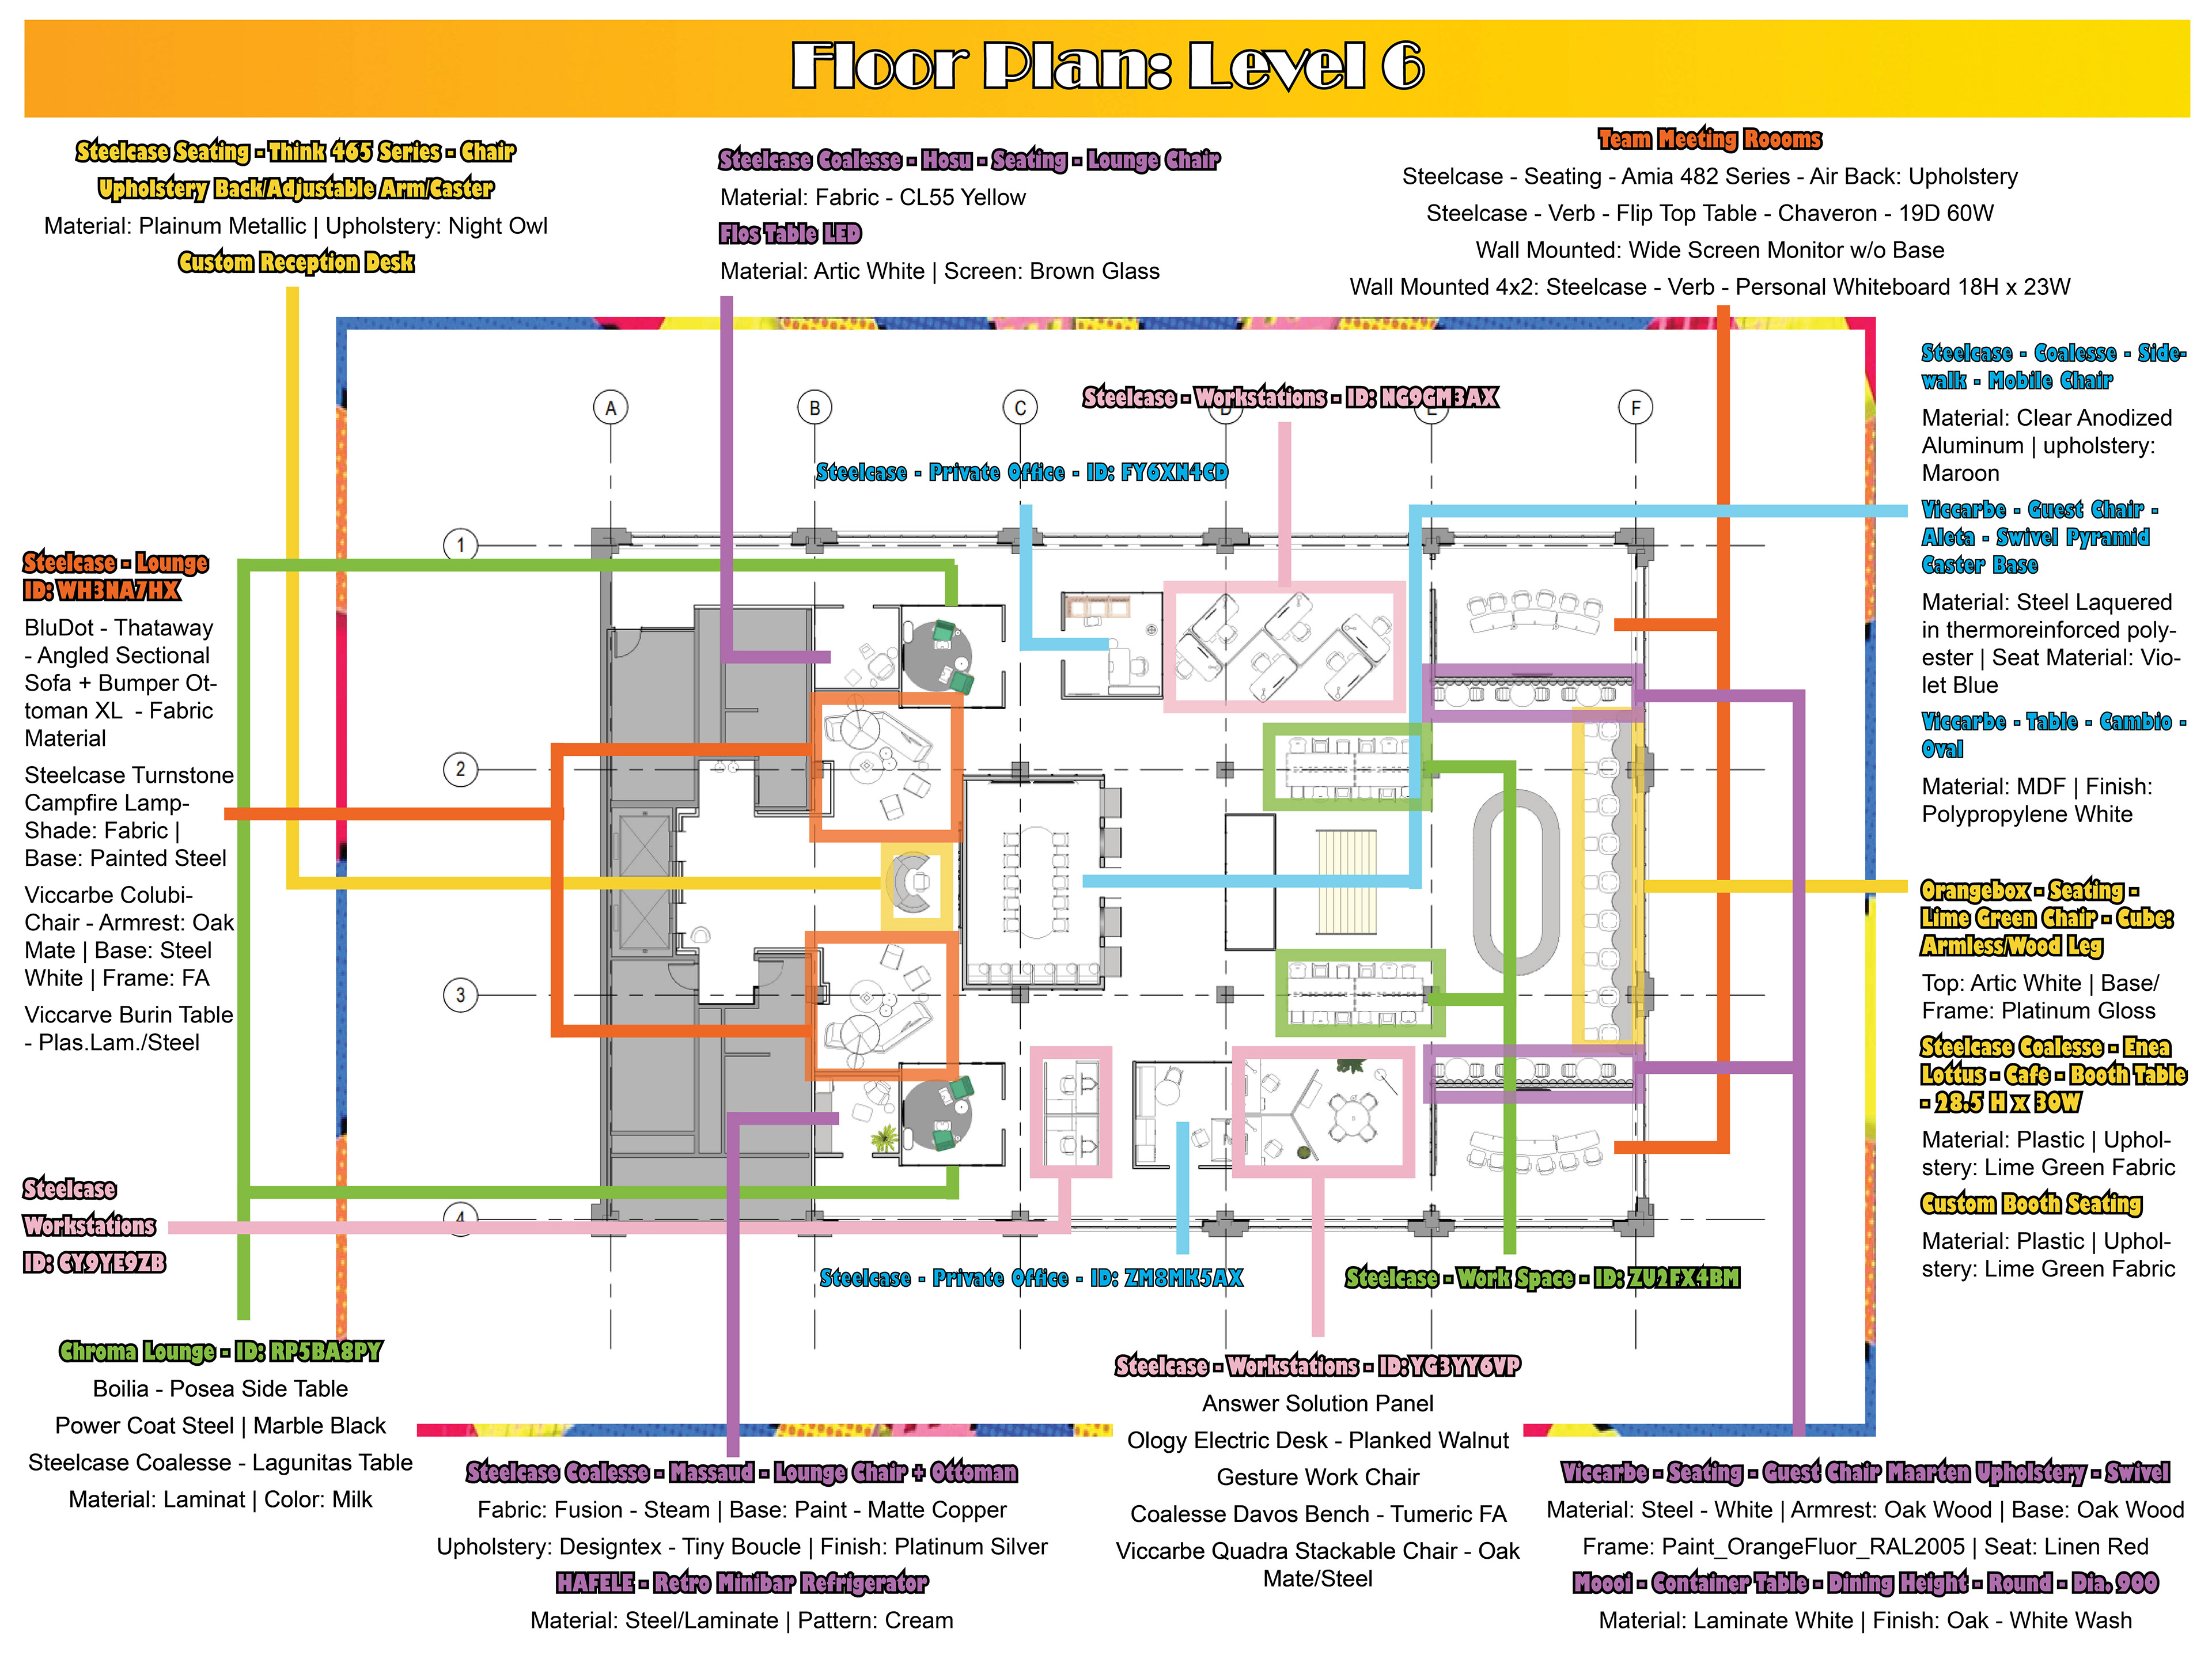
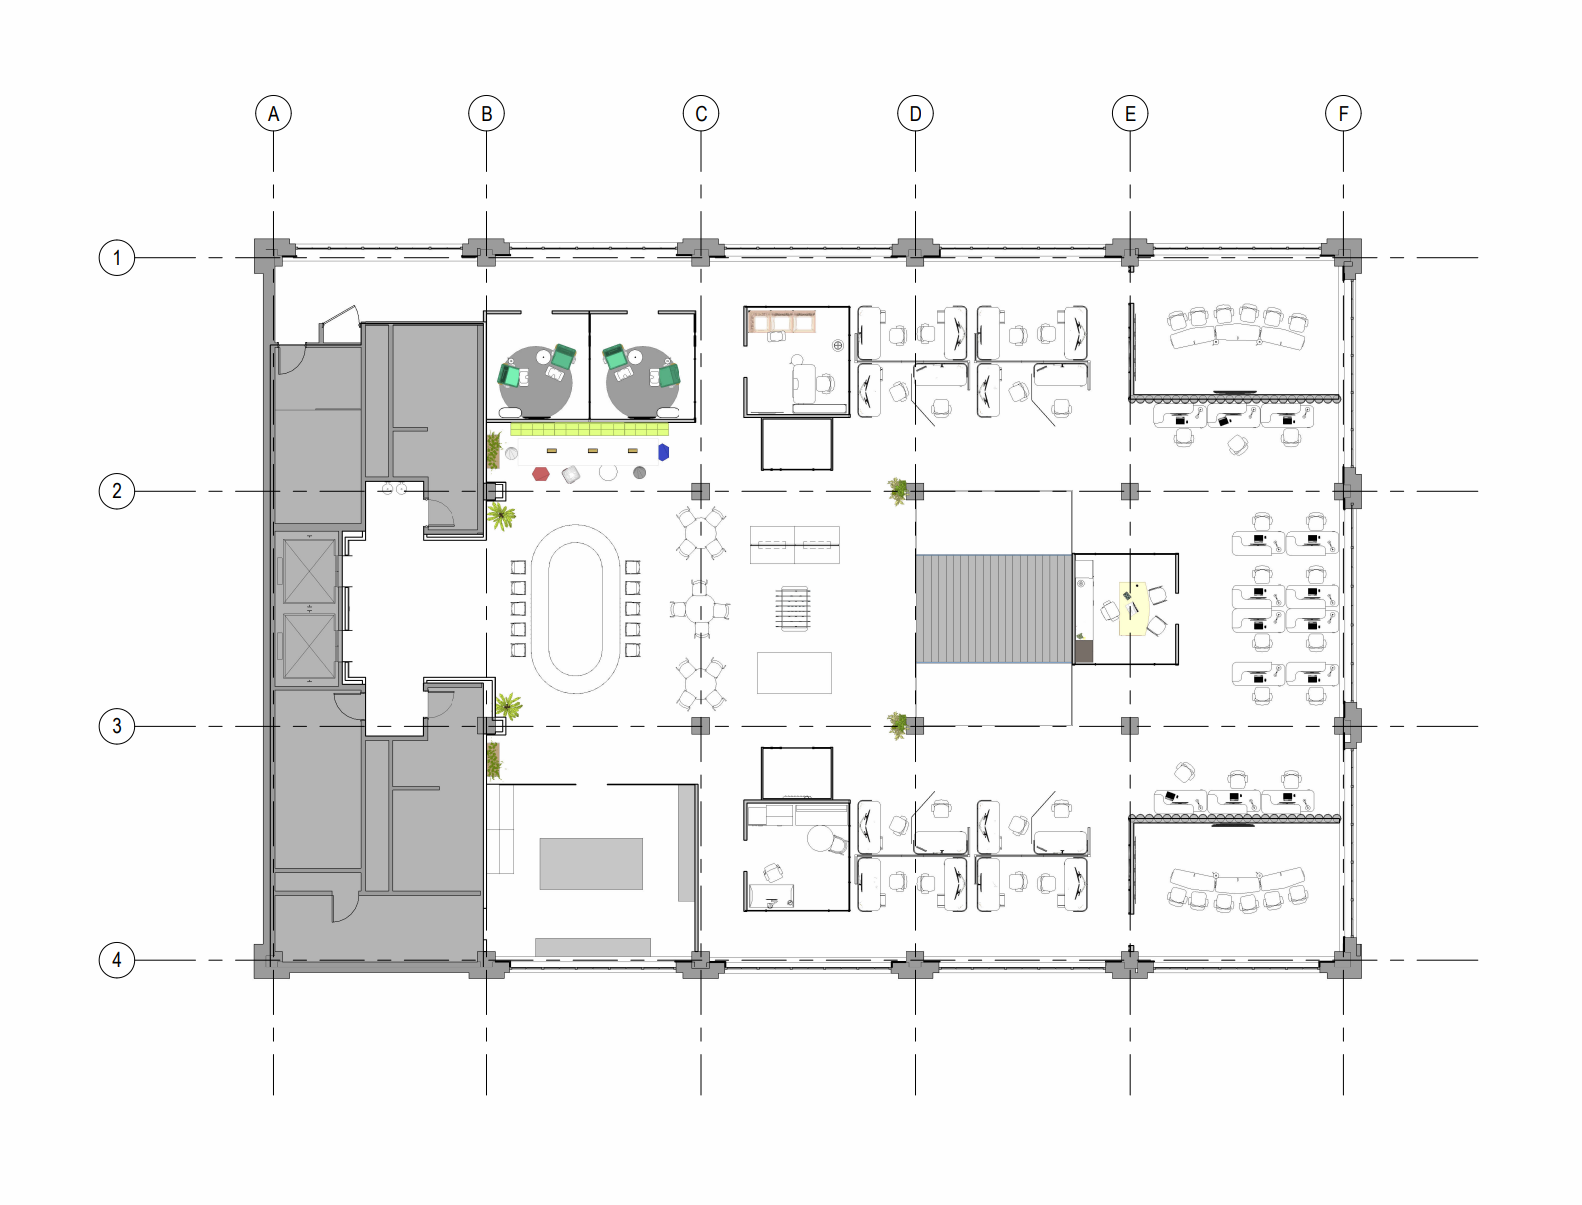
Floor Plan: Level 6
Axonometric View: Level 6
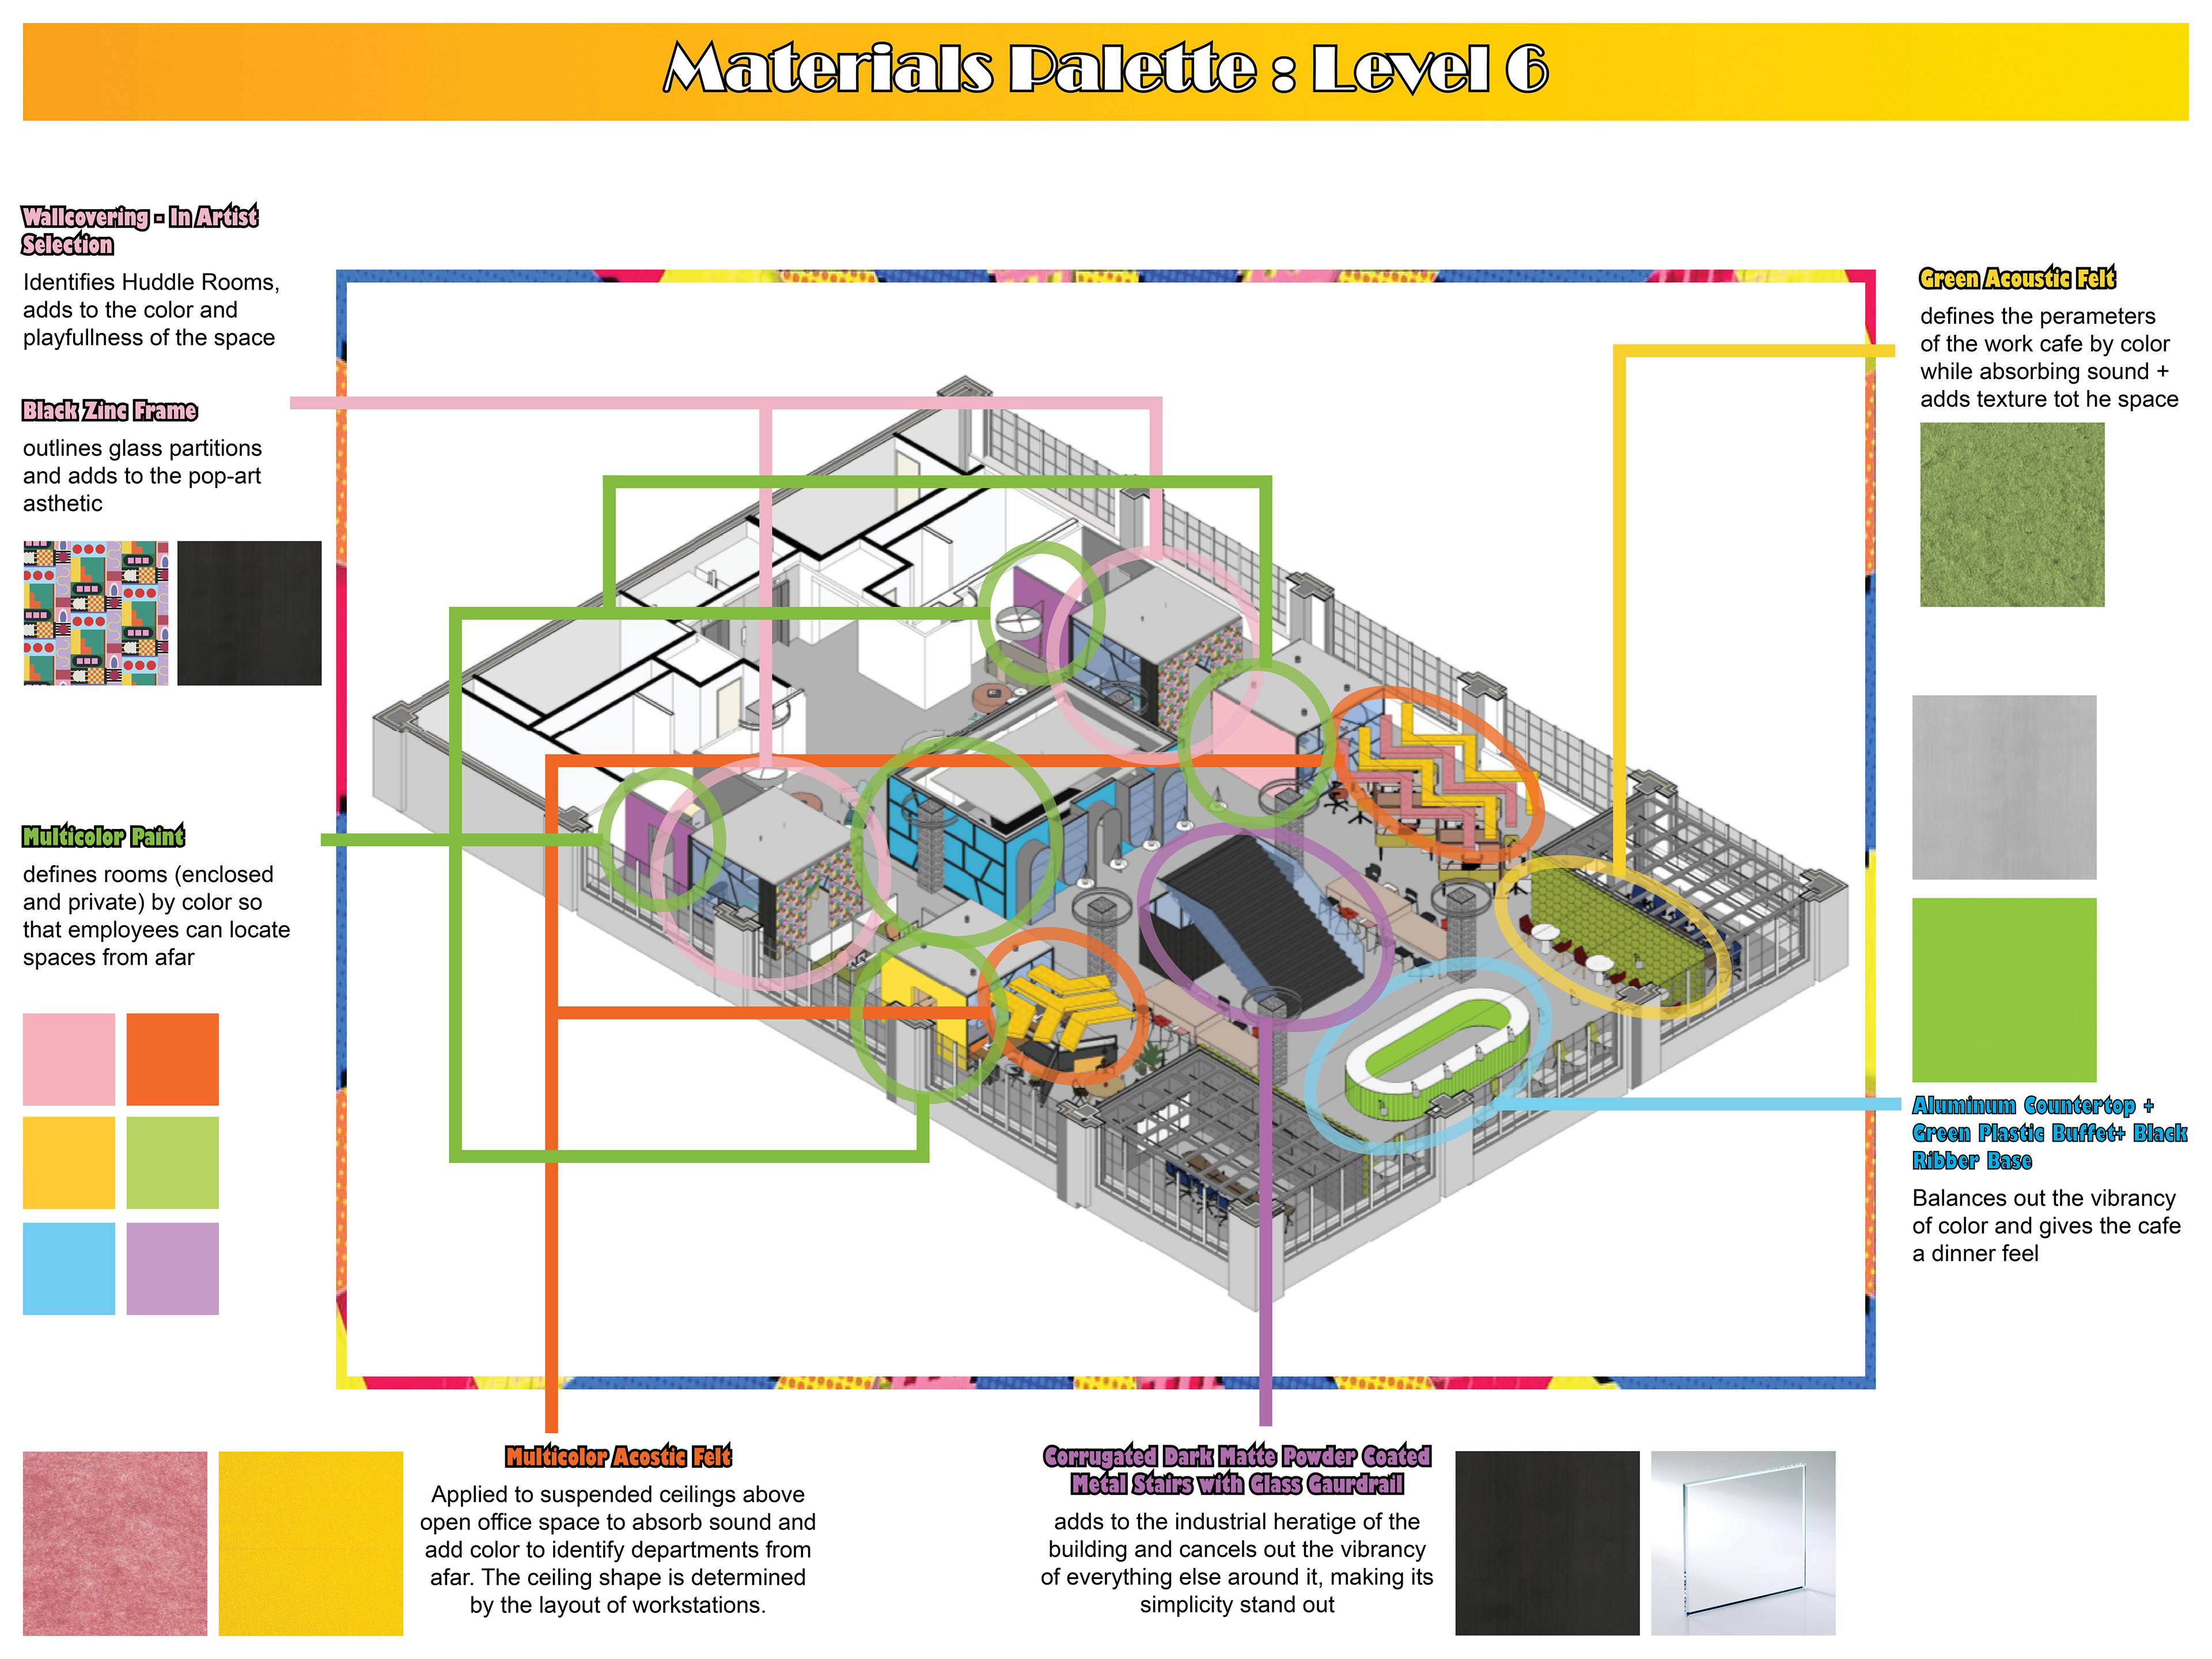
Annotated Materials Palette: Level 6
Floor Plan: Level 7
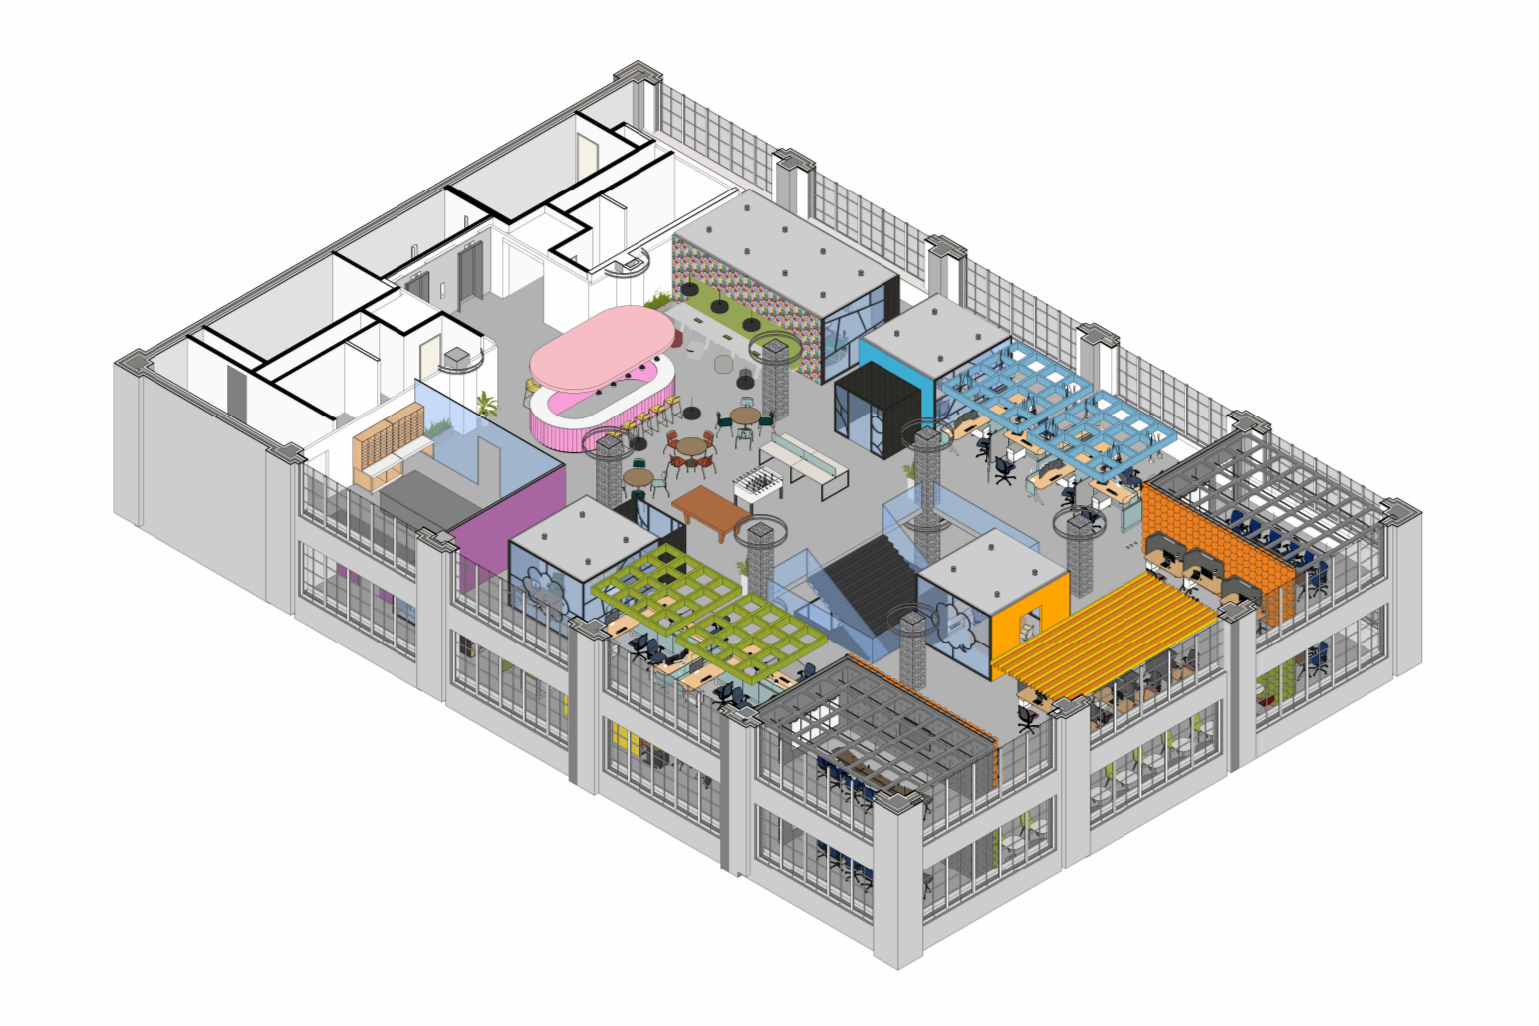
Axonometric View: Level 7
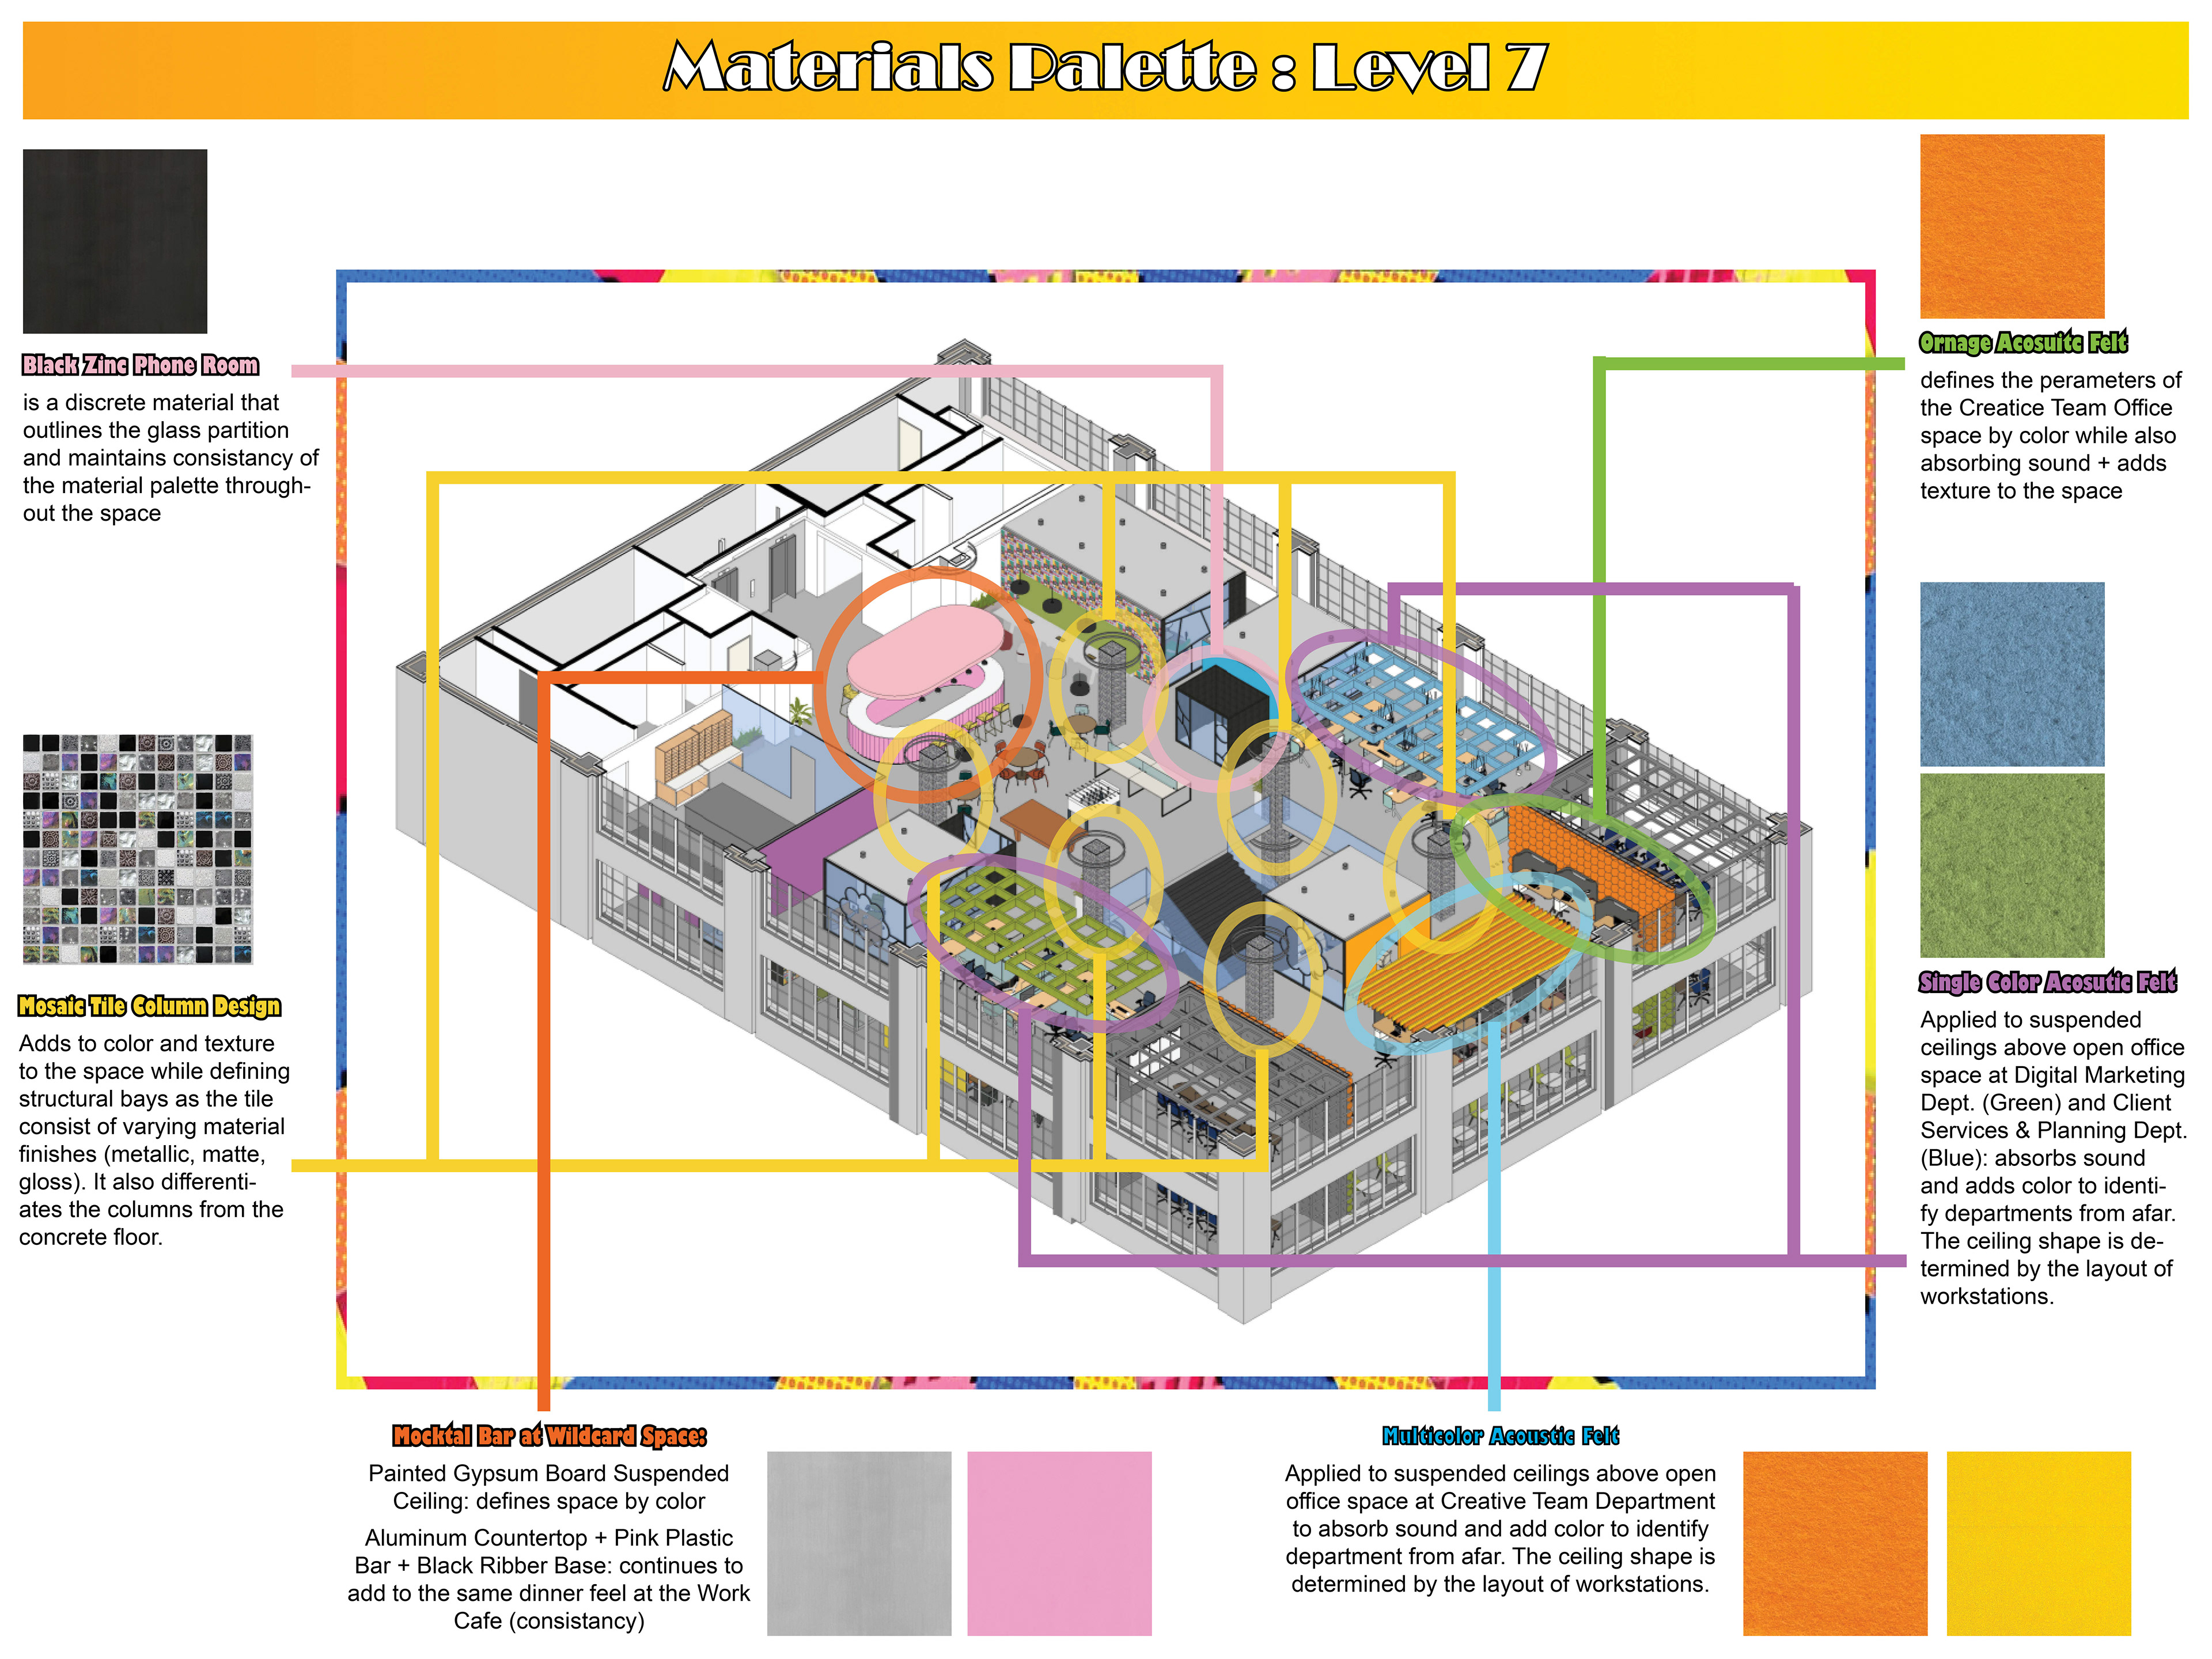
Annotated Materials Palette: Level 7
Rendered Reception Area
Rendered Monumental Stair
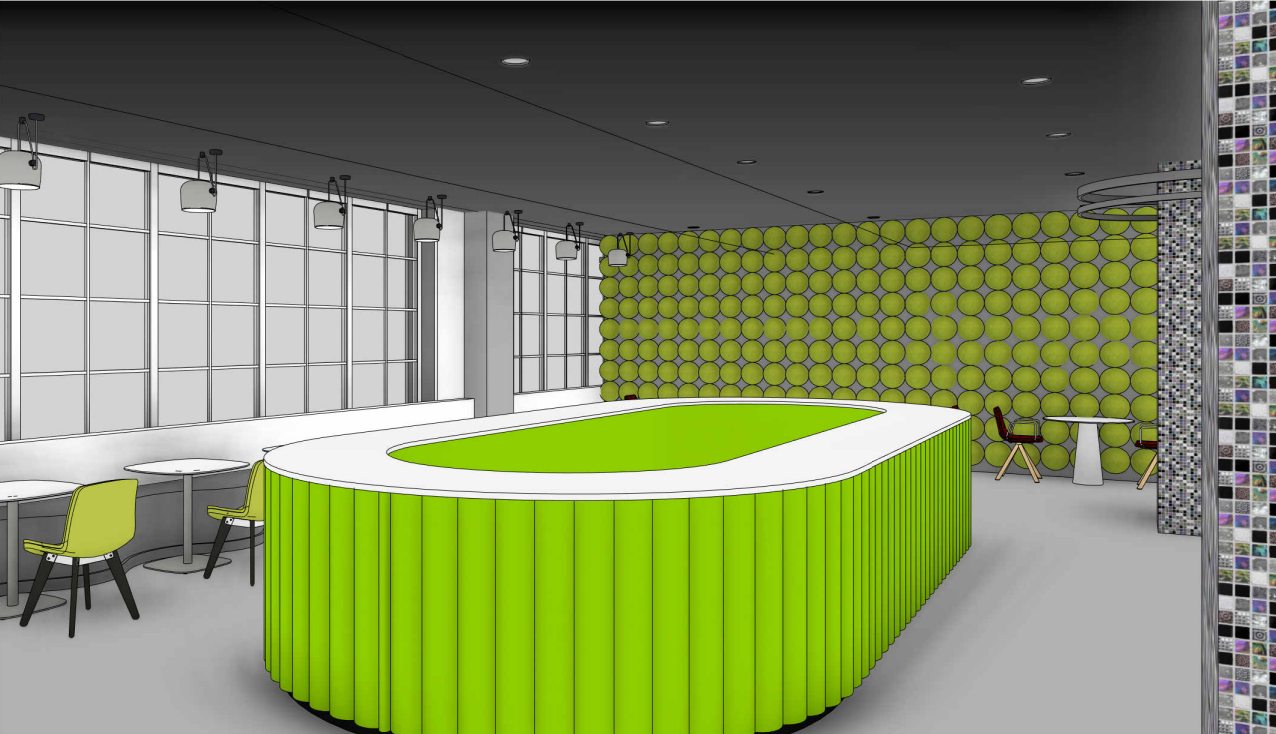
Rendered Work Café/Multipurpose Space
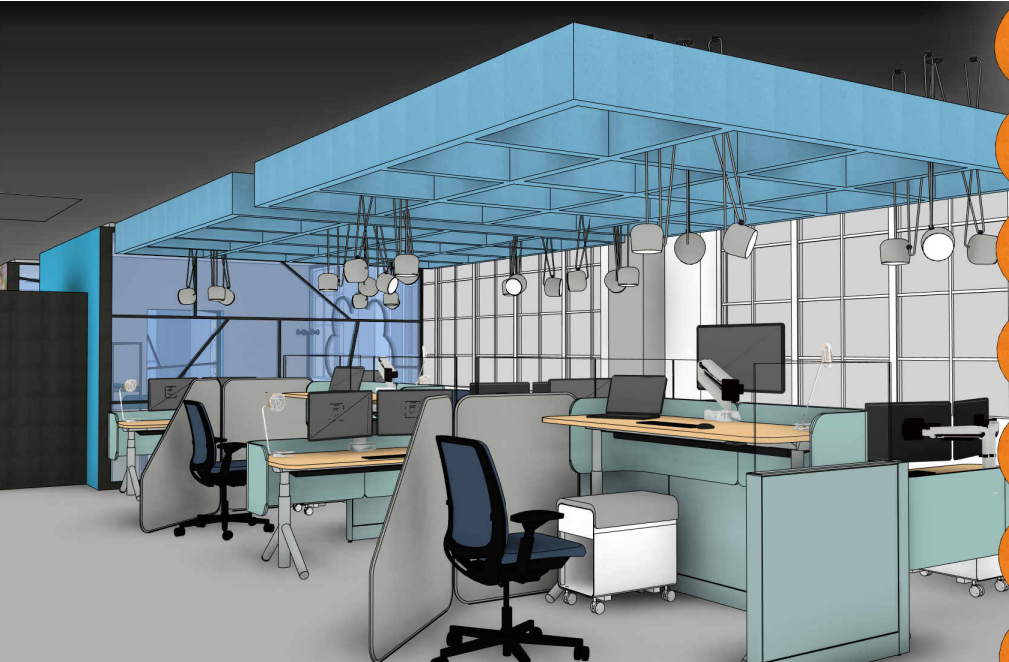
Rendered Open Office Area 1
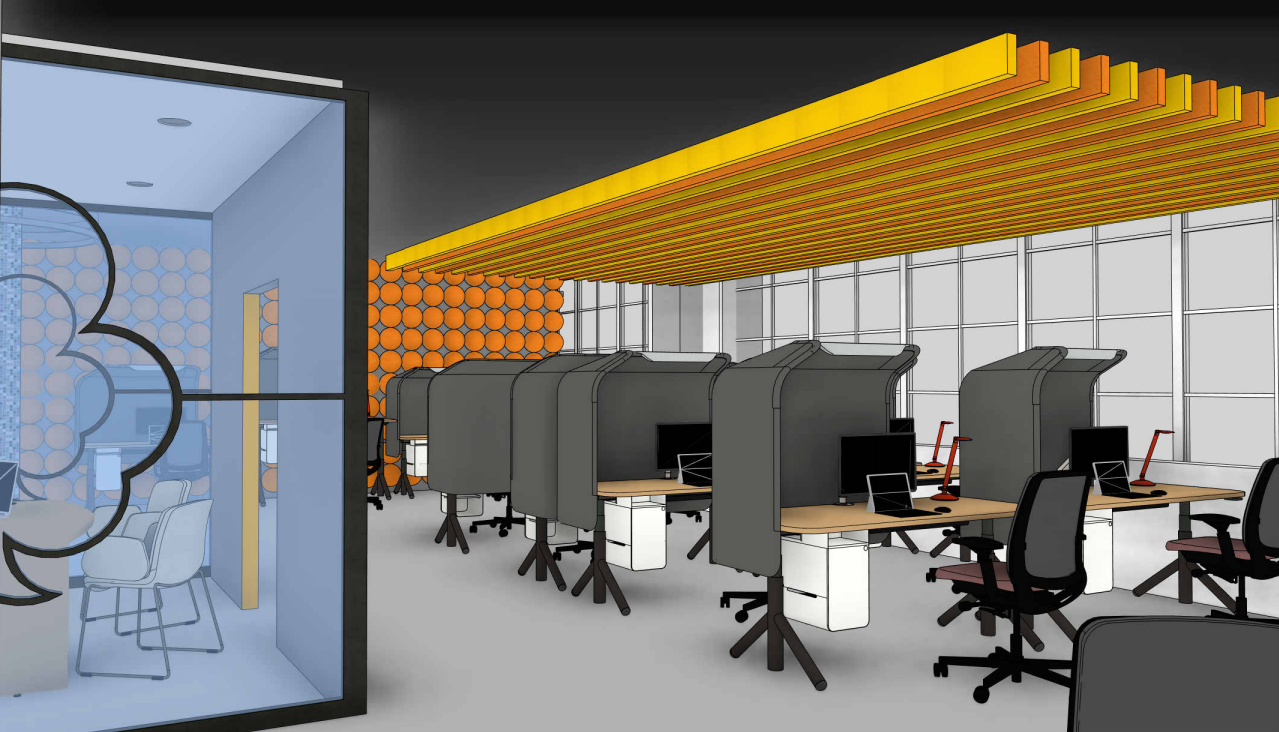
Rendered Open Office Area 2
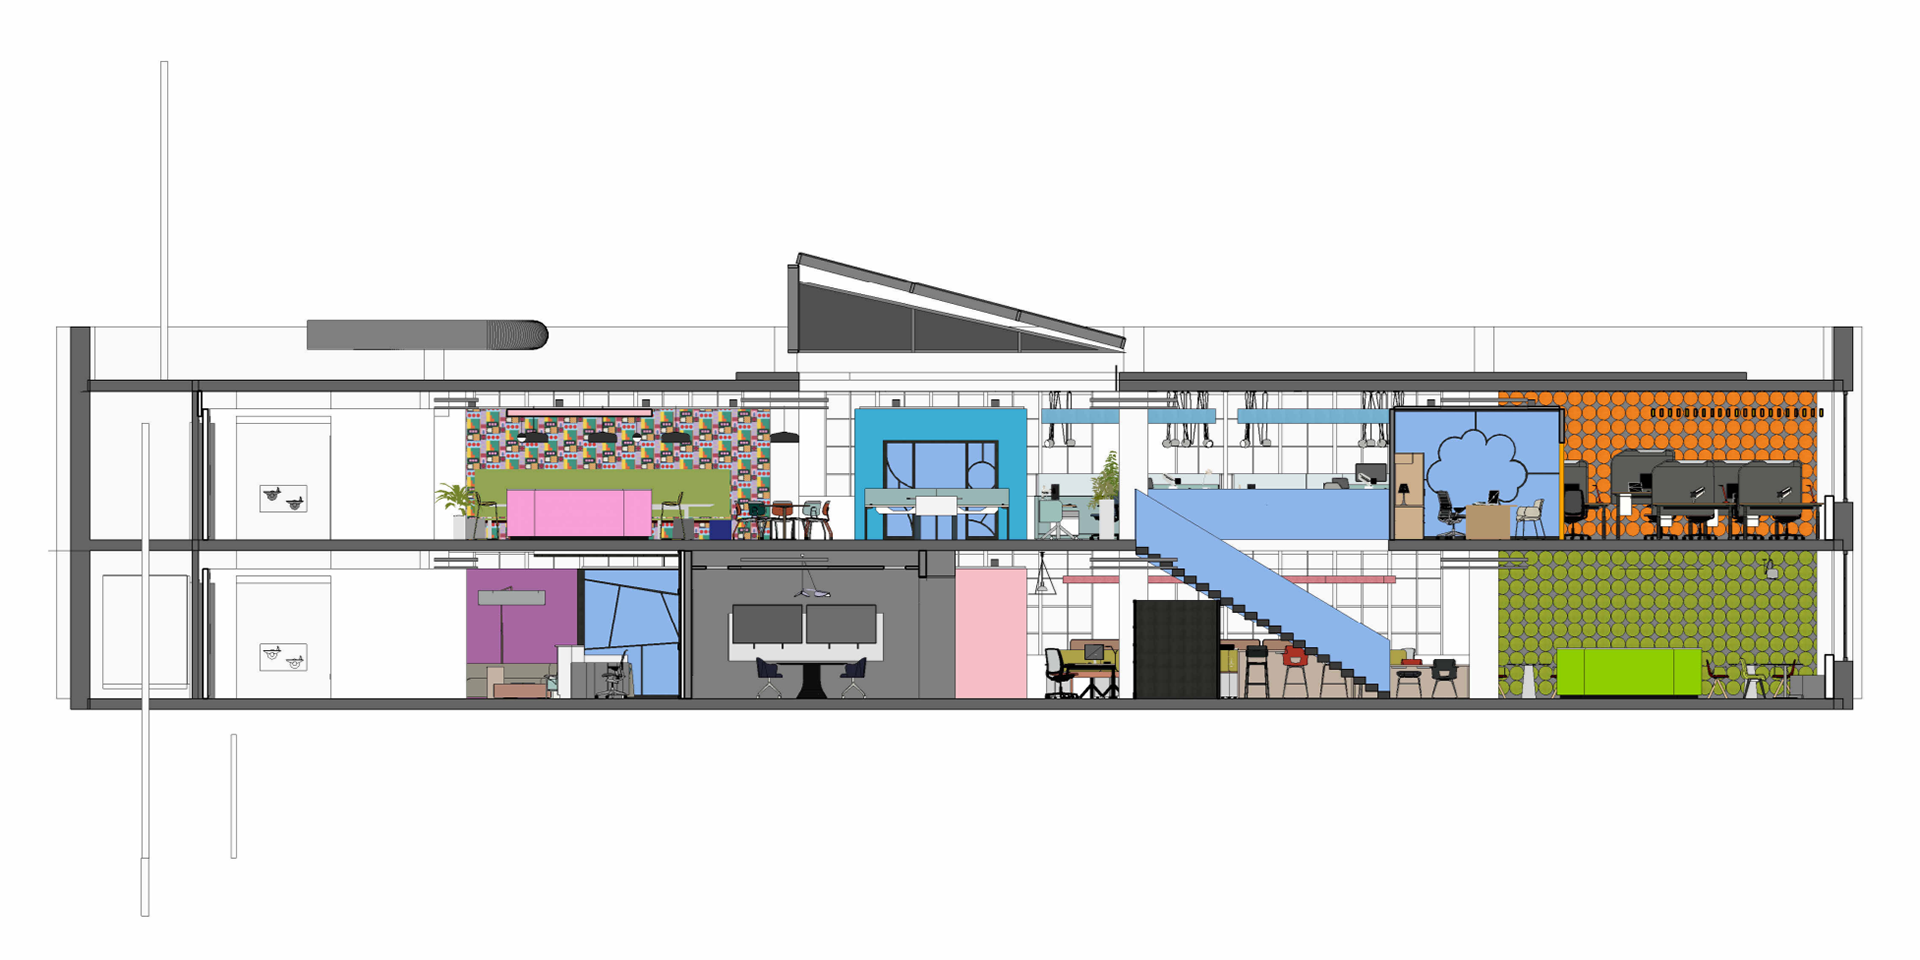
3D Section: Horizontal facing North
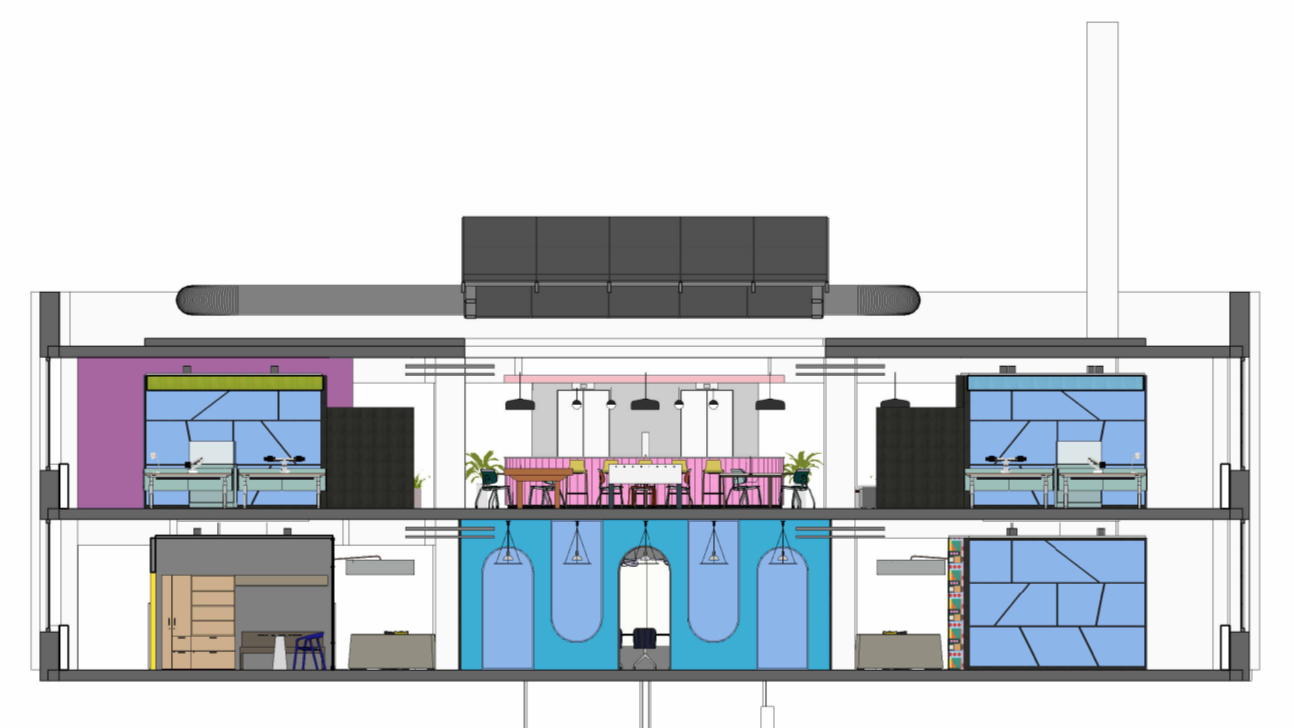
3D Section: Vertical facing West
END PHASE 3_WORKSESSION 12_Design Development (FINAL)
It was time to finalize the numerous iterations of massing models, plans, and sections that I felt best embodied my concept statement. My project is vibrant, bold, and unapologetically creative. By incorporating Pop Art influences into the architectural forms, colors, and materials, I aimed to showcase my adventurous spirit and willingness to push boundaries. The multi-colored wall in the café stands out as a key highlight, reflecting my ability to translate playful ideas into reality. If I were to further refine the design, I would focus on achieving greater visual balance by identifying specific moments for bold expression while incorporating areas of visual calm. This approach would enhance the overall harmony and sophistication of the design.